
In photography, flash gels are thin sheets of colored material that are placed over a flash or strobe to modify the color of the light it emits. They are often used in studio photography to add a specific color cast to a subject or background, or to match the color temperature of the flash to the ambient lighting in a scene. Flash gels are available in a wide variety of colors, ranging from subtle warming or cooling filters to bold, vibrant hues. They are usually made from heat-resistant plastic or polyester material, and can be cut to size or mounted using special gel holders or tape. Using flash gels can add a creative element to photography by allowing photographers to experiment with different colors and lighting effects.
Flash Gel Video Tutorial
Flash Gels can be used for corrective purposes or to add a dramatic look to a scene for an artistic effect. In the following video, we show you these two techniques so you can take your images from ordinary to extraordinary.
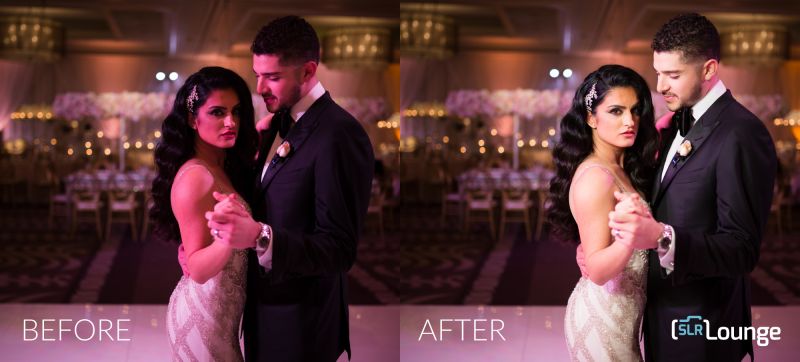
Flash Gels For Corrective Effect
Corrective coloring is different from creative in that we want to match the direction of light but change the quality and color of the light.
By default, the color temp of your flash is most likely 5500K (Kelvin). If you are shooting outside and you walk indoors into a dimly lit reception hall or ballroom, the lights are generally around 3600k or Tungsten, which looks more orange. So, when lighting your subjects with flash, your subjects look “cooler” or more blue, but the background retains a more orange look. When you try to fix it in post, your background looks very muddy – brown and oversaturated.
To fix this, you ‘gel’ for corrective purposes by taking your CTO gel (Color Temperature Orange) and place it over your flash or inside the flash gel holder, as doing so will change the color temperature of your light to orange. Then drop the in-camera white balance to 3600K which will be very close to the Tungsten color temperature of the light in the ballroom.
For the first scene, we are using the Profoto OCF Beauty Dish (which we tested in this article) with the Profoto B2 and an orange CTO in one of the flash gel holders. Remember when lighting to set your camera exposure first to how you want the ambient light to look in the scene, and then adjust the flash power accordingly.
Camera Settings: 1/200th, f/1.4, ISO800, 3600K
Gear Used:
The Profoto B2 with OCF Beauty Dish was held at a 45-degree angle on camera left at about 20-30% power. The before image on the left is without the CTO flash gel and the one on the right is gelled. Both images are SOOC (straight out of camera).
Example 2: Flash Gel to Match or Correct

In this image, we placed a tungsten gel on our flash to adjust for the green tint on our couple coming from a nearby building. We then used, you guessed it, a silver reflector to simulate the same direction of light found in the scene to create a cleaner and brighter light source than the pre-existing light.
Flash Gel For Creative Effect
In the second scene, we show you how to flash gel for creative effect and tell you about a bonus lighting technique from our Lighting 101 and 201 courses.
Creative coloring is when we refine color in order to create a dramatic result. First we work with our background, light our subject and if needed, refine color.
First, we begin by setting the in-camera exposure to how we want our ambient light to look, just as before. We drop the white balance to 3600K and set the shutter speed to 1/50th, aperture to f/1.4, and ISO at1600.
Gear Used:
We set up the Profoto B2 and use the CTO flash gel inside a grid, and the grid will help control light spill on our models. We are using a modeling light to determine where and how that light is going to fall and we use it to glance the light off the models’ hair but t’s primarily hitting into a reflector we are holding on the other side. This pushes the light into the models’ faces and we get a two light look with only one strobe.
The before image shows what the scene looks like set in-camera without flash, and the one on the right is our end result.

Example 2: Flash Gel for Creative Effect
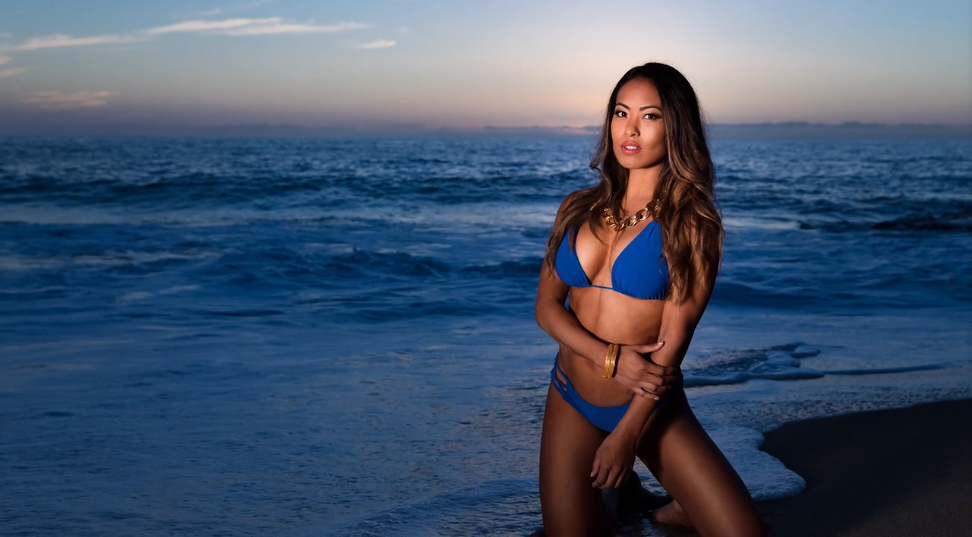
In our shoot on the beach we combined a tungsten gel to maintain a warm skin town. We then cooled our white balance down (between 3500k-4200k) and utilized a silver reflector to achieve higher contrast and saturation.
Conclusion
To recap, the two reasons we gel depend on what effect we are going for:
- Creative effect: a temperature throw
- Corrective effect: balancing the ambient light with flash & matching the existing lighting


Get Connected!