
There are quite a few RAW editors these days; Lightroom, Capture one, On1, Phocus, to name a few. The majority perform the same or very similar tasks, and, at least with the ones I have mentioned, do it pretty well. Aside from the large overriding features; RAW conversion, UI etc. I usually find it’s the little things that make the difference. Those little features which you’ll use every day that truly separate them. This article will cover three such features within Capture One Pro.
Capture One Has a Luma Curve
I like a lot of control when I edit. That’s why when I add curves in Photoshop I often change the blend mode to Luminosity. The reason I do this is to stop the addition of contrast via curves, interfering with other things, saturation for example. You may think there can’t be that much of a difference but take a look at the photo below.
[REWIND: GUIDE TO TETHERED SHOOTING USING CAPTURE ONE PRO]

Both images had the same settings applied in Capture One, I then applied a curve. On the left, you can see the Luma Curve. In a similar way to Photoshop, the tones have been adjusted but the color has remained intact. Compare that to the image on the right which uses the exact same curve, but as RGB, there’s a gigantic difference. I love the ability to precisely control the tones separately to color. Not only that but you can add layer upon layer of curves in the Local Adjustments tab and control them with masks, just like Photoshop.

The Color Editor In Capture One
That moves me neatly on to my second favorite feature of Capture One. The Color Editor. Now, I admit that as a product photographer I don’t tend to make wild adjustments to color. For the most part, all I want is accurate color which shows the product in its true light. That said, I still love the Color Editor in Capture One.
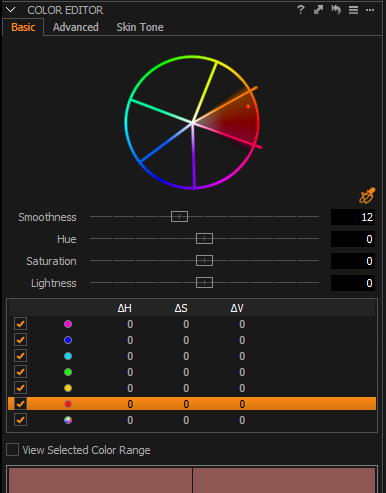
The Color Editor is made up of three tabs; Basic, Advanced and Skin Tone. The basic tab (above) provides a very simple method for adjusting color, similar to what you’ll be used to in other programs. You can use the color picker to select the color you want to edit or select the channel from the colors at the bottom. The main difference here is the Smoothness slider which controls how much your adjustments will bleed into neighboring colors on the wheel.

The real power of the color editor can be found in the following two tabs. The advanced tab looks very similar at first glance but a more precise selection is made when you click using the color picker. You can then manually refine that selection. Moving the control points out in either direction will select further Hue’s, and moving it up or down controls the saturation selected. In addition, you can visually see your selection by ticking View Selected Color Range at the bottom.
Two other very cool features of the advanced tab are the ability to make multiple adjustments. Whenever you click with the Color Picker a new Adjustment layer is created, you can see them all listed in the photo above. That means that you can adjust the same color in the most precise way possible. You could make separate adjustments based on the saturation of a color for instance. The other feature, which seriously is the dogs B*******s, is the ability to export your color selection as a mask. Once you’ve done that, you can apply all the usual edits you have in the Local Adjustments tab; Curves, Clarity, High Dynamic Range, Sharpening and so on. That’s pretty amazing!
[REWINDSHOOTING TETHERED | WHY IT’S SO GOOD & PRACTICAL ADVICE ON DOING IT]
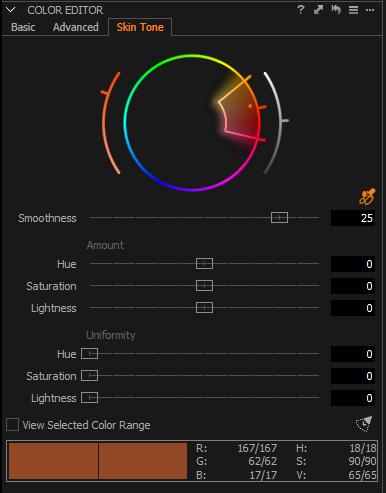
As a product photographer, I don’t have much use for this tab, however, that in no way reflects it’s power; from what I hear. Essentially it works in a similar way to the Advanced tab BUT it adds another slider called uniformity. What that will allow you to do is select a skin tone and then bring other Hue’s, within a range you select, to being closer in color to what you selected. Basically, you’re evening out the skin color, an adjustment that complex I almost always do in Photoshop.

Clarity And Structure, Oooooh
You’ll probably be familiar with clarity but for those who are not, it’s a way of adjusting the midtone contrast of your image. Capture One has four different methods for Clarity; Natural, Punch, Neutral, and Classic. Each one makes the adjustment in a slightly different way, prioritizing different tones to produce the effect. How it does it is not really the important part, the important part is that it does it better than I’ve seen elsewhere. Clarity, in my experience, is a way that many amateurs ruin their photos. Adding too much looks bad. In Capture One, I’ve found that Clarity (depending on the method) is far more subtle and natural in appearance.
[REWIND: CAPTURE ONE VS LIGHTROOM FOR TETHERED SHOOTING]

Unless you’ve used Capture One before, I imagine Structure will be a new setting for you. It works in a similar fashion to clarity (hence being in the same tab) but in a different way. I read an excellent analogy on Phase One’s blog which explains it perfectly. Imagine you have a photo of a tree, Clarity will adjust the trunk and large branches, Structure will adjust the Leaves, and Sharpening will enhance the structure of the leaf. If that still leaves you a little perplexed I suggest giving it a go yourself, Capture One does have a free trial,after all, click here.
Summary
Capture One has loads of great features but if you think this is an article designed to get you to jump ship then you’re wrong. I use both Capture One and Lightroom. Perhaps that’s down to laziness; perhaps it’s because I prefer the way I can navigate through my images in Lightroom (it’s definitely the second one). Either way, both programs are fantastic. If you have the budget, I highly recommend you purchase Capture One. You can then do as I do and use the programs alongside one another (some of my work goes through C1, and some through LR) or be brave and jump ship altogether.


Get Connected!