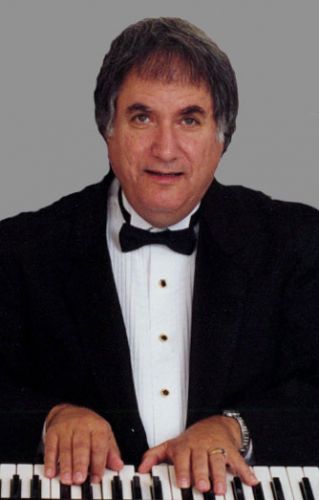
“Wow! That camera of yours takes great pictures!” said Howard, after seeing the professional-quality portrait I had just taken of him using only one flash and 5 dollars worth of white cloth. Of course he was kidding; he was making a reference to something I had said in Day 1 of the seminar I was teaching, saying that if you ever want to get punched out by a photographer, just say to them “Wow, those are great pictures! What kind of camera do you have?”
This was at the end of Day 2 of the Orlando seminar, just after everyone had gone home, and I had agreed to use the MacGyver-esque wireless flash technique I had demonstrated on Day 1 to take a high-quality portrait of a very special seminar attendee, Howard Herman, the guy who taught me to play Jazz piano in my youth, and still one of the best piano players in Florida. Howard, of course, was the kind of person who always felt much more comfortable behind a keyboard than in front of a camera, and so the assignment had become a double challenge: Get the light right AND get the subject comfortable, relaxed and natural.
How We Got The Shot
The lighting part was relatively straightforward (see featured photo at the top): I used one Minolta 5600 flash (seen being held on the left by Volunteer #1), and 1 piece of white cloth (being held by Volunteer #2), in front of it to act as a diffuser and soften the shadows. Another piece of white cloth was held on the other side of the subject by Volunteer #3 (seen on the right); this reflected some of the light back to brighten the dark side of the face, yielding about a 1:2 (maybe 1:3) lighting ratio — a pleasing ratio for portraits. No expensive studio equipment was used — I tried to get the point across in the seminar that you don’t need to spend a lot of money in order to get GREAT results using wireless flash.
The camera was the Sony A550 and I used the Minolta 80–200 f/2.8 G lens. And for arrogance everything was set to AUTO mode. The result you see at the bottom of this blog was not post-processed at all — this is the .jpg taken directly from the camera. I keep telling people that wireless flash is the best invention since sliced bread!
But how to get the subject comfortable? After all, many a photographer had tried to do this before me, often taking an entire afternoon and hundreds of shots, all to no avail. (See some previous head shots he had taken appear below).


[Related Reading: 5 Simple Posing Tips for Men | Minute Photography]
I used every trick I knew: I had him use the “Relaxed” Burt-Bachrach-type pose; I had him tell a joke, I ran back and forth periodically to provide feedback (show him what I was getting and telling him what I liked and didn’t like). The trick was to try to get him to stop trying to pose for the camera and just pretend he was sitting there with friends. Had this not been a conference center I probably would have given him some wine, put the camera down and just talk with him a bit to loosen him up a little more.
But it turns out that wine wasn’t necessary. A mere 30 shots into the session, I got what I wanted. He said that’s the best portrait anyone had ever taken of him in decades, and he couldn’t believe how quickly I was able to do it. (And without the use of a full blown studio!)
More On How I Set Up The Shot
Fortunately in the age of digital, setting up the lighting can be a trial-and-error process. So the first thing I did was start with a flash and just a white cloth:

Not a bad start, but the dark side of the face is too dark, and the edge of the shadow was a little too harsh for what I wanted. So I increased the distance between the flash and the diffuser (softening the shadow), and then asked his wife to hold up a 2nd white cloth on the other side of him to provide some fill light:

Much better! Now to get Howard to appear natural and relaxed:

After a few more shots we get exactly what we need!

That’s the ticket!
So as you can tell from this write up, it doesn’t take much to be able to create a great portrait. In this case, the “5 Dollar Studio” was simply two pieces of cloth to diffuse and fill light in for my subject, proving that with a good eye, and a little creativity, you can create fantastic images for your client(s) practically anywhere!
I hope this helped you get a few ideas for your next upcoming portrait session and if you’ve got a few “budget” studio tips and tricks, we’d love to hear all about them in the comments below!


Get Connected!