
Introduction
In this tutorial we will be creating a nice soft black and white photo for our lovely little newborn. We’re going to be using a base preset that softens our newborn portrait and converts it to a black and white image. We want to show you how versatile the SLR Lounge Preset System v5 is, and how it can be applied to many types of photography.
[Note: In the new Lightroom Presets v5, we have revamped all of the presets to improve image tonality and quality, allowing you to achieve even more amazing results. We’ve also added 95 new presets to reach a total of 311 presets in what is the gold standard of Lightroom image processing. In this series we’ll be going over how to use the new v5 presets to create great looking photos. Click Here to learn more or purchase the system.]
With each of our Ordinary to Extraordinary Edits, we’re going to first be going through how we create our effects with the SLR Lounge Lightroom Presets v5, then we’ll be going through the details in the develop settings so everyone can understand exactly how we get to a specific look. This way, whether you have the presets or not, everyone can benefit from watching this video or reading the article below.
Lightroom Presets v5 Mixology Recipe
For this photo we use our eye dropper to get our Color Temperature where we want it, then we used the Base preset “01-10 Base – Soft: 12b Super Soft – B&W” with minor adjustments made to exposure.
Develop Mixology
01-10 Base – Soft: 12b Super Soft – B&W
Local Adjustments
Spot Removal (watch Video Tutorial for reference)
To see exactly how we transformed our newborn portrait to a nice soft black and white photo, watch the Lightroom video tutorial below.
Watch the Lightroom Video Tutorial
Complete Written Tutorial
Getting started, we always want to hit “I” to bring up the EXIF data of our photo. It’s always helpful to review the EXIF data so we know exactly how our image was shot. From the image below, we can see that the image was shot at a high ISO setting of 800. We are on a Canon 5D Mark III, so that should not be a problem, but we are just going to keep that in mind so that we pay attention to potential grain.

We are going to start with our eye dropper tool to get a white balance that is closer to where we want it. Here’s what our Color Temperature and Tint settings look like after we use the Eye Dropper.

For newborn Portraits I love the super soft effects because they’re beautiful and it creates a really nice soft look that is great for newborn photos. We are going to apply the “01-10 Base – Soft: 12b Super Soft – B&W”, and after we do a slight exposure adjustment we are pretty much done. Here’s what our develop settings look like after our preset is applied.

With the addition of +0.50 to the exposure, we have a beautiful black and white newborn portrait. We have our highlights and whites that have been taken down quite a bit to -60 and -40. This is to smooth out those highlights and bring it all in closer to the mid-tones and shadows. With clarity, were dropping it -20 because we want nice soft skin, and the reduction of mid-tone contrast helps us achieve the soft portrait look.

With our black and white mix, we are raising the reds, oranges, and yellows, which is primarily for our skin tones. This essentially brightens up the skin tones a bit, further enhancing the soft and flattering look.
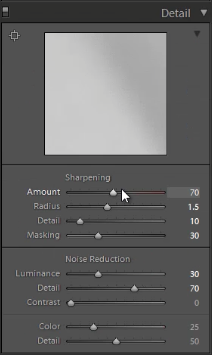
We have our standard amount of Sharpening for portraits, but under Noise Reduction Luminance we have it at +30 now because we chose an “Extra Soft Portrait” preset. The additional noise reduction will also help in reducing image noise from being shot at ISO 800.
With the new enhancement to the Lightroom 5 Spot Removal Tool, we can zoom in and remove some of the more obvious bits of dry skin and hair by sampling to remove them. It’s really nice and efficient to be able to make these small adjustments in Lightroom 5, instead of having to going into Photoshop. Remember to keep these small adjustments really thin and close when you are making them so that it looks more realistic. If you would like to see these adjustments in more detail, refer to the video above.

Below you can view our original image, the Lightroom B&W Conversion, and our V5 Preset applied. We have such a beautiful soft B&W image with just a couple clicks using the presets.
Original Image

Lightroom Presets v5 Black and White Conversion

Conclusion and Learn More
We hope you all enjoyed this tutorial. If you are interested in learning more or purchasing the SLR Lounge Lightroom Presets v5, please click any of the links in this article.
Stay tuned for more SLR Lounge Weekly Edits!


Get Connected!