
Introduction and Look
In this weeks edit, we have a studio headshot portrait. We’re going to be doing a professional retouch on this image to show just how capable Lightroom is. To do this, we’re going to be utilizing our brush presets to smooth out skin and enhance key details to make our headshot extraordinary.
Of course, for “true” professional retouch, Photoshop is necessary. But, I think all of you will be pleasantly surprised just how far Lightroom can take us. In fact, for most people, Lightroom and its retouching capabilities will be sufficient.
[Note: In the new Lightroom Presets v5, we have revamped all of the presets to improve image tonality and quality, allowing you to achieve even more amazing results. We’ve also added 95 new presets to reach a total of 311 presets in what is the gold standard of Lightroom image processing. In this series we’ll be going over how to use the new v5 presets to create great looking photos. Click Here to learn more or purchase the system.]
With each of our Ordinary to Extraordinary Edits, we’re going to first be going through how we create our effects with the SLR Lounge Lightroom Presets v5, then we’ll be going through the details in the develop settings so everyone can understand exactly how we get to a specific look. This way, whether you have the presets or not, everyone can benefit from watching this video or reading the article below.
Lightroom Presets v5 Mixology Recipe
In this tutorial we started 2 of our presets, to help us find and remove dust. After that we used 1 preset to give us the soft portrait look, and then we fine tuned the image using our Brush presets.
Develop Mixology
03-80 ADJUST – TOOLS: 81. Dust Correction Curve
03-80 ADJUST – TOOLS: 80. Reset Curve
01-10 BASE – SOFT: 11a. Extra Soft – Skin Desat
03-00 ADJUST – EXPOSURE: 06. BRIGHTEN +.05
03-40 ADJUST – SHADOW BLACKS: 43 Darken – Light (+10,-20)
Local Adjustments
21 Skin Softener
23 Line Diminisher
24 Eye Brightener
25 Iris Enhancer
26 Lip Enhancer
15 Hair | Lashes
03 Burn (Darken) -0.5 Stop
To see exactly how the presets and Local Adjustments were applied, please watch the video tutorial below.
Watch the Lightroom Video Tutorial
Complete Written Tutorial
As always, we start off by checking our EXIF data, and we do that by pressing “I”. We see that it was shot at f/9 and because the depth of field will be so deep, we’re going have a lot of unwanted dust in our photo if our lens or sensor is unclean. To check for that, we are using the Preset System’s “03-80 Adjust – Tools: 81. Dust Correction Curve” to help us visualize any dust. You can see and recreate the curve as shown in the image below.
We should also note, that if you are using Lightroom 5, you can use Lightroom 5’s built in visualization tool. However, as we mentioned in a previous article, we feel that the dust correction curve still does a better job of visualizing the dust. Hence we will stick with the curve.
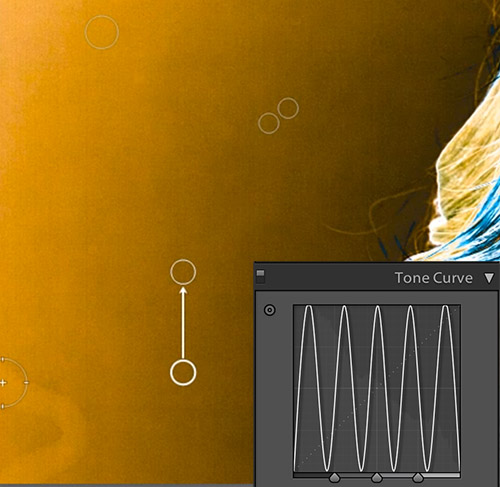
One of the key differences between the Lightroom 4 and 5 Spot Removal Tool, is that you can actually click and drag to remove dust or unwanted artifacts. Then we’re going to reset our curve by using our “03-80 ADJUST – TOOLS: 80. Reset Curve” to reset the curve and see if we caught all of the visible dust.
After removing the dust we’re going to go to our Base Presets. We’re not going to use one of the import presets because it will reset all of the adjustments we just made. Instead we’re going to go with the “01-10 BASE – SOFT: 11a. Extra Soft – Skin Desat” preset, and we don’t want to go any softer than that because it will be too soft for this image. We’re also going to do a slight adjustment with our “03-40 ADJUST – SHADOW BLACKS: 43 Darken – Light (+10,-20)” preset to add a little more contrast.
In addition to our preset, we’re going to increase the exposure by +0.40 and color temperature to 4900 so the skin looks nice and bright. Here’s what our develop settings will look like after our presets are applied.

As you can see, we have the same Tone Curve, Sharpening settings, and Noise Reduction as the Soft Flattering Color Portrait and Portrait with Retouch and Enhancement tutorials. What’s really going to differentiate this portrait from the other tutorials is all of the local adjustments we’re going to do.

We’re going to go into our Brush Presets, and you’ll notice that they are numbered. The reason why they’re in this particular order is because this is generally the order of our retouching workflow. We like to start with skin softening, and then we move on to enhancing the lips, eyes, hair, etc. So we’re going to start with our “21 Skin Softener” preset. When we apply this Brush we’re going to make sure our Flow is at 100, and we press “O” to bring up the overlay so we can see exactly where the Brush is being applied. If the Brush is applied somewhere you don’t want it, simply hold down “alt” on PC or “opt” on MAC and remove the undesired Brush adjustments. We don’t want the lips, eyebrows, or eyes softened so we’re going to selectively delete the Brush adjustments there.

Moving on, we’re going to hit “New” and select a new Brush Preset. This time we’re going to select the “23 Line Diminisher” preset. With the Line Diminisher we’re going to go in and reduce some of the lines on the face. We don’t want to completely remove the lines completely, we just want to make them more subtle. We’re going to be applying it mostly under the eyes and in the smile lines.

Now we’re going to hit “New” and select “24 Eye Brightener”. We’re going to zoom in and apply this preset directly onto the eyes. Eyes are something to be very careful of because although brighter eyes are more attractive, making them too bright will make them “glow” and that will cause your model to have a weird alien look. In this portrait we want the eyes to be a little more subtle so we’re going to drop the exposure on this Brush to “0.15”.

We’re going to do one more retouch to the eyes, so we hit “New” and select “25 Iris Enhancer”. We’re going to zoom right into the eyes and apply the Brush right into the irises. What this preset does is exaggerate the catch light and add nice colors to the eyes. With this Brush you want to avoid the pupils, and anything around the iris. Again, we want our eyes to be subtly bright, so we’re going to bring the Brush exposure down to “0.30”.

Now that our eyes are nice and bright, we’re going to hit “New” and select “26 Lip Enhancer”. We want to apply this on the lips and avoid the teeth and gums. This Brush preset will add some more appealing color and contrast to the lips.

After the lips, we’re going to hit “New” and select “15 Hair | Lashes”. This preset subtly brings out contrast, color, and details in the hair, making it look really nice. This model has nice brown highlights in her hair that really come out nicely when this preset is applied.

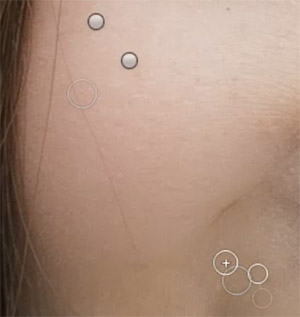
We’re also going to do some spot removal adjustments on her skin. One of the new features of Lightroom 5 is the ability to click and drag spots away (see video for more clarification). What we’re removing are blemishes that aren’t a part of her look. If she has anything distinguishable on her face, we want to keep that. Although if you want to diminish a spot and not completely remove it, simply lower the Opacity of your brush and select the area you want to diminish.
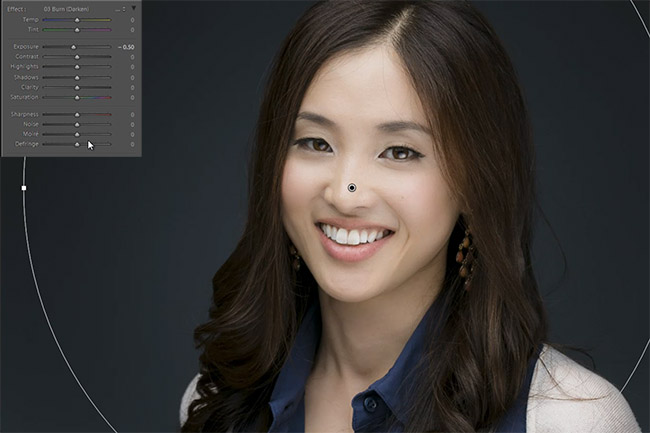
One last thing we want to show you, is a new feature in Lightroom 5, the Radial Filter. The Radial Filter works like a Graduated filter or Brush, where it applies an effect, but in a radial fashion. What we’re going to do is select our “03 Burn (Darken) -0.5 Stop” and darken the areas of the image that aren’t her face. We’re going to click in the center of her face and pull out the radius of the filter. The main advantage this Radial filter has over a vignette is that you can change the shape of the Radius (oval or circle) and you can move the filter to different parts of the image.
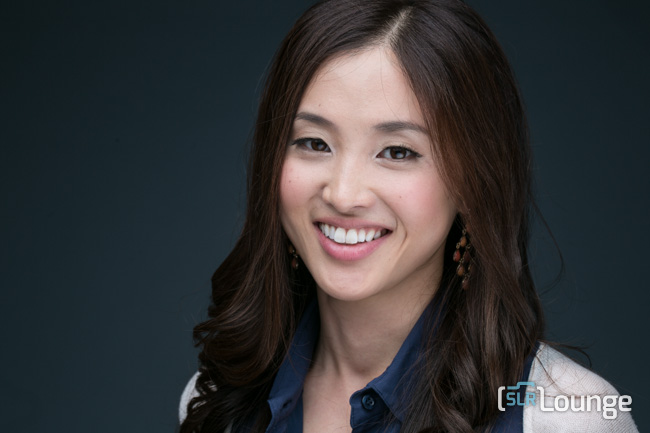
Now we’re done with our Professional Headshot Retouch. Here’s what our photo looks like before and after.
Before
After
Conclusion and Learn More
We hope you all enjoyed this tutorial. If you are interested in learning more or purchasing the SLR Lounge Lightroom Presets v5, please click any of the links in this article.
Stay tuned for more weekly edits!


Get Connected!