Hi there folks! This will mark the beginning of another new series, and be forewarned, it will be a series that may make you a little squeamish if you are used to taking extremely good care of your camera gear.
 Nikon Df, Nikon 55mm E non-AI, FotoPro C5i Tripod
1/10 sec @ f/16 & ISO 100
SLR Lounge Preset System
 Nikon D5300, Tokina 11-16mm f/2.8, FotoPro C5C Tripod
1/60 sec @ f/10 & ISO 100
SLR Lounge Preset System
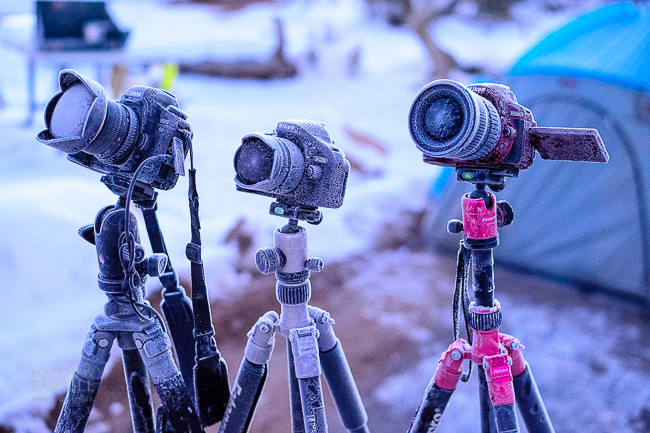
…Uh oh, Matt froze all the cameras. This could be bad!
In this first video tutorial, we’re going to talk about what to do when you get frost on your camera when you shoot at night in extremely cold weather. Please forgive the quality of video; we had to film on a cell phone because all of our video-capable cameras were frosted over (I’m glaring at YOU, Nikon Df!!!!).
Cleaning Frost Off Your Digital Camera
First things first, don’t panic! Frost is actually far less dangerous to a camera (in the short term at least) compared to, say, a splash from a wave at the beach. Your “frozen” camera will be just fine, IF you clean it off and dry it out properly.
Disclaimer:
No, your camera is NOT guaranteed to survive this type of abuse, especially if it doesn’t have weather sealing. Extreme weather, especially moisture, can “brick” your camera beyond repair, even if it is a pro camera. This tutorial is meant to be an emergency guide for those who find themselves in this situation. (We got caught off-guard by the frosty humidity of the American Southwest, since we were so used to the ultra-dry desert climates like Death Valley…)
It is also a good example of the reason why, as an astro-landscape timelapse photographer, I personally prefer to have at least one super-cheap camera and lens setup with me on any adventure. I wouldn’t do half the things I do out in the wilderness, if all I had were $2,000 lenses and $5,000-$8,000 camera bodies. But when an entire kit can be replaced for a few hundred bucks, it’s a risk I’m more willing to take to get a shot!
With this in mind, let’s proceed…

Exhibit A: The Nikon D5200 and Nikon 10.5mm f/2.8 DX fisheye, entirely encased in frost. Before you do anything else, make sure to take out your camera’s battery. Throughout the whole cleaning process, keep cameras in the shade so that morning sunlight doesn’t thaw them faster than you can dab away any melting ice.

Step 1: With fleece or similar gloves, gently brush off as much frost as possible.

Step 2: Take a lens brush and get more detailed with all the nooks and crannies, again be as gentle as possible. If you need to poke at any port or crevice directly, tip the camera upside down so you’re not just jamming bits of ice down inside the camera.

Step 3: As the camera starts to warm up, any time you see frost turning into moisture, be ready with a paper towel or cloth.

Step 5: Glass warms much slower than plastic, so don’t rush your lens’ front element. Aim it down, let it thaw on its own, and be ready with a lens cloth.

Step 6: Give your “dry” camera as much time as you possibly can before putting a battery in and turning it on. If you’re very concerned and your camera is un-sealed, some folks leave at-risk cameras in a sealed ziplock bag with a desiccant (anti-moisture thingy) for many hours or a whole day. However, if you’re in the field and you like to live life on the edge, just give it an hour or so in the sun and go for it. Good luck!
 Nikon Df, Nikon 55mm f/1.2 E, FotoPro C5I Tripod
1/50 sec @ f/11 & ISO 100
SLR Lounge Preset System
General Cold Weather Photography Tips
Even if you’re not reckless enough to leave your camera outside overnight in freezing temperatures, here are a few of the most common tips regarding cold weather photography that you should remember any time you’re shooting in moderately bad weather:
Warm Equipment Gradually
Warm up your camera and lens as gradually as you can, when you go from a freezing cold outside to a warm indoors. Rapid warming in even slightly humid climates will cause your cold gear to fog over, inside and out, and while this may not kill your camera’s internal electronics immediately, it can have long-term lifespan effects especially if done repeatedly.
Heck, when humidity is really bad, you even need to be careful when leaving a cool, air-conditioned indoors to a hot, steamy outdoors! This can definitely be an issue in the American South; I’ve had lenses fog over for 10-20 minutes on a hot summer day in Florida!
Cover Up Your Gear
Frost (and dew) likes to collect on the outside surface of things, so if you need to leave something outside for an extended period, at least cover it up.
Keep Your Batteries Warm
Lithium-ion batteries hate freezing temperatures, especially aging ones that you’ve had for a few years. Keeping your spare batteries in your pocket will help them, well, remember that they’re fully charged instead of pretending to be dead after just three clicks. In fact, even if your battery tries to die on you, putting it back in your pocket and warming it up can bring it back to life sometimes!
Don’t Be Over-Protective
Believe it or not, but for the humidity reason I first mentioned, you can do more damage than good if you do something over-protective such as hiding your camera under your warm jacket while hiking, then taking it out to shoot, and then hiding it under your jacket again. The most I would recommend doing is hiding your camera under an outer protective shell layer, and putting your batteries in your pocket. Actually, if your camera and lens are weather-sealed, I wouldn’t even do that. The more your gear stays at the same temperature, the better!


An Once Of Prevention…
As we already mentioned, this could have all been avoided, or at least dramatically reduced, by carefully covering up as much of the camera as possible. The only reason this happened was that we had been previously so accustomed to traveling in extremely dry climates, (such as Death Valley) where this isn’t a problem. Lesson learned, however- when there is snow on the ground and humidity in the air, watch out!
Some people use ziplock bags with holes cut in them, but I prefer to use those generic rain covers that you can buy for small camera bags. Or, if you’re like me and you’ve owned more than one camera bag in the past, you probably have one or two rain covers laying around!
Carefully gaffer-tape your protective cover around the hood of your lens, and use a UV filter, and you should be good to go. Just be careful not to bump your lens’ focus ring or anything else, when you’re creating a timelapse or a single long exposure!
More Bad Weather Camera Tips Coming Soon!
In the next episode of this mini-series, we’ll talk about wet weather photography; shooting in the rain or on the beach near waves. Stay tuned, and be safe out there!

Bonus Content 1 – A Few Tips On Protecting Your Camera In Bad Weather | Chase Jarvis

I’m currently in England for the next few weeks and for those who are in this hemisphere, autumn is here. If you look outside and squint your eyes, you can see winter encroaching. The change of seasons can be both brilliant and challenging for photographers. The cooler crisper air can make for images as sharp as Wilde’s wit, but elements like snow and rain can be hazardous to the health of your gear. So what to do?
Well, get insured is what I’ll say right off the bat, but that conversation and the details can be reserved for another conversation. More immediately implementable and practical would be to find solutions that let you shoot, but do a rather good job of shielding your prized kit from whatever precipitation nature throws at it. Chase Jarvis has a few words.

For those of you who don’t know of Chase, you should, and are doing yourself an injustice by not being tuned into what he’s always up to. Chase is one of the heads of CreativeLive among other things, but a cutting edge photographer. Having shot for brands as big and varied as the stars, Chase has broken the mold of many standards in photography. He was one of the first to really take advantage of the internet’s broad scope to let the proverbial ‘cat’ out of the bag on photography education, and always seems to be at the forefront of new trends before they hit.

At the base of it though, he’s a fine photographer, and his new series Chase Jarvis Raw, is great for taking in the great information he puts out in small morsels; you can just flick them on and take ‘em back like a shot of tequila. Episode #4 has a few words on how to protect your gear when shooting in very wet weather.
First, he discusses the difference between a Pro camera and a ‘Pro-sumer’ camera – yes there are differences. Shooting in the open pouring rain with no cover on at all, Chase says his D4S is weather sealed enough to do this, but it’s something you won’t find with many lower level cameras, and of course, it works for dust and other elements.

But, and there is a smooth and pert ‘but’ coming, if you don’t have a camera that costs as much as a 2005 Accord, he suggests you bring along a shower cap. Their weird shape isn’t always the easiest to cover and the shower cap works well. The ease and low cost of this is a bonus, and an added bonus (I might add), is if you’re traveling and don’t have shoe bags, buy a pack of shower caps and use them on the soles in your suitcase.
Another tip he gives is how to deal with a really wet lens. Suggestion? Well, first don’t use your good lens cloth to soak up excess moisture. For that, get a ‘shammy’ and BLOT, not rub. Blot the excess and then use your lens cloth to finish it off.
Are these simple? Yes, but damn if the simple things aren’t the ones so often overlooked.
Bonus Content 2 – Protecting Your Equipment In Extreme Shooting Situations
As photographers, sometimes we find ourselves in situations where the safety of our equipment is jeopardized. Our best recourse is to make sure we are prepared and take measures to protect our gear as best we can. Of course, there are times that we cannot prepare for unforeseen dangers – such as an overenthusiastic rugby player or having a 7 foot tall basketball player fall on your lens, but when we know we will be in situations where there is a good chance that your gear could get damaged during an extreme shoot of some sort, it’s best to be overly cautious.
The first thing you should ALWAYS do to protect your gear is get INSURANCE. Whether you are a hobbyist or a professional, insurance is important because you never know what might happen. It’s not that expensive, but worth every penny should anything happen to your expensive equipment.

That being said, you most likely will never find yourself in the middle of a working industrial factory being pelted by BB’s like Jay P. Morgan in the following video from The Slanted Lens. But you will probably find yourself in other random situations, whether for a client or for a personal project, as us photographers tend to try crazy stuff for the sake of our art (like this guy who set off 18lbs of fireworks and then put his clients in the middle of the explosions). In any case, it’s a good idea to have a game plan and Jay P. shows how he protected his Dynalite Baja B4 monoblocks, Canon 5D Mark III and Tamron 24-70mm from flying BB’s to get the image above.
Watch Shoot an Industrial Image Without Destroying Your Equipment
See the post on The Slanted Lens website here.
For more articles on keeping your gear safe, check out the following articles:
6 WAYS TO KEEP YOUR EXPENSIVE CAMERA GEAR SAFE
TAG ‘EM AND BAG ‘EM: HOW TO PROTECT YOUR GEAR FROM THEFT
TIPS FOR TRAVEL PHOTOGRAPHY IN EXTREME WEATHER


Get Connected!