
The Photo
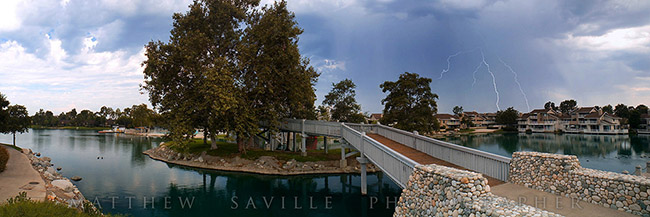 (Click here for a larger image!)
The Equipment and Settings
- Nikon D70
- Tokina 17mm f/3.5 ATX Pro (Very rare, not always available at this link!)
- Giottos Tripod
- 1/4 sec @ f/16 & ISO 400
- 2 stop ND filter, Sigma EX Circular Polarizer
- Manual exposure, Cloudy WB, RAW
The Shooting Conditions
If you have never tried to photograph lightning during the day, let me tell you it is not easy! What makes lightning so easy to photograph at night is 1.) The fact that you can very easily achieve long shutter speeds, and 2.) Lightning is usually the brightest thing in the sky at night.
During the day however, you have neither of these things working in your favor. The brightness of an overcast day makes it difficult for you to achieve long shutter speeds. Then, if you use a small aperture and maybe even an ND filter in order to achieve a slow enough exposure for capturing lightning, …you diminish the brightness of the lightning as part of the overall exposure.
In other words, Lightning acts just the same way as a camera flash does. It pops for an instant, and the “darker” your aperture or ISO get, the more insignificant the lightning will be in the overall exposure.
With this obstacle in mind, it took me a lot of guesswork to determine how to maximize my chances of capturing the lightning. Here is what I decided to do: I captured the base frames for the entire panorama first, which looked like this:

…Of course I had no luck capturing any lightning in those frames. Then, with my camera still positioned for the last frame, (where the lightning was striking most often) I began snapping frame after frame in hopes of capturing something. Now when you’re waiting for lightning to strike and you’re shooting 1/4 sec exposures, you don’t exactly have winning odds in your favor. But wait, it gets worse! My RAW buffer would fill up every few seconds, and even though I had a fast memory card, I was still slowed down to ~1 FPS or so. So you do the math: 1/4 sec exposures at ~1 sec intervals equals a 25% chance of catching lightning, effectively. Great odds if you’re gambling, but somehow the lightning would ALWAYS strike in between clicks. Murphy’s law?
After another few minutes of missing a few good lightning strikes, my annoyance peaked and I decided to try something a little more drastic. I switched my camera to JPG, made sure my exposure and white balance were acceptable, and I just blasted away. I believe I jammed about 1,100 images this way. One of them had a very faint, weak capture of lightning. But like I said with the daytime brightness issues, I was pretty happy to have this frame:

The Post-Processing
This makes me feel a little guilty as a landscape photographer, but I actually had to individually select each lightning bolt in photshop, brighten it manually, and then paste it onto the original panorama. I’m sure there are purist landscape photographers out there who would therefore deem this final image to be a forgery, a fake, or at least a gross mis-representation of what I had originally captured. Fair enough. But each shooting and editing decision I made, I made it with human eyesight in mind. I wanted to capture what I saw, and share that vision… And this image truly represents what my eyes beheld.
(Click here for a larger image!)
Anyways, as usual I processed the original RAW and JPG frames using Adobe Bridge CS3 or CS2, in 2006, and merged them into a panorama manually using painfully delicate warping that I do not care to re-live. ;-) Suffice it to say, nowadays if you wish to create a panorama it is far easier to do so using Photoshop CS6/CS5/CS4’s Photomerge tool.
Click HERE to watch an SLR Lounge video on how to layer two images manually, and click HERE to watch a video on how to use Photoshops Photomerge tool…
As always, I’m open to hearing your thoughts however the main point of this article was to simply explain what went into the creation of the shot, and to help other photographers learn from my random adventures…
Take care!
=Matthew Saville=
For more education about how to merge exposures in all sorts of different kinds of shooting conditions, be sure to check out HDR Tutorial by SLR Lounge. This comprehensive “gold standard” guide will give you a mastery of HDR photography, from the scene considerations to the actual shooting to the post production. Click here for more info.
About The “Photo of the Day” Series
If you’ll notice, the SLR Lounge “Photo of the Day” articles are posted in the Photography / Shooting section of our website, not the Inspiration section. This is on purpose, because these images are simply meant to be a daily dose of “here’s how we shot a random cool photo!” …and not so much as “wow here’s the most incredible photo we’ve seen in 24 hours, it will blow your mind!” We wanted to escape from the typical inspirational photo type posts a little bit, because they are often lacking in helpful background information about the equipment used, camera settings, and details of the shooting conditions or the photographer’s thoughts. Hopefully you find these posts to be helpful insights into how you might approach a certain situation or style of shooting!


Get Connected!