Long exposure portraits capture ethereal, dreamlike portraits that blur the lines between movement and stillness. While the advanced technique requires a bit more work, the results are well worth it, as long exposure portraits can add interest and creativity to otherwise ordinary scenes. In this article, we’ll provide you with expert insights and inspirational examples to help you master the art of using slow shutter speeds to craft stunning visual narratives. Whether you’re a beginner eager to experiment or a seasoned professional looking to refine your skills, this guide will provide you with tips and examples to create more interesting, creative portraits.
Basic Steps to Creating long Exposure Portraits
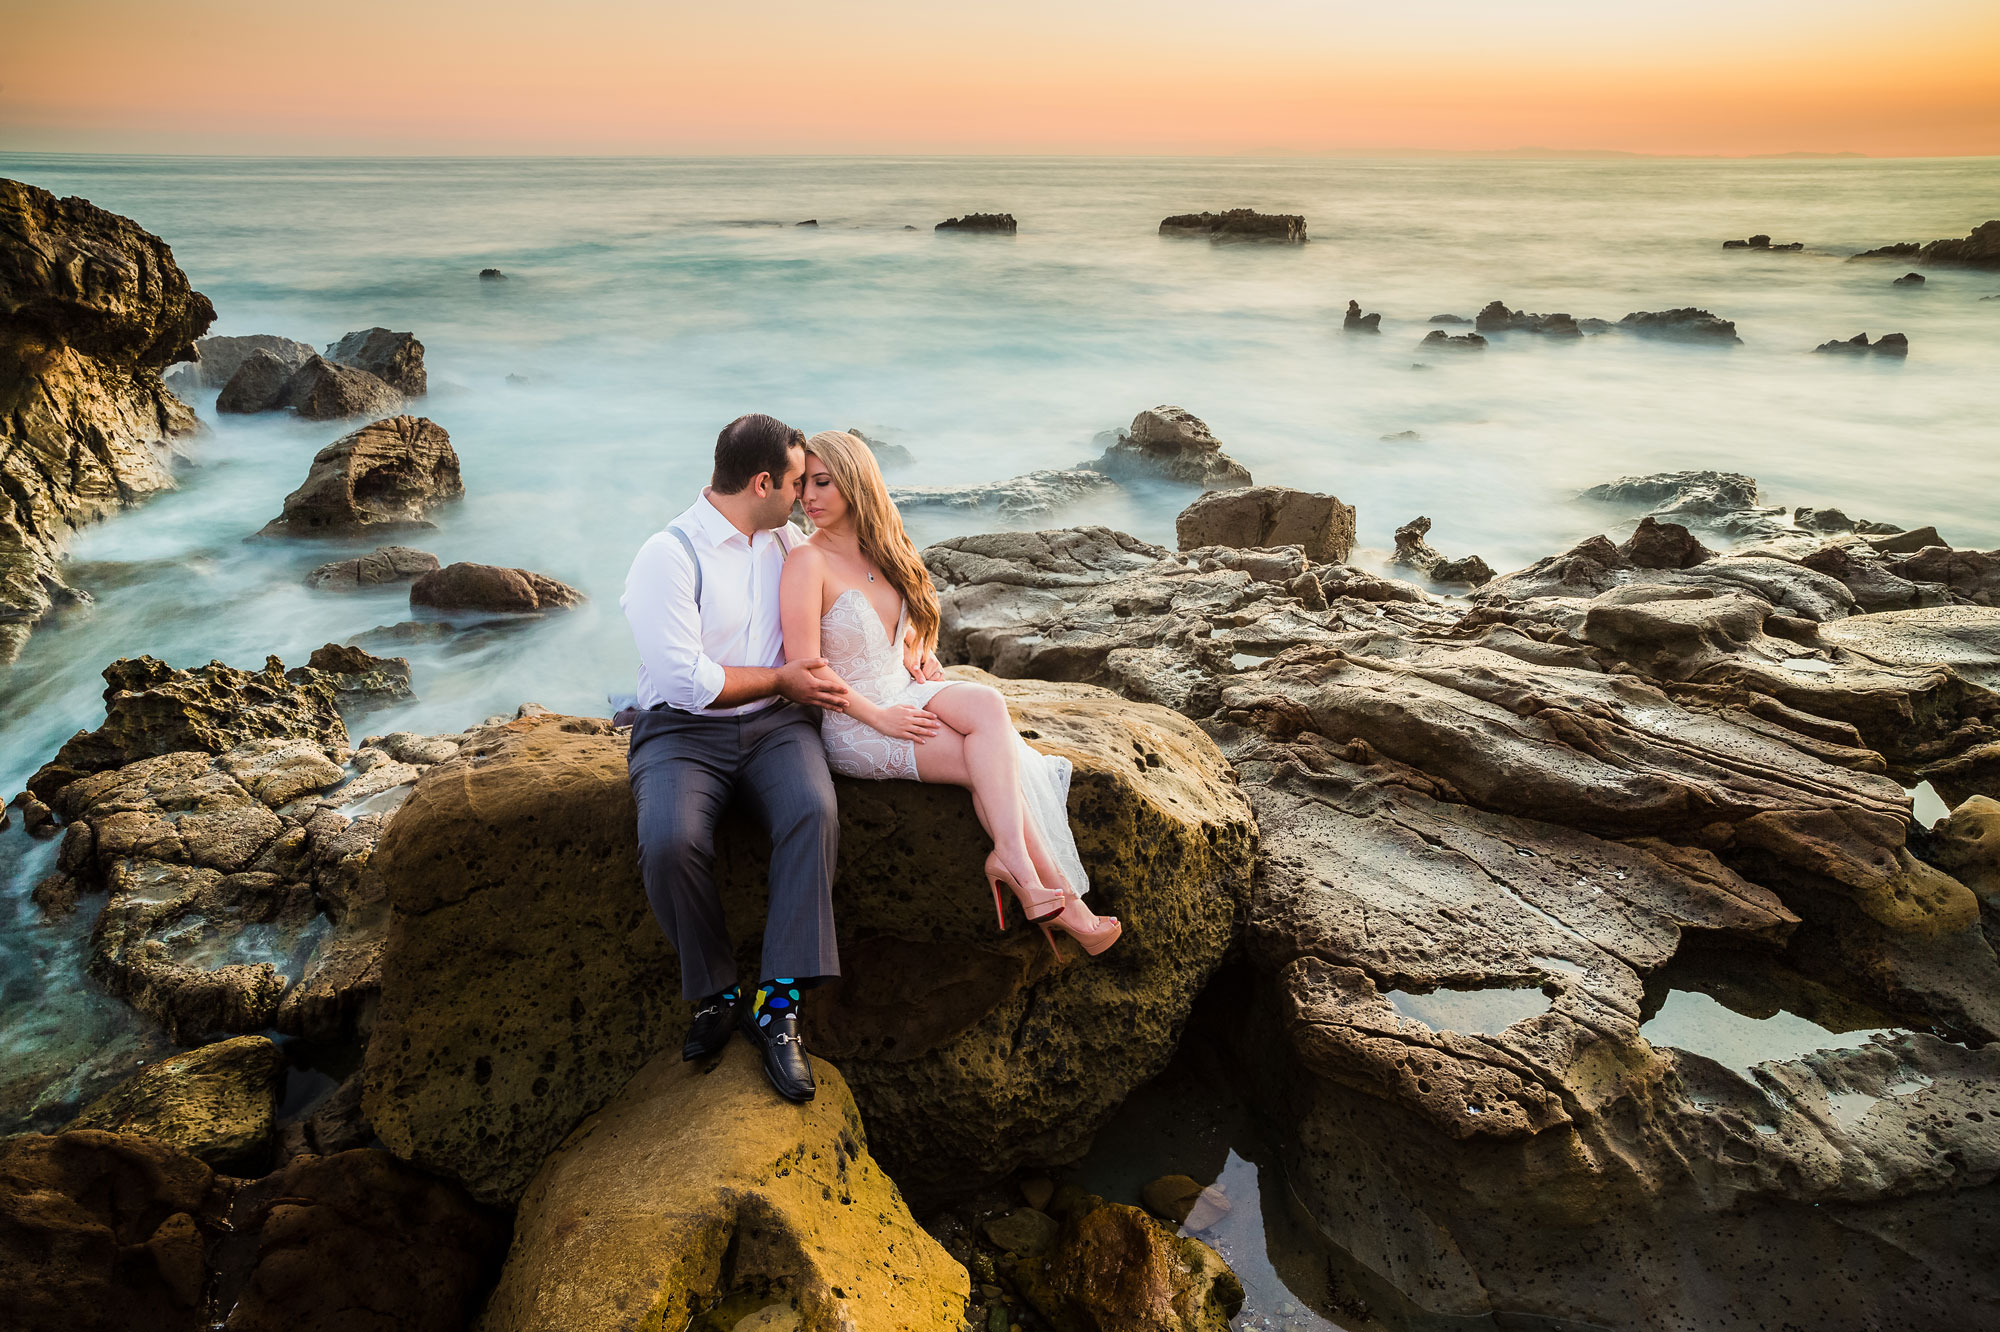
First, let’s review the basic steps of creating a long exposure portrait by walking through a beach example.
Step #1: Scout Your Angle
Before you bring your client into the frame, scout your location to ensure that the client will be standing a safe place. Second, look for an angle where you can capture good and interesting motion. Take sample shots to determine which exact spot creates a good direction of motion for the composition. In the collage below, see all of the test shots taken prior to choosing a final location.

Step #2: Place Your Tripod
Before you set your tripod down, be sure only the bottom extension is going in the sand. This will keep it easy to clean and prevent water and sand from ruining the tripod. Also, if you’re working with wet sand, give your tripod a push once you set it down. Let it sink in just enough until it’s relatively stable. This way, the waves won’t cause the tripod to sink further during or between shots. In this scene, the photographer is using the Peak Design Travel Tripod.
Step #3: Secure Your Camera

Make sure your camera is securely fastened to a stable head. This is especially important if you aren’t using a cable release. For most landscape photographers, this shouldn’t be a problem. However, a secure tripod head will help prevent a shaky shot.
Step #4: Use a Wide Angle Lens
For this shutter drag portrait example, the photographer used the Canon RF 15-35mm f/2.8L lens. This wide angle lens and others like it are perfect for exaggerating the motion.
Step #5: Finalize the Composition
When working with an ultra wide angle lens, keep your subjects in the center of the frame. This prevents any distortion on your subjects. Exaggerate the motion coming toward the lens by tipping the camera slightly down. Lastly, move the camera down to keep the subjects well above the horizon line.
Step #6: Set the Long Exposure Settings
Set your camera to the proper long exposure settings. Do this before bringing your clients or subjects into the scene. We want to aim for about 1/4 seconds. Any faster and you might not capture enough motion. Any slower and your subjects may have a hard time staying still.
Set your ISO and aperture accordingly to get as neutral of a histogram as possible. Be sure you’re shooting RAW to capture as much information as you can. Lastly, use your highlight alert to avoid clipping the image. The final settings were ISO 50, f/16, and 1/4 seconds.
Step #7: Bring Your Subjects Into the Frame
Direct your clients to hold a little more still than they usually would. Be sure to explain to them the nature of the shot and what you’re envisioning.
Step #9: Shoot Through the Motion Using a High Frame Rate

Hold the shutter through the entire motion. Doing so will give you a higher chance of capturing perfect movement in at least one of the images.

Step #9: Verify Before You Move On
Don’t walk away just yet! The scene could be perfect from your viewfinder, but you don’t want any surprises when you sit down to edit them. Before you move anything, zoom in and verify that the image is tack sharp. Be sure to double check your long exposure settings are correct. Once everything looks good, then you can move onto the next scene.
Ideas for Long Exposure Portraits
Now that you have the basic steps down, let’s dive into some ideas for long exposure portraits.
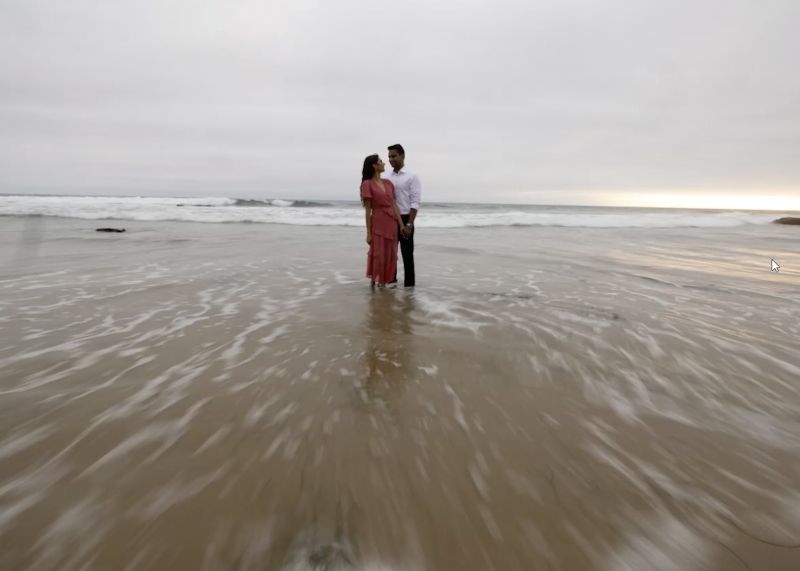
Idea 1 – Create Silky Smooth Water
One of the most exciting aspects of taking creative images involves capturing scenes in ways that the eyes couldn’t otherwise see. For example, in the image below, see that using a long exposure makes the splashing waves appear to have a smooth, almost cloud-like surface. The effect adds a sense of tranquility to the scene.

Idea 2 – Capture Light Streaks via Camera Movement
There are a number of techniques you can use to capture light streaks by moving the camera itself. These long exposure portraits can be done in-camera or combined in post and presented as a composite. The camera twist incorporates camera motion with direct flash. This technique works especially well on the dance floor during wedding receptions. See the video below for a quick, one-minute overview of how to use this technique.
Idea 3 – Whip Pan Photography Technique
The whip pan illustrates how powerful your understanding of lighting can be. Once you understand how to shape it and use it creatively, you can create amazing images in almost any scene. The whip pan, with its manipulation of stationary lights, lends itself to creating amazing long exposure portraits.

Basic steps:
- Find the right composition that includes lights in the background
- Place the camera on a tripod
- Slow the shutter speed to 1″-2″ (or to desired ambient light)
- Set up off-camera flash as either a front or backlight to freeze the subjects
- Quickly pan camera left and right (or right to left) while the shutter is open
Idea 4 – Capture Light Streaks via Moving Lights
In contrast to the previous technique, this long exposure portrait requires the lights to move while the camera remains still. Light sources can vary, from string lights and sparklers to headlights on passing cars. In the image below (from our CreativeLive course on Incredible Engagement Photography), you can see how we twirled string lights to create a unique circular element that complements the scene.

Basic steps:
- Place the camera on a tripod
- Slow the shutter speed to 1/10 or below (or to desired ambient light)
- Twirl string lights as backlight while capturing the image
You can also see this technique applied to Los Angeles traffic from an engagement session.

Idea 5 – Capture Subjects Under the Milky Way
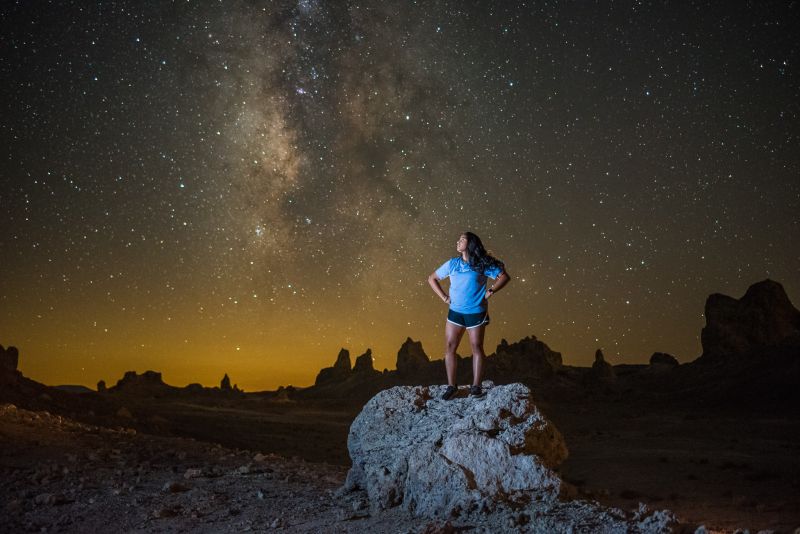
This perfect union of nightscape and portrait photography pushes the boundaries for long exposure portraits. Getting the perfect exposure while shooting at night can prove challenging, but not impossible; you should expect to push your camera’s low light performance to the limit (which includes using a higher ISO than is recommended for standard portrait photography).
Basic steps:
- Place the camera on a tripod
- Slow the shutter speed to (varies greatly depending on ambient light)
- Adjust aperture and ISO. Here is a rough starting point to help practice:
- On a zoom lens: ISO = 6400, aperture = f/2.8, shutter speed = 15 seconds
- On a prime lens: ISO = 3200, aperture = f/1.4, shutter speed = 8 seconds
- Use flash to freeze the subject(s)
- Capture the image
- Capture an additional image without a subject in the frame for a “plate shot” (any movements made by the subject while the shutter is open can cause “ghosting”)
- Create composite in post if necessary
For a complete overview of how to photograph and edit photos of the Milky Way, see our full workshop in SLR Lounge Premium.
Idea 6 – Isolate Your Subjects With People Blur
Waves and lights on cars are not the only things you can use to convey a sense of motion in long exposure portraits. This technique seemingly freezes time only for your intended subjects while the rest of the world rushes by.
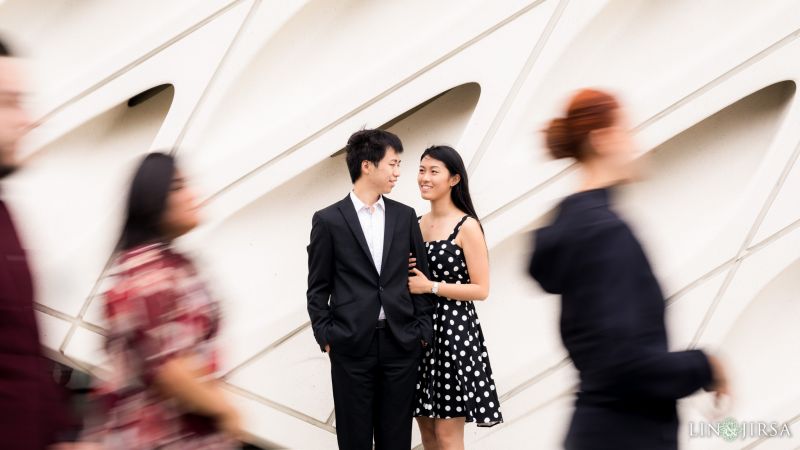
Basic Steps:
- Place the camera on a tripod
- Slow the shutter speed to 1/10 or below (or to desired ambient light)
- Take plate shot with frozen subjects at a faster shutter speed and adjusted aperture and ISO if creating a composite
- Adjust aperture and ISO to taste
- Add a neutral density filter (if necessary)
- Capture multiple images for “plate shot” (and to have options for blending blurry passers-by)
- Set up off-camera flash as backlight (optional)
- Pose subjects
- Capture the image
- Create composite in post if necessary
Idea 7 – Capture Motion of Cars Panning

This technique is nearly opposite the previous technique that we covered. This time, the subject is on the move. Panning the camera from left to right (or vice versa) gives your image the feeling of motion and speed.
You will often see these types of images used in ads for cars, auto racing, or sports. Photos that feature this technique tend to place you into the action. While a fast shutter speed would work fine to freeze the passing subject as well as its environment, slowing the exposure and tracking the subject to convey its movement creates a far more interesting image.
Idea 8 – Capture Motion of Cars
Choose a shutter speed based on the amount of movement in the scene. Start testing between 1/5th to 1/20th of second for this type of shot. The slower the motion of the moving objects, the slower your shutter speed will need to be, and vice versa. To capture motion with quickly moving cars, set a faster shutter speed. In this scene, 1/10th worked well as it captured enough motion from the cars and allowed the subjects to hold perfectly still for a reasonably short amount of time.
Conclusion
Regardless of which technique you choose to use, mastering long exposure portraits will add a creative bundle of skills to your photography repertoire. There is no singular genre reserved for using these techniques. Across the board, from a couples engagement session in the city to a landscape portrait on the beach, several genres converge and benefit from the application of these techniques.


Get Connected!