
Adobe Lightroom Presets are very popular, and have been for many years. Unfortunately, installing them has been a complicated and ever-changing procedure! Repeatedly, Adobe moved them around, changed their format, and changed their compatibility. So, if you’ve been frustrated by learning how to install Lightroom presets, you’re not alone!
In this article, we are going to tackle this confusing task and make it as simple as possible. Where do Lightroom presets actually go, and how do you “install” them? There are different types of presets, even different versions of Lightroom now, and we are going to cover everything.
Thankfully, installing Lightroom presets has gotten a lot easier lately. So, this will be your complete guide, up-to-date as of fall 2023, for installing presets in both Lightroom Classic and Lightroom CC.
How To Install Lightroom Presets | Lightroom Classic VS Lightroom CC
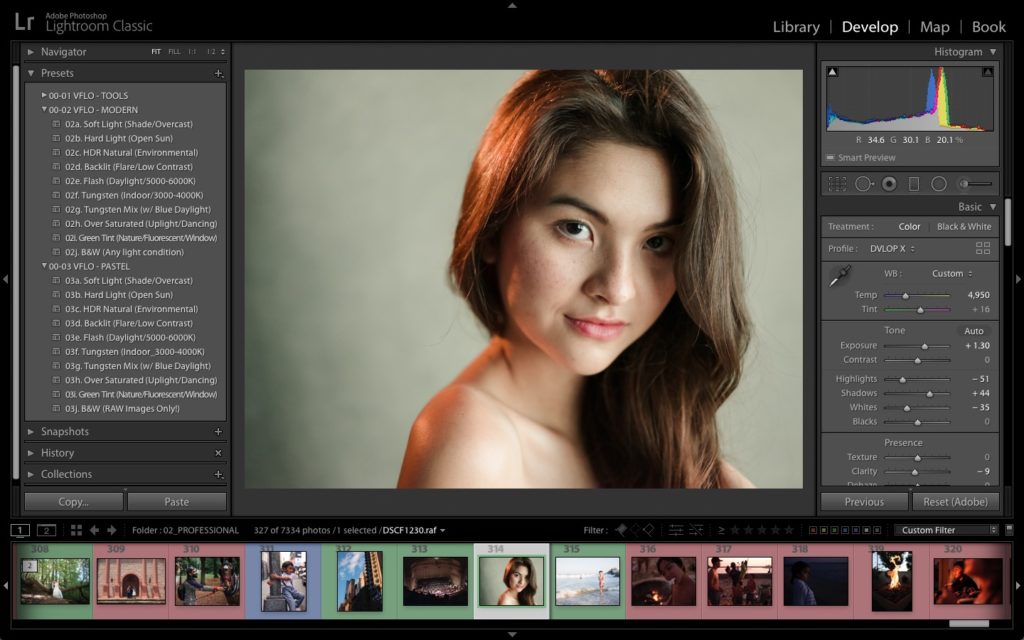
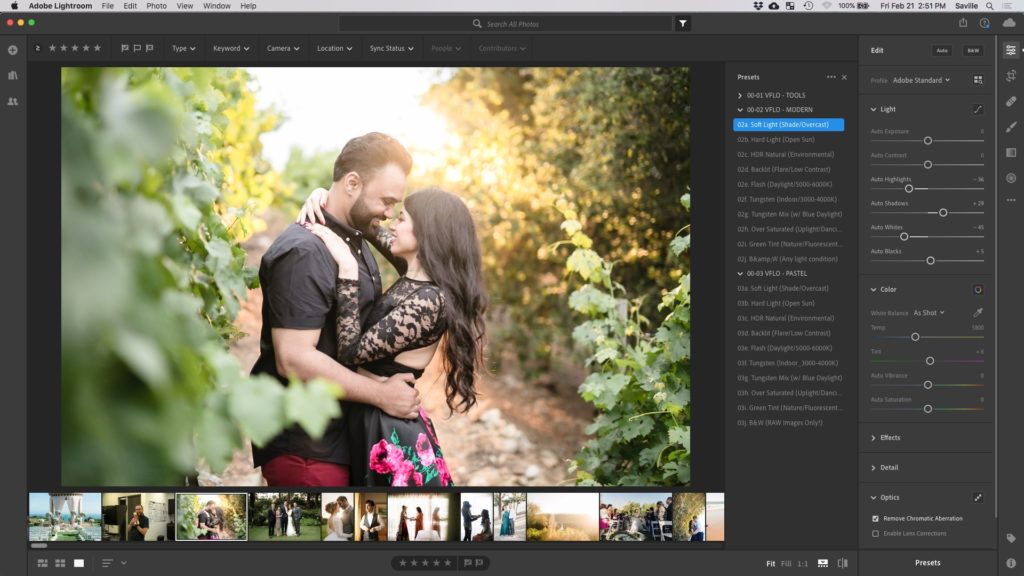
Indeed, there are currently two different versions of Lightroom: “Classic” and “Creative Cloud” (or CC). Technically, both versions are included in a Creative Cloud subscription. Thankfully, both versions of Lightroom are now compatible with almost all Lightroom presets.
There are two main kinds of presets: global presets, which affect your entire image, and Local Adjustment presets, also known as Brush presets and/or Mask presets, which are designed to be used for things like burning & dodging or retouching.
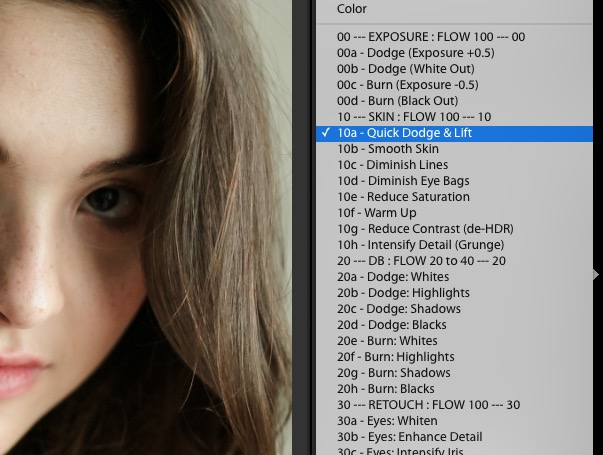
Lightroom Presets | Global Presets, Mask Presets, Brush Presets
Now, although there are “global” presets” and “local” presets, it is important to note that Mask presets and Brush/Gradient presets are currently stored in different places. Mask presets are found on the left side of the Develop Module, in the same place as global presets. Meanwhile, traditional brush-type presets are found in a drop-down menu with the Local Adjustments on the right side of the Develop Module.
But, don’t worry, most presets do have an easy installation method!
How To Install Lightroom Presets
In Lightroom Classic, if you open the left-hand panel of the Develop Module, you’ll see a whole section of Lightroom Presets; these are the global and mask-based presets. They can be organized into sub-folders, and Adobe makes it easy for you to create your own new presets. Plus, Adobe offers some collections of their own, too.

In Lightroom CC, presets are on the right-hand panel; they pop out when you tap/click on the Presets icon in the upper-left corner of the Adjustments panel. Then, as you’d suspect, the “…” icon in the upper-right of the presets panel is where you’ll find “Import Presets…”
 So in both versions of Lightroom, there is an easy option, finally! If you are just installing some very simple global presets or masking presets, this could be all you need. However, there are a few important details to keep in mind, such as installing brush presets, or installing any preset that relies on a custom profile, which might need to be updated every time you upgrade your camera! So, read on…
Did Your Presets Come With A Lightroom Preset Installer?
If you purchased presets from somewhere (such as Visual Flow’s preset packs, created by DVLOP), then you may not have to worry about the confusing task of getting your global, mask, and brush presets all in the right places, or making sure they are up to date when you get a new camera. These presets come with an installer that automatically puts all your presets in the right folders. Done!
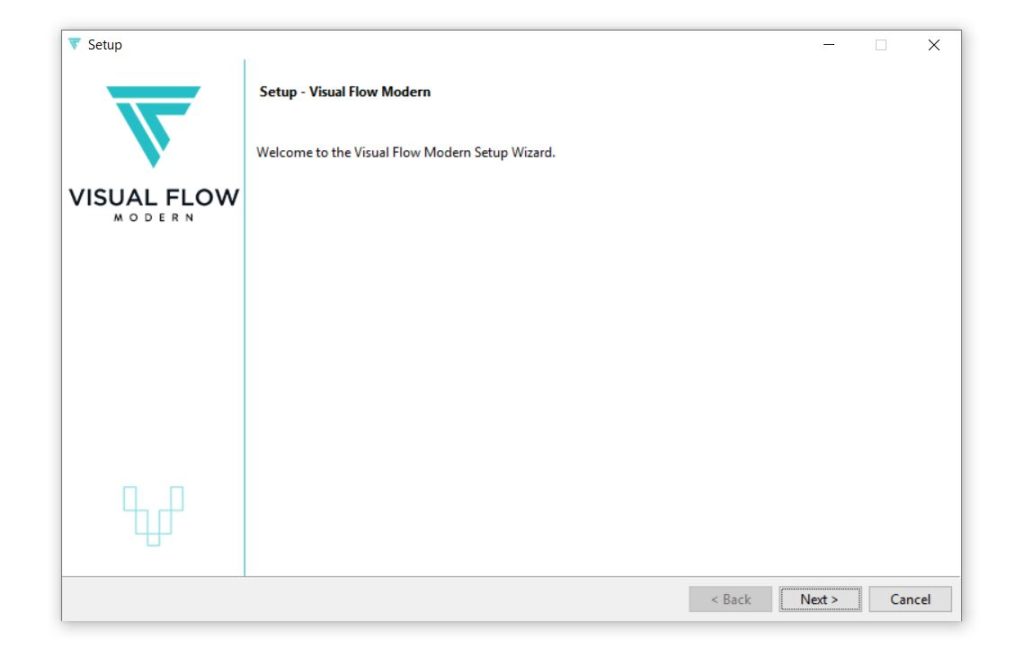
These installers are the easiest way to install any type of Lightroom preset, by far. They allow you to not worry about whether your presets are Global presets, Mask presets, or Brush presets; it takes care of everything for you!
NOTE: keep in mind that you should only install applications from highly trusted websites. Be careful purchasing Lightroom presets and using an “installer app” from any website or business that doesn’t have a long track record in the photography industry!
How To Import Presets Into Lightroom Classic
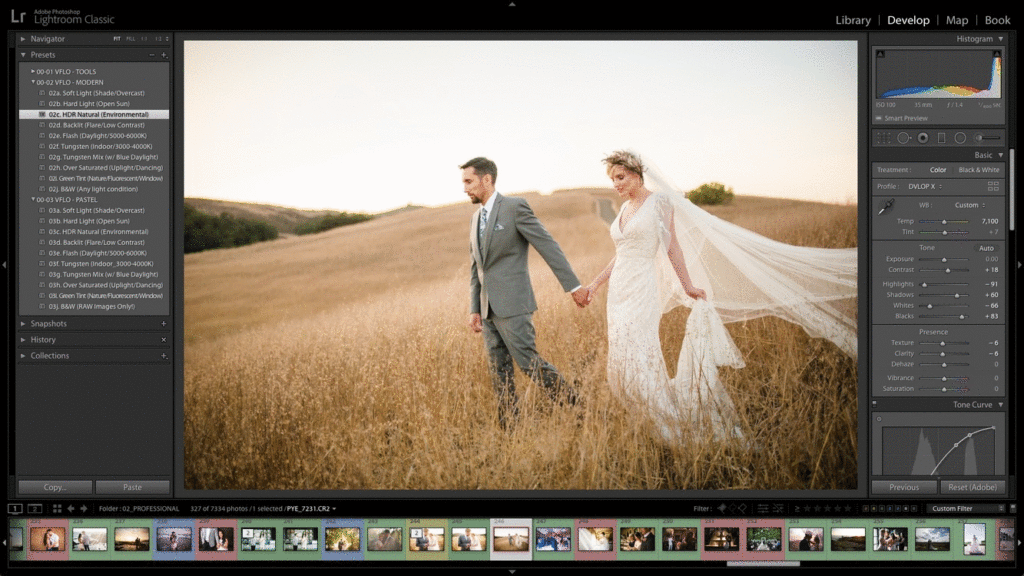
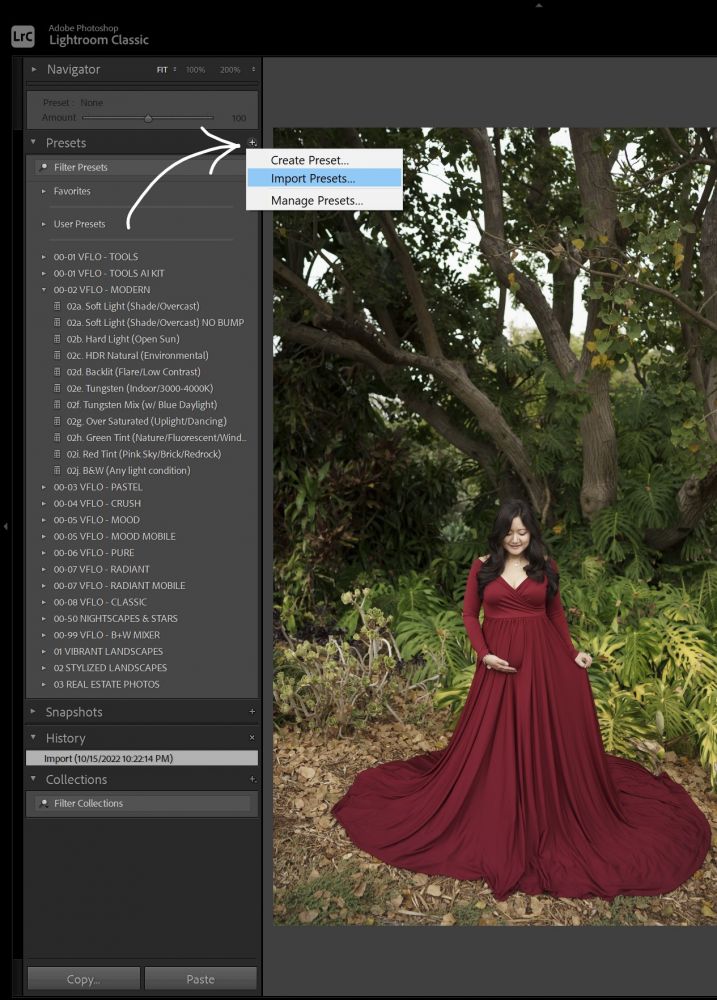
Import Lightroom Presets
The second-easiest option is what we already demonstrated: import your Lightroom presets from within Lightroom itself. In LR Classic, the option is on the left-hand panel; look at the top of the Presets tab for the “+” icon. Click this, then find your folder of presets, and you should be good to go! The similar procedure also applies for Lightroom CC.

NOTE: Although presets can be organized inside folders within Lightroom, newly imported ones may instead appear in your default “User Presets” folder. So, if you import a bunch of presets and then can’t find them or their folder, check the User Presets tab! You may have to re-create the folder within Lightroom. This is one annoying bug that Lightroom Classic might still have, depending on when you read this.
WARNING: You may be wondering, “Can I rename and/or move presets and folders outside Lightroom, in Windows Explorer, or Apple Finder?”
Technically, yes; however, there is a strong possibility that Lightroom itself will not recognize these changes because name and folder information is also written into the code of the preset itself. For this reason, we always recommend moving and renaming presets within Lightroom. Again, it’s just a bug in Lightroom that hasn’t been fixed after many years.
How To Install Lightroom Presets Manually
Just in case you aren’t successful when using the “Import Presets” option inside Lightroom, (or if you are using a much older version of Lightroom) …here are the steps to install presets 100% manually…
(NOTE: You will also need to use this method if you want to install certain Brush presets, AKA Local Adjustment presets, in Lightroom Classic.)
Basically, you need to find the folders where presets are actually stored. So, where DO Lightroom presets actually go? Unfortunately, on both Mac and PC, the exact folder is usually hidden within a computer system folder that isn’t normally visible. However, there’s an easy trick that reveals it!
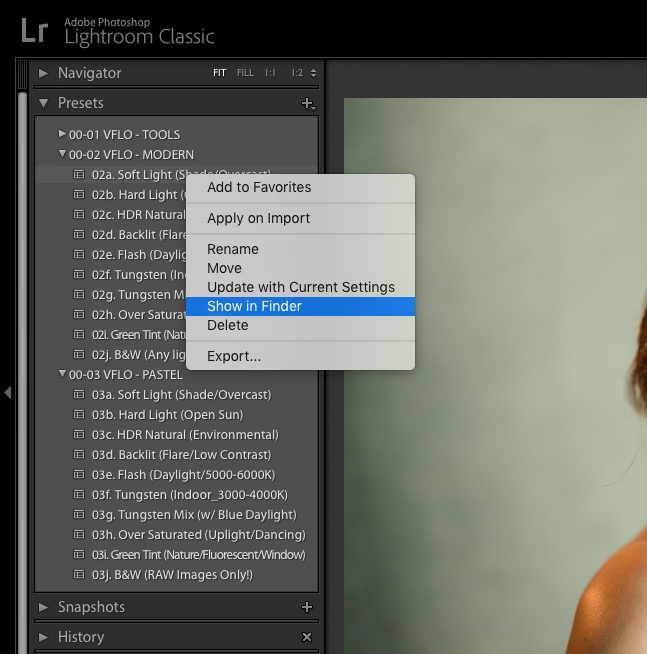
For global presets, simply go into Lightroom’s Develop Module, open the Presets panel, and click “Show in Finder/Explorer.” This will open up your computer’s file browser to the exact folder where that preset is stored, as well as most/all other presets too.
Once you’ve opened that folder, you can copy other presets into it. In fact, you can copy entire folders of presets into this “Settings” folder! Then, simply restart Lightroom and you’ll see the new presets.
On a PC, the folder for Lightroom’s Global Presets is here:
Users > (your username) > AppData (this folder is usually hidden!) > Roaming > Adobe > CameraRaw > Settings
On a Mac, the folder for Lightroom’s Global presets is here:
Users > (your username) > Library (this folder is usually hidden!) > Application Support > Adobe > CameraRaw > Settings
NOTE: The underlined folders, “AppData” and “Library,” are the ones that are usually invisible. To reveal this hidden folder on a Mac, you can use the hotkey combo “CMD + Shift + (period).”
You can also try and back-track to this folder by using the right-click, ‘Show in Finder” trick for global presets, because the Library folder is one of the parent folders for both global and brush presets. (See below!)
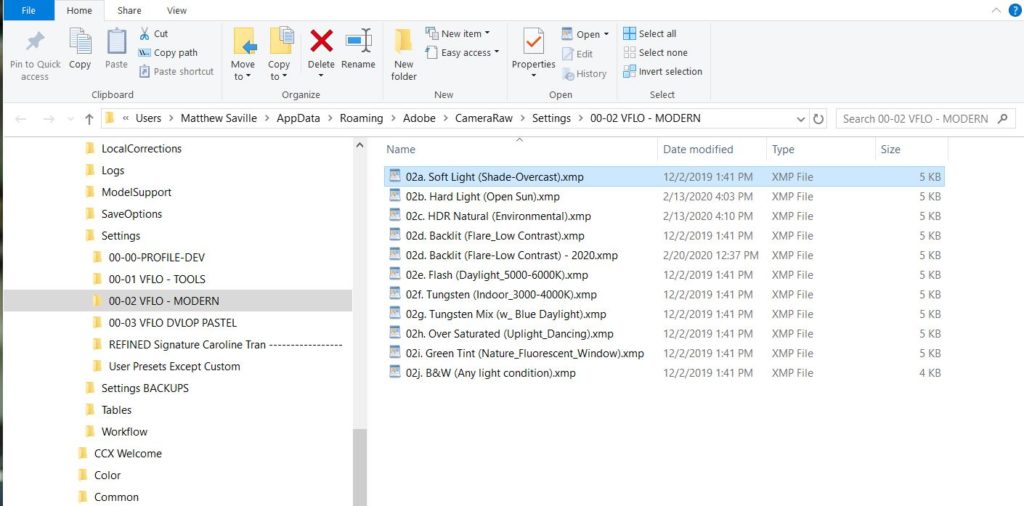
NOTE: Since Mask-based presets are also organized in this left-hand Presets panel, this same trick works for installing Mask presets. However, for installing all types of other brush / local adjustment presets, read on…
How To Install Lightroom Brush Presets Manually
For Local Adjustment Presets, unfortunately, you can’t use this same trick to find their folder. There is no easy “Import” button, nor is there a “Show in Explorer” button. So, here is how to find each of the folders for both types of presets, (Global and Local) on both a PC and a Mac:
On a PC, the folder for Lightroom’s Local Adjustment Presets is here:
Users > (your username) > AppData > Roaming > Adobe > Lightroom > Local Adjustment Presets

On a Mac, the folder for Lightroom’s Local Adjustment Presets is here:
Users > (your username) > Library > Application Support > Adobe > Lightroom > Local Adjustment Presets
NOTE: The important difference is this: while global presets are in the Adobe > CameraRaw > Settings folder, …brush presets are in the Adobe > Lightroom
How To Install Brush Presets In Adobe Bridge / Adobe Camera Raw
For brush presets, there is one more complicated, obscure detail we need to mention. If you are an Adobe Bridge or Camera Raw user, you might be curious if any of this applies to you!
The good news is, global and mask-based presets will be cross-compatible, and are stored in the same actual folders on your computer. This means that if you follow the above instructions for installing presets in Lightroom Classic, then they’ll also show up in Adobe Bridge / Camera Raw.
The bad news is, this is not the case for brush presets. There is one more folder you’ll have to hunt down, but if you’ve read this far then it willl be easy:
On a PC or Mac, Camera Raw and Adobe Bridge store brush presets in the same “Adobe > CameraRaw” parent folders as other presets, but brush presets go in the sub-folder “LocalCorrections”.
How To Install Presets In Lightroom CC Manually
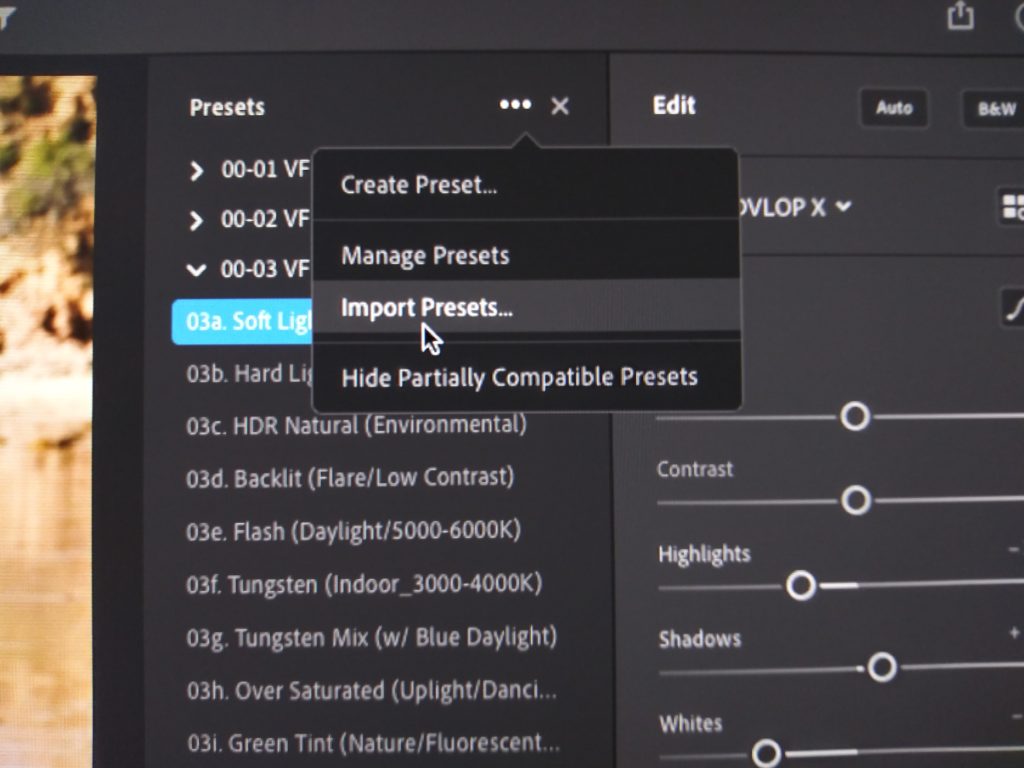
With Lightroom CC, presets are managed a bit more universally, but there are some weird quirks. For one, “Brush” type presets still do not exist in LR CC. If brush presets do eventually become available in LR CC, we’ll update this article!
If you need to manually install presets for Creative Cloud, though unlikely, you should be able to use the previously described method. Again, be careful moving or renaming presets manually, because Creative Cloud is designed to be a synchronized, cloud-based application.
How To Install Presets In Older Versions Of Lightroom
What if you have an older version (pre-CC 7.3) of Lightroom; can you still install presets? Yes, however, the compatibility becomes an issue because the Adobe Lightroom Classic 7.3 update made a significant change to the Adobe Camera Raw engine that Lightroom’s Develop Module is built on. So, if you have presets that are specifically made for newer versions of Lightroom, they may not be functional in older versions of Lightroom, or they may force you to revert to an older, inferior Camera Raw Profile
There is one additional detail about how presets were handled before the 7.3 update of April 2018: Global presets, that is, were previously stored in a different folder, and in the file format .LRTEMPLATE. (Not .XMP, as with newer versions of Lightroom.) Here is where you can find that folder:
PC: Users > (YOUR USERNAME) > AppData > Roaming > Adobe > Lightroom > Develop Presets
Mac: Users > (YOUR USERNAME) > Library > Application Support > Adobe > Lightroom > Develop Presets
Once again, note that the underlined folders are invisible by default, so you’ll have to follow the previously mentioned steps to find this folder. However, in most older versions of Lightroom, you should still be able to right-click a (global) preset and click “Show in…”, too.
Learn More About Lightroom
There you have it! Hopefully, this tutorial has helped you get all of your presets into Lightroom. (Don’t forget to back up your presets from time to time, too!) If you’d like to learn how create other types of presets, here are some other tutorials:
[RELATED: How to create an Import Metadata preset in Lightroom Classic CC (2020 Update)]
To learn more about Lightroom, be sure to visit our full Mastering Lightroom workshop.
Matthew Saville
Follow his wilderness nightscape adventures on Instagram: instagram.com/astrolandscapes



Get Connected!