
Introduction
In our previous tutorials, we have edited numerous professional portraits, couple sessions, architectural images, and landscapes, but what we haven’t shown a lot of are the candid photos we take on a day-to-day basis that we use to document our lives. Because these personal images hold great stories behind them, we tend to keep them even if they have imperfections; one of the most common imperfections is when the subject is not in focus. These images may not be perfect, but they’re still ways to fix them. In this tutorial, we will cover how to edit misfocused images using Lightroom 4 and our Lightroom 4 Preset System. However, for those who don’t have our Preset System, do not worry, as we will cover how every step is done.

Watch the video below
How it was shot
Panasonic GH3 Micro-Four-Thirds camera with the PanaLeica DG Summilux 25mm f/1.4 lens (full frame equivalent 50mm) with the following settings:
- Shutter speed: 1/1000 sec
- Aperture: f/2.0
- ISO: 200
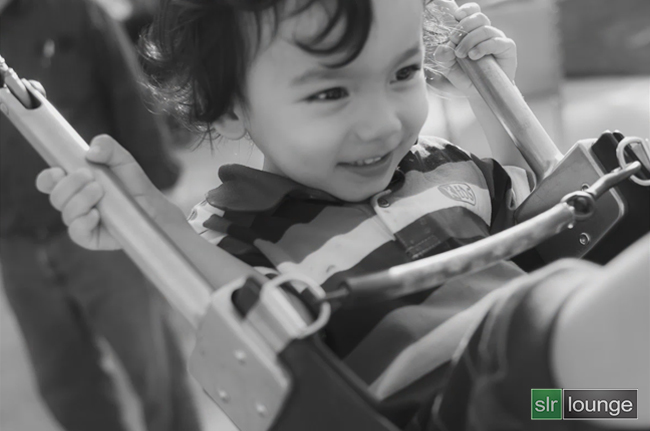
I love everything about this image except the fact that the subject is out of focus. One of the easiest ways to make a misfocused image look good is to process it into a black and white image. By making it black and white, it will take the focus off the random haphazard colors like the distracting reds, blues, and whites in the image below.

Post Producing the Image
Step 1) 00 MY MIXOLOGY – 10 SOFT PORTRAITS > 15 SP Extra Soft B&W
For those who do not have the Lightroom 4 Preset System, you can get the same look by using the following settings:
- Convert image to Black & White
- Contrast: +25
- Highlights: -30
- Clarity: -25
- Create a slight s-curve in the Tone Curve panel to increase contrast by pulling up the highlights and lowering the shadows
Step 2) 05 ANTIQUE CURVES – 40 VINTAGE PUNCHES > 41 B&W Vintage Punch
This will clip the shadow detail and fade out the shady areas of the image, giving the image a faded vintage look.
For non preset owners, to achieve this effect, pull up the black point and pull down the white point, giving your Tone Curve a slightly more pronounced s-shape.
Step 3) 07 SPECIAL EFFECTS – 20 FILM GRAIN > 23 Medium Film Grain
Whenever you have film grain in an image, it automatically kills a lot of the detail. This causes us not to notice the misfocused shot. This is why I love that Film Grain look in these types of images.
In the Effects panel, adjust these settings:
- Grain Amount: +60
- Grain Size: +30
- Grain Roughness: +40

Step 4) Decrease Clarity to -10
I don’t want to drop Clarity too much as it is already soft since its already out of focus.
Decrease Clarity
- Clarity: -10

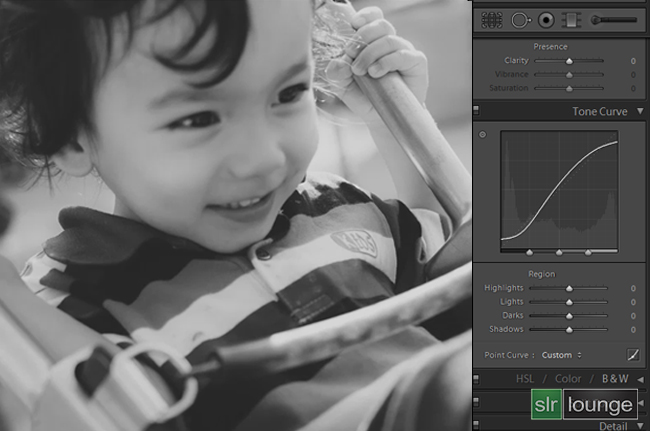
Step 5) Adjust the Tone Curve
Pull down mid-tone shadows, raise deep shadows, and darken the deepest shadows. Your Tone Curve should look like the Tone Curve below.

Step 6) Standard Sharpening & Noise Reduction 0
We will keep Sharpening to the standard settings:
- Amount: +70
- Radius: +1.5
- Detail: +10
- Masking: +30
Next zero out the Noise Reduction. Sharpening and Noise Reduction won’t do much to our image as it already has grain.
Step 7) 00 DODGE|BURN > Burn (Darken) -1 Adjustment Brush tool
Adjust Lens Vignette settings on the right panel.
- Amount: -10
- Midpoint: +20
From here we will be making a couple of tweaks. If we were in Lightroom 5, I would be using the Radial tool to create a vignette, but since we are working in Lightroom 4, we will instead use the 02 Burn (Darken) brush to darken up the edges of the image, so that it brings less attention to it.
- Exposure: -.47
We can also achieve this effect by using a -.47 Exposure brush and painting in the corners of the image. By placing a vignette into the image, we bring the attention to the subject matter, rather than the edges of the image.

Step 8) 40 SPECIAL EFFECTS > 43 Heavy Desharpener Adjustment Brush tool
It is kind of strange that the child’s left hand is in focus while nothing else is in focus. I want to make sure that everything in the image has the same sharpness and focus. Therefore, use the Adjustment Brush tool “shortcut: K” and select the brush effect, Heavy De-Sharpener. Paint the effect over the subject’s right hand as well as any other regions in the image that doesn’t match in sharpness. Make sure to match the sharpness consistently throughout the image.
- Sharpness: -74

Conclusion

With just a few tweaks we have transformed a distracting, misfocused image, into a beautiful, consistent, black and white photograph. In short, images don’t have to be perfect for them to be completely worth keeping, but at the same time with just a couple of clicks, the image can be easily improve.
The SLR Lounge Lightroom 4 Preset System is designed to enable users to achieve virtually any look and effect within 3-5 simple clicks. From basic color correction, vintage fades, black & white effects, tilt-shift effects, faux HDR, retouching, detail enhancing, and so much more. The sky is the limit with what has been dubbed the most powerful and intuitive preset system available. Click the link above to learn more/purchase.
You can also purchase the LR4 Preset System as part of the Lightroom 4 Workshop Collection.


Get Connected!