
Going beyond Lightroom’s standard black & white conversion, we can create incredible monochromatic images with a few key tweaks.
Download THIS IMAGE from our Mastering Lightroom workshop on slrloungeworkshops.com so that you can follow along with this tutorial (or simply use your own photo and apply the following concepts).=
This tutorial is part of our Lightroom Tips Series, where we give you simple guidance on how to use Lightroom more efficiently and effectively.
1. Create a Virtual Copy
It’s always a good idea to create a duplicate when you plan to apply a special edit to an image. You can quickly do this by pressing CTRL+’ (Windows) or CMD+’ (Mac) in the Develop Module.
2. Adjust the Color Temperature

It’s important to note that color temperature settings DO affect the tonality of black & white images. Be sure to adjust your white balance, just like you’d do when editing a color photo. Press “W” to select and use the white balance dropper tool and then click on a neutral area of the photo (see image above).
3. Apply the Adobe Monochrome Profile

After you’ve adjusted your white balance, press “V” to apply the “Adobe Monochrome” profile to the image. This is Adobe’s basic go-to for creating black & white images and it will give us a nice foundation for beginning our edit.
4. Reduce Exposure

Normally, one of the first adjustments we’d make to the image is increasing the exposure (assuming we shot to preserve highlights). However, for this conversion, we’re going to reduce our exposure by 1.5 stops (or -1.50 on the exposure slider). We call this “dark mode” editing; “Dark Mode” is one of the presets available in our Visual Flow Presets Modern Pack.
5. Increase Highlights, Shadows, Whites, and Blacks

By slightly increasing the highlights, shadows, whites, and blacks, we can create a more unique, tonally dramatic image that already stands as a marked improvement over the initial black & white conversion based on the Adobe Monochrome profile.
6. Reduce Texture and Increase Clarity

You can enhance your subject’s skin tone with quick adjustments to the texture and clarity. We recommend zooming in to make sure you’re not overdoing it one way or another. If you go too far to the right with clarity, for example, your image can quickly take on a “grungy” look. When making these adjustments, just remember that “less is more.”
You can also make adjustments to the “Dehaze” slider under the Presence box, but we’ve decided to skip it for this edit.
7. Adjust the Tone Curve
A. Start with the Parametric Curve

There are different ways to use the tone curve tool, but we’ve selected the “Parametric” button that can be found just below the sliders in the Tone Curve box. This activates the sliders for use in making adjustments as opposed to placing points on the line and making adjustments that way, which we’ll still do in the following step.
B. Adust the Point Curve
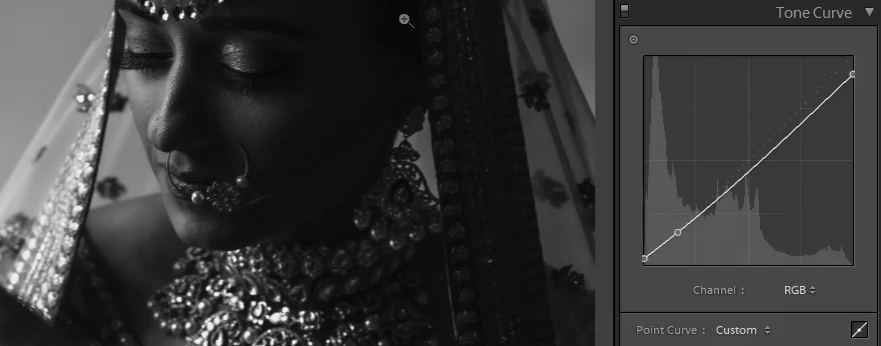
You can dramatically alter the tones of your black and white image by making simple adjustments to the point curve.
In this image, we’ve pulled down the white point in the top right corner by about 10%, which has the effect of graying the white elements that previously existed in the top 10% of this histogram.
Next, we lifted the gray point in the bottom left corner by about 10%, which means any black elements in the bottom 10% of the histogram become gray. This often adds a more filmic look to images.
(NOTE: Remember to hold shift before making the above adjustments to the point curve to restrain the movement to straight up and down.)
Finally, you’ll notice in the image above that we added another point on the line, which we pulled slightly to the right to darken some of the shadows.
8. Target Specific Tones with the Black & White Mix Box

You can use the dropper/picker to in the Black & White Mix box to target and adjust specific tones. As you make adjustments, be mindful of the entire frame as adjustments to one section can affect other areas, including skin tones. For example, in the image above, we made an adjustment to darken the background, but it removed too much detail from the bride’s face. Try to find a happy medium here and then make local adjustments later if necessary.
9. Add a Radial Filter
The radial filter is a great tool to use to make local adjustments based on where we place the filter, and it’s useful to further guide the focus of your image using light vs. dark areas in the frame. Here’s how we suggest using this tool:
- Select the Radial Filter tool
- Press “Alt” or “Option” and click “Reset” to return all settings to zero
- Drag and drop the Radial Filter tool over the area of the image you want to adjust (see image below):
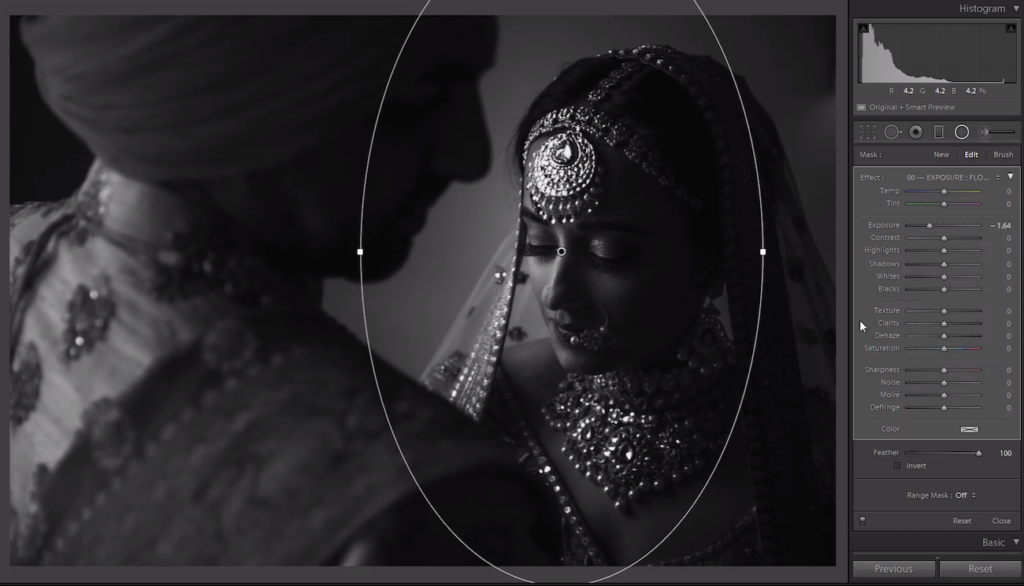
- Everything outside of the radial filter is darkened when we adjust the exposure to the left.
- Adjust the “Feather” slider to change the dynamics of the gradient between light and dark around the edge of the filter
The Adobe Monochrome Conversion vs. the Custom Black & White Conversion


As you can clearly see, the end results are quite different; personally, we prefer the custom edit. Of course, you can always adjust to taste, depending on how dramatic you want the final image to look.
Recap
Here’s a quick recap of the steps we covered for creating an incredible black & white conversion in Lightroom:
- Create a Virtual Copy
- Adjust the White Balance
- Apply the Adobe Monochrome Profile
- Reduce Exposure
- Increase Highlights, Shadows, Whites, and Blacks (to taste)
- Reduce Texture and Increase Clarity
- Adjust the Tone Curve
- Target Specific Tones with the Black & White Mix Box
- Add a Radial Filter
Bonus: Turn Your Black & White Conversion into a Preset!

It’s super easy to create a new preset using the adjustments you made in the previous edit. Doing so can drastically speed up your workflow and cut your post-production time, all while leaving you with incredible final images! Here’s how you can create your very own preset (use the image above for reference):
- Click the “+” symbol next to the presets box on the lefthand side of the interface.
- Select “New Group” from the “Group” dropdown menu
- Name the new group and press the “Create” button
- Retitle the “Preset Name”
- Click the “Check All” button to select all settings
- Remove the settings that you don’t want to include in the preset (we removed white balance, graduated/radial filters, lens corrections, transform adjustments, and because they can vary greatly from image to image and don’t really make sense to include in a preset)
- Click “Create”
You should now be able to find your new preset under the folder you created in the Presets box. Please note, you may need to make additional adjustments after applying your new preset to different images, but the preset should give you a solid place to start.
Related Tutorials
If you enjoyed this tutorial, be sure to check out our “Dark Mode” Lightroom Editing Technique video on YouTube:
Premium Video Tutorials

You can find our full workshop on Mastering Lightroom here.


Get Connected!