
Metadata provides a location for information such as a name, copyright, website, address, etc to be stored with your images. In this article, we will cover how to create standard import metadata presets as well as how to edit metadata. Once you have set up a metadata preset, you can quickly apply metadata to all of your images in just a few clicks.
This tutorial is part of our Lightroom Tips Series, where we give you simple guidance on how to use Lightroom more efficiently and effectively.
How to Edit Metadata or Exif Data

From the Library Module, we can edit metadata by opening the Metadata section on the right-side panel (see image above) and plugging in any relevant information (including title, caption, copyright, etc.) for the file we’re working on.
Editing metadata in Lightroom one file at a time can seriously slow down your editing workflow, however, and we recommend against it. The best way to handle metadata is by setting up a standard import metadata preset.
How to Create a Standard Import Metadata Preset
Before we set up our preset, we need to make sure we are in the Library Module. To get there, hit “Ctrl + Alt + 1” or simply select a Library view mode. Once you’ve accessed the Library Module, go to the Metadata Menu, which is toward the top. Select “Edit Presets,” as shown below.

Once you’ve selected “Edit Presets,” a dialogue box will appear like the one in the image below. You’ll notice that we’ve compacted each of the options in the dialogue box so that you can see how many different pieces of information you can include and save into your files.

Because it’s what we typically do here in the studio, we are only going to complete the “IPTC Copyright” and the “IPTC Creator” fields. You can add whatever additional information you would like, but we do want to keep this preset rather generic so that we can use it on ALL of our images.
IPTC Copyright
First, we are going to fill in the “IPTC Copyright” field. Expand this field by simply clicking on the arrow next to “IPTC Copyright.” Next, make sure you check the box so that the copyright will be included in the preset. Now, you can start filling in your information.
Put in whatever name or company name you want for “Copyright.” As you can see in our example below, we put “SLR Lounge.” For the “Copyright Status,” select “Copyrighted” from the dropdown menu. For the “Rights Usage Terms,” we are going to type in “Personal educational use only, all other with express permission only.” Finally, for the “Copyright Info URL,” put in the specific copyright URL. Since SLR Lounge does not have a specific copyright URL, we will just put “slrlounge22.wpengine.com.” However, if we actually had a specific URL for the copyright, then we would put that there (for example, “slrlounge22.wpengine.com/copyright.html”).

Make sure you put your personal information in and not ours! Also, be sure to check the boxes next to “Copyright,” “Copyright Status,” “Rights Usage Terms,” and “Copyright Info URL.” See our example above.
IPTC Creator
Next, we are going to fill out the “IPTC Creator” field. Once again, expand this by clicking on the arrow and make sure you have checked the box next to “IPTC Creator” so that it is included in the preset. Now, just fill out your information! For the fields that you do not fill out, make sure they are unchecked. It is a good idea to put down your email in case someone has any copyright inquiries and needs to contact you. As you can see in the example below, I have kept my information rather generic.
Saving Our Preset
Now that we have filled out the “IPTC Copyright” and “IPTC Creator” fields, we are going to save our metadata preset. To save our preset, go to the top of the Edit Metadata Presets Dialogue Box and select “Save Current Settings as New Preset” from the dropdown menu, as shown below.

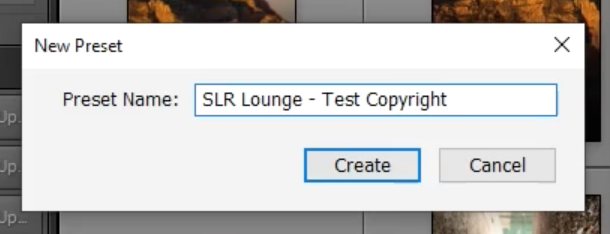
Another dialogue box will appear, where you will enter the name of your preset. Once you have finished, hit “Create.” In our example below, we’ve named it “SLR Lounge – Test Copyright.”
After you have created your preset, it will take you back to the Edit Metadata Presets Dialogue Box. Hit “Done” to finish creating your preset.

Now, with your metadata preset in place, you can quickly select the preset when importing images into your catalog (see the image above). You can also update images you’ve already imported by selecting the files and then applying the preset.
Conclusion
Remember to keep your information rather generic because you do not know who will have access to this information. In addition, you can now apply this preset to all of your images because it is generic. Be sure to leave some sort of contact information, such as your email, just in case someone wants needs to reach you in regards to your photo.
Premium Video Tutorials

You can find our full workshop on Mastering Lightroom here.


Get Connected!