
The following is an excerpt from our HDR Tutorial by SLR Lounge. This workshop dubbed “the gold standard of HDR education” by FStoppers contains over 13 hours of tutorials, RAW files for you to follow along, and dozens of full prep to post examples. We cover bracketed HDR, in-camera HDR, single-shot faux HDR, single-shot bracketed HDR, panoramic HDR and more! Click here for more info.
Introduction
In this tutorial, we will be back in Lightrooom 4, where we will RAW process our images and then import them into Adobe Photoshop.

HDR Processed Version vs. In-Camera Version
In a previous tutorial, “Horseshoe Bend: HDR Processing in Photomatix Pro,” we processed and exported our image from Photomatix Pro. Now, we are back in Lightroom 4 with the HDR processed version that was automatically re-imported. Here, we can compare this version with the In-Camera HDR version (press “C” to compare).
Below, the image on the left is the HDR processed version and the image on the right is the In-Camera HDR processed version.

Now, there is nothing wrong with the In-Camera version. In fact if we were to just pick one of these 2 images we would probably go with the In-Camera version since it seems to “pop” a little bit more at first glance.
However, we are going to do additional processing to the our image since we want to bring out a some more extra detail, add additional color and get a finer look out of the image. The in-camera processing usually just doesn’t deliver the same type of fine detail and tonality as properly processed RAW images. This is why we work with RAW images in Lightroom, manually merged Photomatix.
Also, the In-Camera version gets slightly cropped during the HDR process, so the dimensions will not be quite the same as the original image.
Making Adjustments to the Brighter Exposure
First, select the brightest version of this image. We are going to process this as if it was our only image, and then later we will blend it with the HDR image from Photomatix.

First, expand the Presets Panel by pressing “Ctrl + Shift + 1.” Next, we are going to expand the “00 MY MIXOLOGY – 20 VIVID LANDSCAPE” presets folder. Then, select the “26 VL HDR Max” preset to apply to our image.

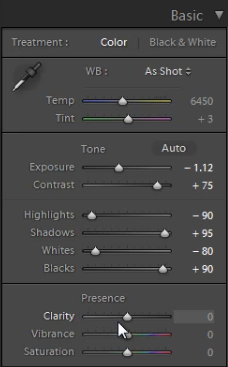
Next, make adjustments in the Basic Panel (press “Ctrl + 1” to expand this panel). Bring Exposure down significantly to -1.12 so that we can see all of the range in the image. Next, bring Contrast down to +75. Then, bring Highlights down to -90 and bring Shadows down to +95. Finally, bring Whites down to -80 and bring Blacks down to +90. We want to make these adjustments subtle because we will be blending our images together. Therefore, this image does not need to have perfect shadows and highlights.
[FAQ: What is HDR Photography?]
Export both images to Adobe Photoshop
Before we export our images to Adobe Photoshop, we want to double check them for noise reduction. First, zoom into brightest exposure and check the noise levels especially in the shadow areas. If adjustments need to be made, expand the Detail Panel by pressing “Ctrl + 5” and adjust the Noise Reduction settings. For our image, we will adjust the Luminance to 10. If you are brightening your image more, or if you shot at a higher ISO, you will definitely need more Noise Reduction than this.

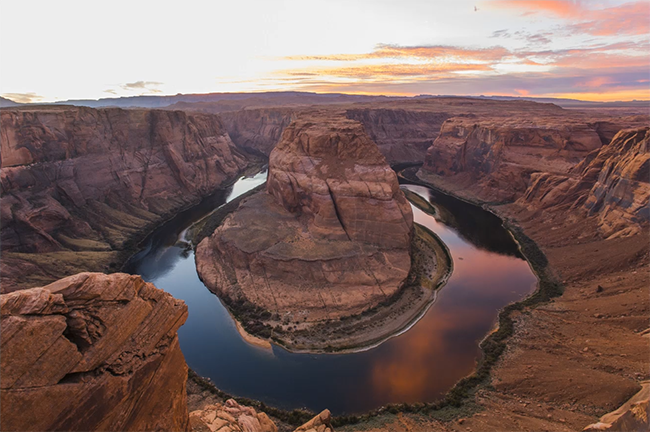
This is what the brightest exposure looks like after the adjustments are made.
Next, select the HDR processed version and check the noise reduction in that image to make sure we do not need any additional noise reduction. Everything is fine in our image, so we can move onto exporting our images to Adobe Photoshop.
Select both the HDR processed file and the Lightroom processed RAW file. Then, right-click on the images. select “Edit In” from the menu and then click on “Open as Layers in Photoshop” from the dropdown menu. In our next tutorial, we’ll blend these two images for the final result!

Conclusion & Learn More!
We hope you enjoyed this tutorial on how to RAW process in Lightroom 4 and export our images to Adobe Photoshop. Stay tuned for our next tutorial on how to process and blend these 2 images inside of Adobe Photoshop.
For more HDR education, be sure to check out our HDR Tutorial by SLR Lounge. This comprehensive “gold standard” guide will give you a mastery of HDR photography, from the scene considerations to the actual shooting to the post production. Click here for more info.


Get Connected!