-
Term: Gobo
Description: A gobo is a physical template or device that is placed in front of a light source to control the shape or pattern of the light being cast. It can be made of various materials, such as metal, plastic, or glass, and is commonly used to create textured or patterned lighting effects on a subject or background. A gobo can also be used to prevent unwanted light from spilling onto a subject or a part of the scene. They are often employed to avoid lens flare or to control the directionality of light. The exact derivation or abbreviation is unclear. Some believe that it is a derivation of "go-between" or "go-before." Others believe it's an abbreviation of "graphical optical black-out" or "goes before optics."
Gobo
Modifying and controlling light can truly make you the master of your scene. Cinematographers and photographers have analyzed and shaped light to fit the tone, mood, and story of their scene for years. While we can do plenty with available light, we can further elevate our portraiture with creative off-camera flash. One of our favorite creative methods for adding light involves the use of GOBOs. In case you’re unfamiliar, GOBOs are “go-between-objects” placed between the subject and the light source. They are used heavily on Hollywood movie sets to create unique patterns or to simulate a source of light. Luckily, GOBO photography doesn’t require a Hollywood budget.
How to Use a GOBO
In Lighting 201, we show you just how simple it is to use inexpensive lights & modifiers to transform any scene. GOBOs are just one way to create drama and interest in addition to the existing light. How you choose to modify your light source will inevitably dictate the mood of the scene.
A go-between-object shields the light output depending on the object used. You can purchase various GOBOs online or make your own using styrofoam boards.Gobos are relatively easy to use and they open up new creative possibilities. Here’s a step-by-step guide to using them.
Step 1: Choose your gobo

GOBOs can be made from pretty much anything you can think of to place in between the light and your subject; you can purchase pre-designed GOBOs created specifically for your light source, such as these from MagMod, or you can create your own using everyday objects.
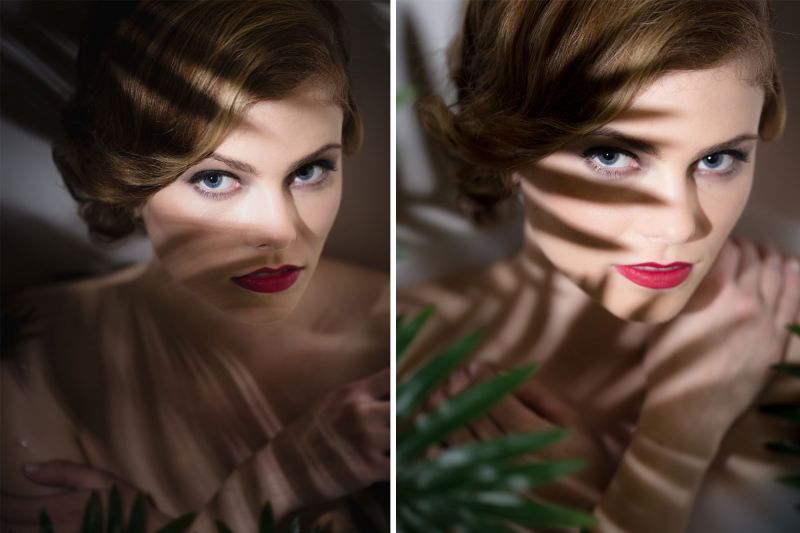
We chose to use palm leaves as a GOBO in the scene above because they mirrored the palm leaves we placed in the bathtub with the subject, and the shadows of the individual leaves served to direct the viewer’s focus to the subject’s face (see example below or in the Instagram post above).
Step 2: Find your angle(s) and pose your subject(s)

Getting the best angle when posing your subject is very important, especially when using a GOBO. Sometimes, you may not like an image because of how it’s cropped, even though there’s a strong image present within the frame. So, pay close attention to your angles.

Also, where and how you pose your subject should be consistent with the end goal for the photo you’re capturing. For this series of fine art boudoir images, we placed our subject’s hands and arms across her chest to tastefully cover her upper body, while her hands (like the GOBO shadows) also drew attention back to her face. Also, positioning her chin down and directing her eyes up to the camera accentuated her seductive expression.
Step #3: Position the Light Source
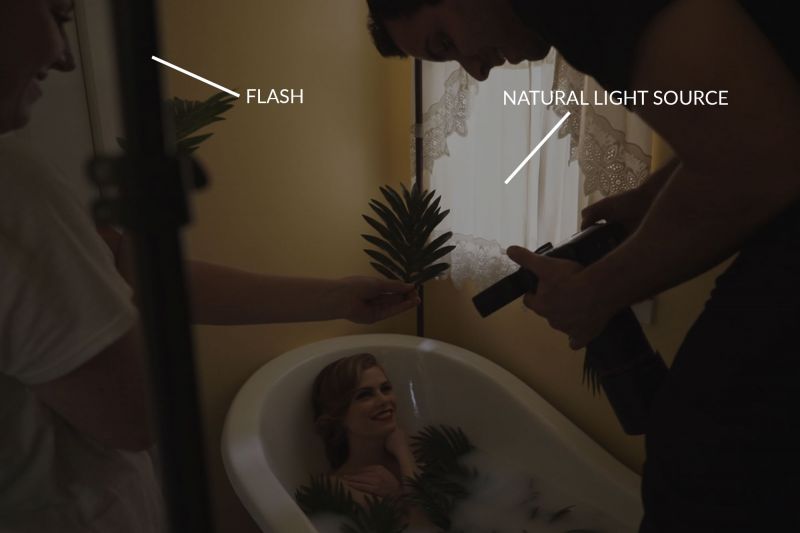
Setup your flash at the appropriate height and angle to adequately light your subject. For this shot, the bathtub was located directly beneath a window with a sheer curtain, which we used for a soft, diffused fill light.

We then placed a flash with a grid to focus the light direction and minimize light spill (see the image above), and directed the flash down toward the subject’s face from camera left.
Step 4: Position the Gobo
To help you find the perfect spot for the gobo, in the case that you are using a flash and not a modeling or constant light, use the flash test button (this button will vary depending on the camera you are using; for a Canon, the DOF preview button can be programmed as a flash test button). Using this button will fire a pulse, or a quick series of flashes, that will allow you to see how the shadows from the GOBO will fall across your subject’s face. You can then move the GOBO into the exact position you want it and take the picture. You can expect to take quite a few shots in order to capture the “perfect” image.
Note: Keep a good distance between the flash and the subject. Also, place the GOBO farther from the light source for hard, defined edges, or closer to the light source for softer edges.
To help you continue to develop your photography education, SLR Lounge Premium offers world-class workshops on topics like lighting your subjects with off-camera flash in Lighting 201, and so much more.
Related Articles to Gobo Definition
Creative Lighting Fundamentals With Colored Gels and Gobos
By learning the fundamentals, studio lighting can open up tons of creative opportunities. In this video, I’ll be going over…
No Nonsense Creative Lighting Tips for Photography with Manny Ortiz
In this latest video from our friend Manny Ortiz, he wastes no time giving us some quick tips for epic…
Use DIY Gobos to Create Interesting Shadows In Your Portraits
A gobo (or “go between”) is basically anything that goes between your light and your subject. It can be anything from a standard reflector to block direct light from hitting your subject to a prism to get creative effects in your images.


Get Connected!