
As photographers, we are creative beings. I’m a strong believer that it’s our creativity and artistic talents that separate each of us from one another. I’m admittedly a junkie for freelensing, using tilt-shift lenses, bokeh panoramas, as well as a number of other techniques to be as creative as possible with my photography.
Maybe it’s the artist in me, but just like a painter, my camera has always been my paint brush. Sure, a lot of these techniques can be replicated within a few clicks in Photoshop, but something is lost in this process and I’ve never been happy with the results when done in post production.
As a wedding and portrait photographer, one of my favorite ways to create the mood I want and add a little artistic touch is by using lens flare. An effect that has been around since the film days, lens flare is the result of non-image forming light entering the lens and hitting the sensor or film. For the most part, it’s always been thought of as an undesirable effect. It can lower the overall contrast by producing bright streaks of light and a washed out look. However, when done carefully, lens flare can be successfully employed to create stunning images that add that extra little touch of mystery and mood.

What is Lens Flare?
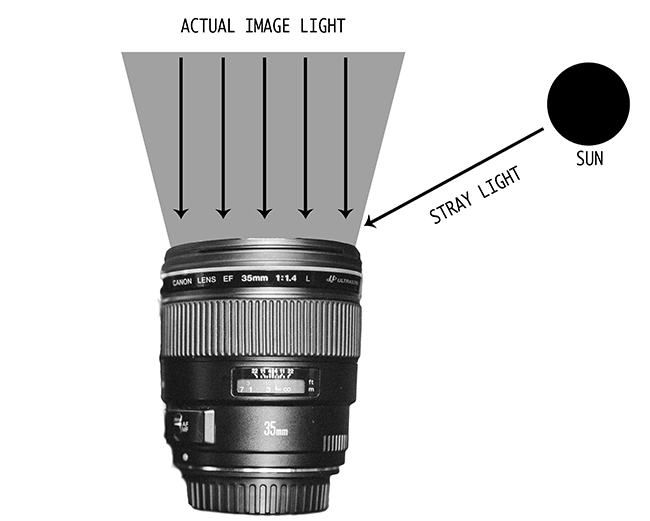
Lens flare isn’t anything new, it’s just that it has always gotten a bad rap. Understanding what it is and how it works will allow you to learn to use it to your creative advantage, or block it out to get crystal clear and sharp images. Lens flare is created when light sneaks into your lens, non-image forming light, and hits your sensor. Instead of traveling in the intended path that the lens is expecting, the light reflects internally on the lens elements and eventually makes it’s way to the sensor. This reflected light is the “lens flare”. It takes an intense light source to create this flare and it’s easily avoided, but on a bright sunny day you can get creative and really take advantage of it.
How to Reduce It
Due to it’s ability to wash out the contrast and sharpness, light leaking into your lens is easily avoided now a-days. The most popular way to block out any unwanted light is by using a lens hood. A good lens hood can nearly eliminate unwanted light from leaking in completely. A good lens hood will extend far enough out to block out any and all unwanted light without entering the image. When not using a lens hood, your hand or a piece of paper can be used on the side of the lens which is nearest to the flare-inducing light source.

How to Love it
Now that you know what it is, and how the best prevent it, let’s talk about how to add it to your repertoire of creative techniques. While the lens flare can have a very artistic and unique look, any unwanted light leaking into your image can negatively affect your image in one way or another. The trick is keeping those undesired side effects to a minimum while adding a slight touch of flare. With a little practice at carefully introducing that unwanted light, you can really get creative with it. Here are a few tricks to creatively adding a little lens flare to your images.

1. Shoot into the sun
Backlight your subject and let the light be as bright as possible in the frame. You can lock your focus and then recompose giving the light different angles to hit the lens.
2. Partially block the sun
This can cause the light to take different paths on it’s way to the sensor, giving different looks to the lens flare.
3. Change your aperture
Due to the different shapes and sizes to the elements that make your lenses, shooting at different apertures can change the size and shape of the actual lens flare. Shooting wide open will give you a larger round shaped flare, while stopping it down will give you different shapes and sizes.
4. Take multiple shots
Lens flare will look different with each shot, so experiment. Take multiple shots to give you a variety of looks. Shoot until you get the effect you want, you’re the artist.


As always, thanks for reading!
Jay Cassario
Natural Light Portraiture
If you are interested in becoming a master at natural light portraits, (photographing couples) …then you should check out our Natural Light Portraits for Couples DVD Workshop! This comprehensive video workshop collection will help you master everything about photographing people in a simple, natural light setting… Click here to visit the SLR Loune Store and get more info.
The SLR Lounge Preset System
The SLR Lounge Preset System is designed to enable users to achieve virtually any look and effect within 3-5 simple clicks. From basic color correction, vintage fades, black & white effects, tilt-shift effects, faux HDR, retouching, detail enhancing, and so much more. The sky is the limit with what has been dubbed the most powerful and intuitive preset system available. Click the link above to learn more/purchase! The SLR Lounge Preset System is now available for both Lightroom 5 and Adobe Camera Raw! (Bridge CS6)


Get Connected!