
The following is an excerpt from the SLR Lounge Lightroom Workflow System Workshop on DVD, a system designed to increase your post production speed by 5 to 10 times. Click here to view more details.
Introduction
In a previous tutorial, we created a Standard Color Preset to create a “soft portrait” look for our portraits. This preset made the portrait more flattering overall because it softened up the highlights in our portraits and also reduced the appearances of blemishes on the skin. We highly recommend that you go through the Standard Color Preset tutorial before going on to this tutorial because we will be applying almost the same exact settings from the Standard Color Preset to the Standard Black and White Preset. In this tutorial, we will demonstrate how to create and save the Standard Black and White Preset in Lightroom 4.This preset will give our portraits that “soft portrait” look again, but our portraits will be in black and white instead of color.
Watch the Video
Creating the Standard Black and White Preset
In the Standard Color Preset tutorial, we recommended that whenever you are creating a new preset, you should base the new preset off of the Standard Import Preset or a preset that will get you closest to the look you are trying to achieve with the new preset. Therefore, we would choose the “Standard Color Preset” to create our Standard Black and White Preset because we are still trying to achieve the “soft portrait” look, but have it be in black and white instead of color. To select the Standard Color Preset, go to the Presets Panel (or hit “Ctrl + Shift + 1” to expand the panel) in the Develop Module (hit “D”) on the left of Lightroom and click on “Standard Color” from our “Soft Portrait” category. As you can see below, we have selected the Standard Color Preset.

After you have selected the Standard Color Preset, simply hit “V” to convert our portrait from color to black and white.

With black and white images, we typically need a little more contrast in them so we are going to boost up the Contrast to +25 in our portrait. Go to the Basic Panel (or hit “Ctrl + 1” to expand the panel) in the Develop Module (hit “D”) on the right of Lightroom to adjust the settings for Contrast.
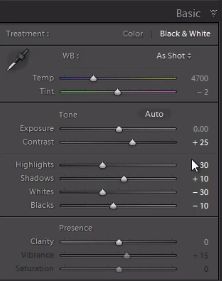
Since we are only changing the toning of the image, we are going to leave all other settings as is because these settings have already been dialed in from the Standard Color Preset to create that “soft portrait” look. As you can see in our image below, we have boosted up the Contrast a bit, giving our image a punchier look.
Saving the Standard Black and White Preset
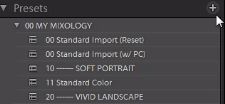
Now that we have adjusted the settings for our Standard Black and White Preset, we need to save the preset by clicking on the “+” sign next to the Presets Panel.
A dialogue box will appear, like the one below. We are going to name the Standard Black and White Preset “12 Standard B&W.” Next, hit “Check All” at the bottom left of the New Develop Preset Dialogue Box. Then, deselect “Lens Correction,” “Lens Profile Corrections,” “Transform,” and “Chromatic Aberration” because these settings are already built into the Standard Import Preset. Then hit “Create” at the bottom right of the New Develop Preset Dialogue Box.

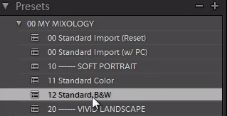
Once you hit “Create,” your Standard Black and White Preset should appear below “11 Standard Color” under the “Soft Portrait” category as “12 Standard B&W.”
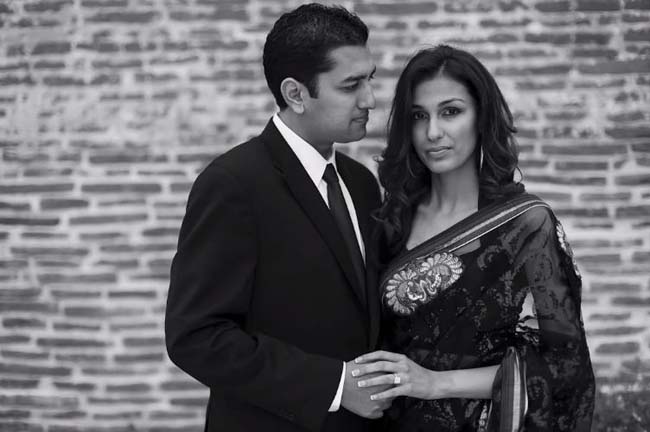
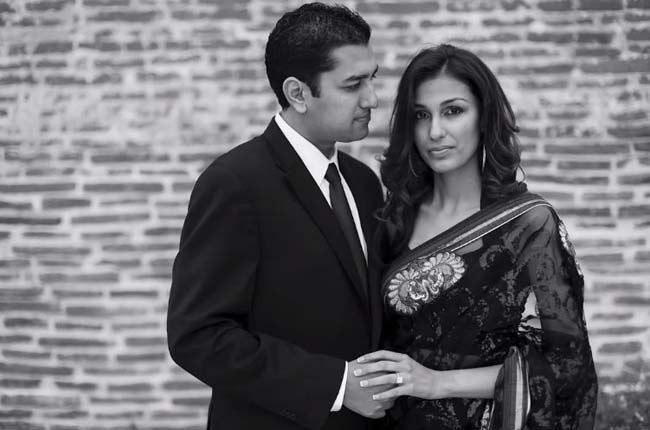
After you have applied the Standard Black and White Preset to your image, make any adjustments as necessary. In our example, we will bring up the exposure in our image to +0.20.

This is our final image with the Standard Black and White Preset applied to it as well as an adjustment to the exposure.
Comparing the Standard Black and White Preset and the Lightroom 4 Black and White Conversion
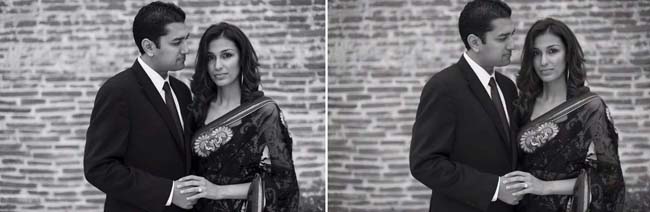
As mentioned before, to convert an image to black and white, you can simply hit “V.” However, we highly recommend that you use the Standard Black and White Preset that we just created instead of relying on Lightroom 4’s Black and White Conversion of your image. Below, the image on the left has the Standard Black and White Preset applied to it. The image on the right is what your image would look like if you only hit “V.” As you can see, the image on the left with the Standard Black and White Preset looks much better than the image on the right. Therefore, whenever you are creating black and white images, do not just rely on Lightroom 4’s Black and White Conversion. Always use the Standard Black and White Preset and then make any adjustments as necessary.
Conclusion & Learn More!
We hope you have enjoyed this tutorial on creating a Standard Black and White Preset to create the “soft portrait” look for our portraits. Remember to always use this preset rather than relying on the Lightroom 4 Black and White Conversion because the preset will give you much better results. After you have applied the Standard Black and White Preset to your portrait, make any adjustments needed. Stay tuned for our next tutorial on how to create a Standard Color Preset for landscape images.
To learn more about the SLR Lounge Workflow System Workshop on DVD or to purchase it, click on this link.
To purchase the Lightroom 4 Workshop Collection which includes A-Z Tutorials, the Preset System, and Workflow DVD, click here.


Get Connected!