
Beginner Astrophotography: How To Create Portraits Under The Stars – Part 2 Compositing
We’re continuing our three-part series on how to create awesome portraits at night, under the stars!
In part one of this series, we talked about how to create a single exposure that has a starry sky and yet still delivers sharp portraits. To check out the part one video, click HERE.
Unfortunately, sometimes we need to create two exposures and merge them in post-production. This is especially true if you want to create images that don’t just capture a few stars at dusk, but actually get the whole Milky Way in view!
Nikon D800e, Rokinon 14mm f/2.8, FotoPro C5C Tripod
(Two) Nikon SB80DX, Radiopopper JRX triggers
To be honest, I think it’s sort of annoying when photographers complain “it’s all been done before.” In a sense, sure it has, but you can always find new ways to shoot the same thing, or find new things to add to the same job, etc.
Few types of photography prove this more than astro-landscape and portrait photography. 5-10 years ago, certain images were simply impossible to accomplish, or at least extremely time-consuming and intensive both to capture and to edit.
Now, with just a few simple tricks and a minimal amount of gear, we can create stunning portraits in almost any lighting conditions. Alright, let’s get to the video!
Watch ‘How To Create Portraits Under The Stars – Part 2 Compositing’
Original Images
 Nikon D800e, Rokinon 14mm f/2.8, FotoPro C5C Tripod,
2 sec @ f/3.5 & ISO 800, one flash on the right at ~1/32 power,
one flash hidden behind at ~1/32 power
 Nikon D800e, Rokinon 14mm f/2.8, FotoPro C5C Tripod,
30 sec @ f/3.5 & ISO 800, no flash
In these two images, we accomplish our two separate objectives. One image delivers a proper exposure of the couple, at a shutter speed that doesn’t allow any ambient light to blur their faces, while the other image delivers a proper exposure for the stars / sky, even though the highlights are blown out and the couple’s face is blurry.
At this point, it is a simple task of post-producing the two images so that they match overall as much as possible, and then layering them together in Photoshop.
If you don’t process the images similarly enough, when you layer them in Photoshop the results will look totally fake. What I do is I completely disregard noise and blur and blown highlights, and process the two images to look like this:
Processed Images, Separate


Once the images look like this, layering and masking them in Photoshop becomes much easier, while delivering more realistic results, too!
If you don’t believe me, here’s a screenshot of how simple the final layer mask was:
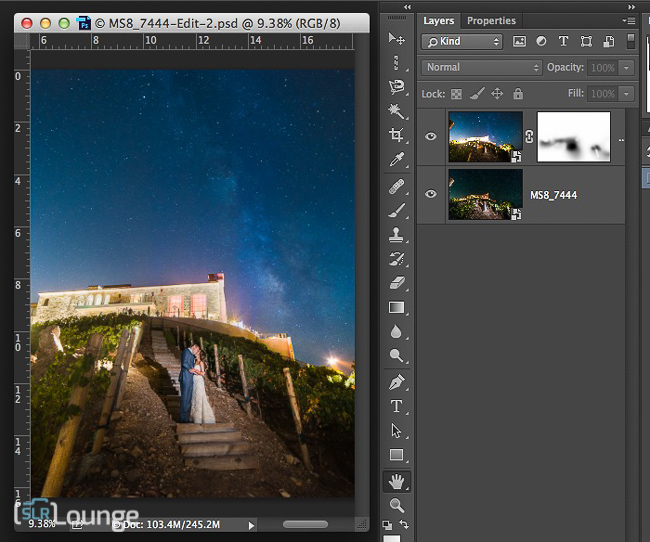
This goes a long way towards making your job easier. Any time you have to mask something with pin-point accuracy, you’ll turn a job that should have looked perfect in five minutes into a job that still doesn’t look right after twenty minutes.
Things To Remember
Shutter Speed
Your choice of shutter speed depends entirely on the ambient light. If you’re shooting in pitch-darkness on a moonless night, for example, you could just create a single 30 second exposure, and manually pop your flash at your leisure to create an exposure for your subjects. As long as their heads / bodies are framed against a dark background, and not the sky, they’ll appear perfectly illuminated without any ghost shadows or blur.
Ambient Light
Oppositely, if you have any ambient light whatsoever, which is the case 99% of the time in my experience, you’re going to have to play it much safer with your shutter speeds. Depending on how dark it is, I wouldn’t use a shutter speed much longer than 1-2 seconds.
Why Not Video Light?
Or, if you’re really brave and want to use a video light / flashlight to illuminate your subjects, you’re going to be extremely restricted with shutter speeds. You’ll want to aim for 1/30 sec. or 1/60 sec, even with a tripod. Or if your posing allows your subjects to hold very still, (if they’re embracing each other), then you might be able to get away with a 1/4 or 1/8 sec shutter speed. This is why I prefer to use flash for these types of images- as long as the ambient light isn’t a problem, you have much more flexibility with your shutter speed.
 Just a little bit more work in Lightroom, and…
Voila! An image that is possible with literally any modern digital camera.
In our next and final video, we’ll wrap things up with a few tips on how to overcome some of the challenges of shooting in this type of environment, such as how to nail focus, and how to avoid motion blur in your subjects, or how to remove it in post-production if necessary. Stay tuned!
Happy clicking,
=Matt=


Get Connected!