
Through trial and error I have learned a lot in my five years of capturing drone imagery. So, whenever I am asked for tips, there are usually three things that come to mind. I believe that following these tips will help any drone pilot take their drone photography and cinematography to the next level. I will say up front that I primarily fly with DJI drones, but the general ideas and concepts can be applied to other drone models as well.
1. Plan Ahead by Scouting Your Locations
Many times drone pilots will just show up at a location and not realize that being prepared is how many of your favorite photographers get their epic images. One of my favorite tips I like to give drone pilots is to use the amazing resources of the internet to first scout a location you want to fly at. You can use the search feature inside a photo app like Instagram to see what imagery has been captured there previously and you can use apps like Google Earth to find easy to navigate satellite imagery that delivers a bird’s eye view. This can help you not only determine what might be worth capturing before you get there but also where you might be able to take off and land your drone, as well as what obstacles you need to be mindful of (and even where to park your car, as in this example here).


Another way to be prepared for your location is to check the weather in the area to make sure you are flying in the best possible conditions. One of my favorite apps is UAV Forecast, which gives you a clear breakdown of local wind speeds, the chance of rain, cloud cover, visibility, and local temperature. The sunrise and sunset feature—along with the hourly forecast feature—can help you determine the best time to shoot since light and weather can make or break an image.
2. You Need a Subject

I’ve been featuring incredible imagery from the #fromwhereidrone Instagram hashtag on @fromwhereidrone for over four years now and I can say that I have sifted through hundreds of thousands of images. One of the main things that I find that can make or break an image is there not being an interesting and recognizable subject. Having a great subject is one of the main keys to capturing great aerial imagery.

This is important for several reasons, the first being that a great subject clearly gives the viewer something to focus on. Next, it provides the viewer with an important sense of scale. Once the drone goes up a few hundred feet, the earth quickly compresses and things can become quite abstract. Finally, a subject allows you to tell a story. For example, if you have a lone boat surrounded by nothing but water, it can convey feelings of isolation, which might make the boat feel like it is lost out at sea with nothing around. In reality, it could be surrounded by the hustle and bustle of a busy harbor, but you can’t tell because all of how the image is cropped.
3. Take Advantage of the Advanced Shooting Modes
Here’s a quick look at two advanced shooting modes you should incorporate into your drone photography and videography:
A. Photography: Auto Exposure Bracketing (AEB)
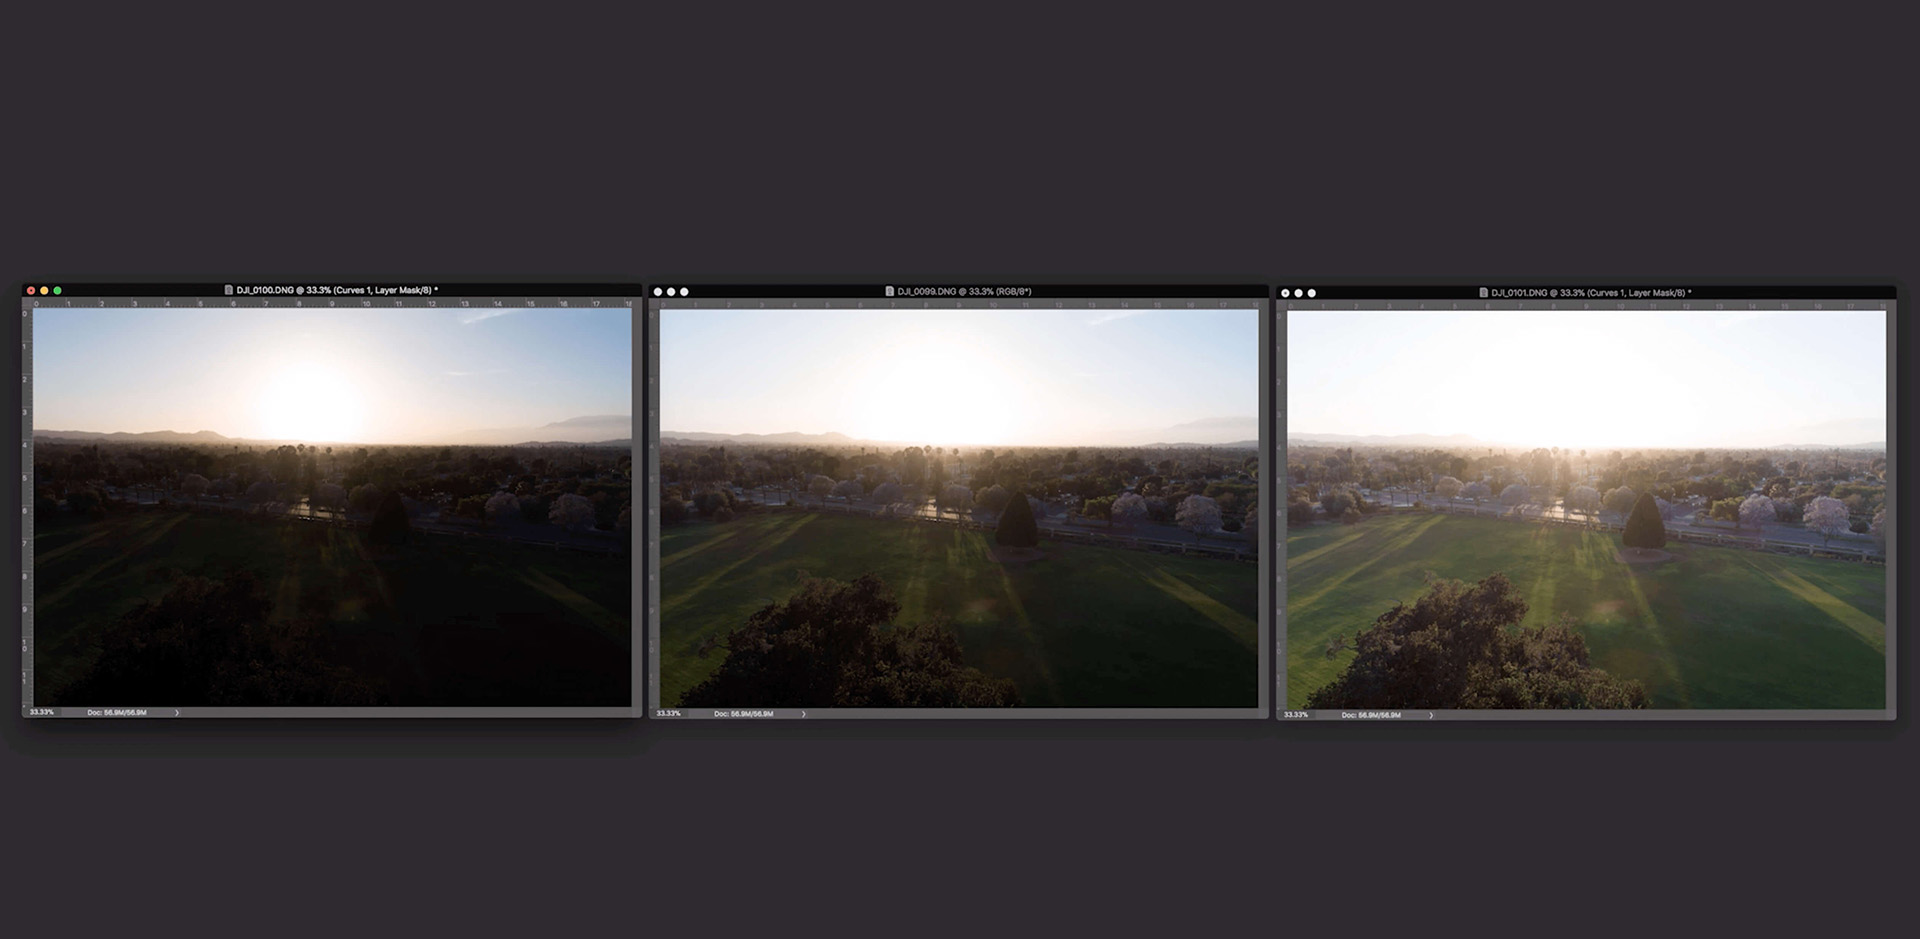
I like to capture my photos in the RAW format using Auto Exposure Bracketing (AEB), which means that you can take multiple photos (I usually pick three) with different exposures, back-to-back. Then, in post, you can combine them together to get a much more dynamic image and latitude in your edit.

For example, if you find that you have images where your subjects are exposed correctly but your sky is blown out, then you could fix this issue by shooting in AEB mode because the camera will take a shot that exposes for just the highlights, such as the blue sky. Once you get back to your computer, you can use a program like Adobe Lightroom or Adobe Photoshop to merge all the photos together, which creates a nice HDR image.
B. Video: Picture Profile

If you fly a DJI drone or something comparable, then chances are the default video recording picture color profile is set to “Normal,” which is fine for most shooting (that is just for fun). But once you feel it is time to take your aerial video work to the next level and make it more cinematic, then you are going to want to use a picture profile you can really edit and enhance, such as “D-Cinelike” (the one I use) or “D-Log.” Basically, these profiles are a way for your to capture a flatter image because it desaturates the image and lowers the contrast while giving it more details in the highlights and the shadows. This helps prevent the image from losing details due to areas containing sections that are completely white and blown out or black and crushed. Each of these settings can then be perfectly tuned in a post-editing program like Adobe Premiere or Apple Final Cut Pro X.
Bonus – Editor’s Tips for Drone Photography and Video
To help you take your drone video coverage to the next level, we offer five simple tips.
These tips apply to any class of drone videographer, whether you fly a DJI Spark or a DJI M600. Gear does not determine creativity.
Use ND Filters with Your Drone Videography
One of the sure signs of an amateur drone video is the lack of a neutral density filter. If you’ve never heard of ND filters, they are basically glass filters that block light from entering your sensor. Think of them as sunglasses for your lens. NDs are critical for video because they help cut down exposure without having to crank up the shutter speed. Faster shutter speeds can make your videos jittery. That, coupled with the smaller sensor size found on most drones, is a sure way to make your video look jarring.
Pro Tip: If you’re using DJI’s filter for the Mavic Pro, make sure to insert the filter after you power on the drone. Gently press the filter in against the lens. Otherwise, the filter may jam against the head of the drone when calibrating.
Using Foreground Elements For Your Drone videography
Foreground elements help create interesting composition and layers in both photo and video. The same rules apply when shooting on the ground and when flying in the air. If your shot is not visually interesting in camera, color grading, slow-motion and other tricks won’t magically make your shot any better. When possible, utilize some foreground elements to enhance the production value of your shot.
Pro Tip: Using trees or a building to reveal your scene is a great way to bring the viewer into your scene.
Move and Pan the Camera With Control
For slower, more establishing shots, employing a technique known as counter movement can be highly effective. This involves moving the drone in one direction while panning the camera in the opposite direction. The result is a shot that creates a sense of calmness and stability, allowing the viewer to fully take in and appreciate the scene.
The counter movement technique is particularly useful when you want to establish a location or set the stage for the unfolding narrative with your drone videography. By moving the drone forward or backward, you can smoothly navigate through the environment, revealing the various elements within the frame. Simultaneously, panning the camera in the opposite direction adds a layer of visual interest and depth to the shot.
Pro Tip: Adjust the gimbal speed to your liking and get a smoother shot.
Reveal the Scene by Panning & Tilting
For fast camera movements that capture wide scenes, implementing the technique of panning and tilting is essential. Panning the camera from left to right allows you to showcase the expansive nature of the environment you’re filming. It creates a sense of scale and immerses the viewer in the grandeur of the surroundings. As the camera smoothly pans, it sweeps across the landscape, revealing the intricate details and capturing the breadth of the scene in all its glory.
On the other hand, tilting the camera adds a different dimension to your footage. It allows you to lead the viewer’s eye into the scene by angling the camera up or down. By tilting upwards, you can capture soaring structures, towering mountains, or majestic skyscrapers, evoking a sense of awe and wonder. Conversely, tilting downwards can draw attention to interesting elements on the ground, such as winding roads, picturesque landscapes, or vibrant city streets bustling with life. This downward tilt can create a unique perspective and invite the viewer to explore the scene further.
Combining both panning and tilting in your drone videography enables you to create dynamic shots that engage the audience and evoke a sense of movement and depth.
Pro Tip: By starting your flight path closer to the ground, you are also utilizing more of your foreground space which will exaggerate camera movement. Just be careful with how close you are to the ground.
Keep Filming On The Flight Back
Keep filming footage on the flight back to get more out of your flights. After you take off, fly from point A to point B and nail your perfect shot, but keep rolling for a backup shot and for creative purposes. It isn’t enough to just record throughout; you’ve got to make sure to fly back just as smooth as your initial shot. You can always reverse the shot too!
Choose the Best Time of Day
Every tool has limitations and knowing what your gear can and cannot do allows you to overcome its shortcomings. Drone technology is still maturing and the cameras on these devices typically don’t have the same robust dynamic range of their more advanced DSLR and mirrorless counterparts. This means the most favorable lighting for your drone is probably at sunrise or sunset.
Use an ND Filter
ND Filters are an absolute necessity for outdoor video of every kind, not just drone footage. As the video says, they cut down on the light that makes it to your camera’s sensor, allowing you to use wider apertures and slower shutter speeds. Without them you would not be able to match the settings that create a cinematic look in your videos.
Use Slow Movements
Much of movie magic is created by the subtlety of camera movements and, if you want to immerse your viewers into what you’re showing them, slow camera movements are a tried and true method of doing so. This will allow your viewers to soak in the scenery and add a sense of gravity to your story.
Understand Color Match & Color Grading
As a rule of thumb, maintaining a consistent look throughout a sequence of shots is the ideal creative choice. This is achieved by color matching and color grading each portion of footage to look the same. If you are using footage from more than one camera, the footage from each needs to look the same in your final edit. Furthermore, adding a unique and stylized feel to your shots with a specific color grade needs to be applied consistently to maintain continuity between the shots.
Tools to accomplish this are:
Waveform – this tool helps you obtain the proper exposure.
Vector Scope – this tool helps you adjust the color of your footage.
#5 – Zoom
Adding a digital zoom is a creative method of adding some flare or drama to your footage and is another means of pulling your viewers into your story. Manipulating the perspective of your viewer in ways that the human eye can’t add a great visual effect to you story
#6 – Cinema Crop Bars
The black bars at the top and bottom of the screen are a hallmark of the cinematic experience. You can add them by overlaying a simple PNG file onto your footage or change the settings in your software to add a crop, leaving the top and bottom of your footage black.
Conclusion
By implementing these five drone videography tips, you can significantly enhance the quality and impact of your aerial footage. The use of ND filters ensures proper exposure and balanced lighting, resulting in more professional-looking shots. Incorporating foreground elements adds depth and visual interest, creating a captivating composition. Mastering camera movement and control allows you to smoothly pan and tilt, adding cinematic dynamism to your videos. Additionally, utilizing these techniques to reveal the scene gradually can create a sense of anticipation and intrigue for the viewers. Lastly, don’t forget to keep filming on the flight back, as unexpected and remarkable shots can often be captured during the return journey. So, armed with these tips and a sense of creativity, you are now equipped to capture stunning drone footage that will impress and engage your audience. Remember to fly responsibly and keep up with the latest regulations for legal drone usage.


Get Connected!