In this video, you’re going to level up your photography with five of my favorite compositional techniques. Let’s dive straight in.
Video: 5 Compositional Techniques to Level Up Your Photography Game
We’ve teamed up with Adorama to bring you a series of photography tutorials called “Master Your Craft” to be featured on their YouTube Channel. Subscribe to see more of our videos on their channel that cover photography, lighting, posing, and editing education to help you hone your skills and master your craft. To watch the entire series, check out our playlist!
Tip 1: Frame Your Backlit Subjects Over the Shadows

The first compositional technique that I want to discuss is framing your subjects over the shadows, particularly in a backlit scene. Take a look at the image above of my friend, David Suh. You will probably recognize this shot from the behind the scenes video that we included in our post for posing techniques for men. I want you to pay attention to how this entire scene is backlit, yet David’s head is tilted to the left, just over this darker fountain object. Half of David’s head is positioned in front of a dark object while the other half is in front of the brighter sky.

Often, when we have our subjects backlit, we wonder (or at least I wondered when I was starting out) why our backlights are not showing up. It’s because the backgrounds are often too bright. If we actually zoom in on David’s head, you can see how the hair light stands out on one side versus the other, which sort of blends in with the sky.

Let me share another example. In the image above, my couple is naturally lit by the sun, and my position makes all the difference in the outcome of this image. As you can see, I’m shooting at a higher position compared to my couple. This allows me to frame them below the horizon line, within this darker area of the background. Because of that, you get this beautiful kiss of light, and I do say kiss because it is so soft and subtle.
Tip 2: Use Perspective

Using perspective is one of my favorite compositional techniques because it’s a very simple and easy way of taking something very ordinary and turning it into something quite extraordinary. In fact, case in point, it looks like I captured this photo of Shivani in some sort of fancy studio, but as you can see in the BTS shot, we are literally in the back of our studio parking lot in a warehouse area. The difference between a great shot and a boring shot here is simply me getting down on the ground and shooting up towards Shivani.
I used a 16-35mm wide angle lens set to 16mm on a Sony a7R IV, but any wide-angle camera and lens combo would work. You’ll find that on my TikTok account (@bornuncreative), I actually use this technique a lot with just my phone. You have wide-angle lenses on your phones and you can do the exact same thing. Just get down low and have your subject interact with the camera.
In this photo, Shivani is sort of dancing around, bringing her hands into the camera. I’m focusing on her eyes and letting the hands kind of go out of focus with an aperture of f/5. Perspective is the only thing that makes this shot interesting.

Looking at a before and after of David’s shot from the posing tutorial, I can see that what makes this image unique (besides switching up the pose) is that we’ve shifted the camera angle down low, and this allows David to tower over the frame, creating a stronger presence in our subject-to-camera interaction. Perspective is a wonderful tool, and it’s so powerful a tool that many photographers specialize just in this one compositional technique.
Tip 3: Don’t Be Afraid of Negative Space
I don’t actually have behind-the-scenes footage for this shoot, so let me start with a shot of my friend, Buddy, whom I met while photographing strangers. I actually just met him before I captured this photo. He’s a street performer in Pasadena, and I asked if I could take his portrait. He agreed, and I photographed him against a white wall.
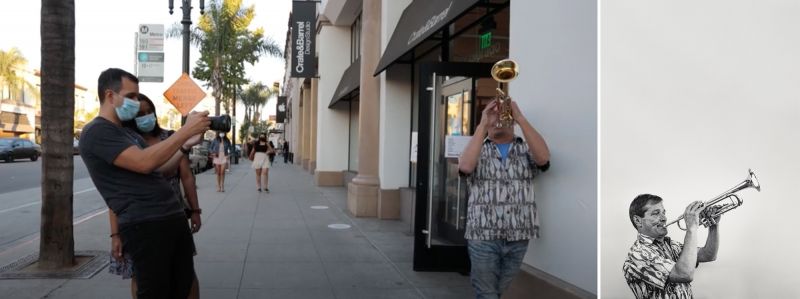
You can see the original shot in the image above. I simply framed him against that white space on the wall because I knew that once I edited the image, I could actually just go into Photoshop and extend the wall up and create a unique negative space around Buddy. What I love about negative space is that it’s the empty space around the frame that draws our eyes to the subject. It’s a very powerful compositional technique when it comes to advertising and other media you might use for website design and so on, because you have so much room for copy on top of the image. I think that images that use negative space look absolutely awesome in print as well.

I grew up in Utah, and Utah has the Great Salt Lake. Attached to it is the Bonneville Salt Flat. Again, I don’t have behind-the-scenes images from the shoot, but in this unique landscape, you can find puddles of saltwater that are fairly large in diameter but only one to two inches deep. People can stand in them, and they essentially look like they’re floating on water. The thing is, most of us don’t have access to the Bonneville Salt Flats. So, I want you to see what negative space looks like in a very simple scene, and I want you to keep in mind that pretty much any puddle can look like this if you bring the camera down to the ground. Once again, if you add perspective to this concept of negative space, you can really do a lot with it to draw your viewer’s attention right into your subject.
Tip 4: Find & Use Natural Framing

Natural framing requires looking into your background for an element or a shape that you can use to naturally frame your subject. In the image above (from Lighting 4), I photographed Kylie using a small light. What interested me about this particular shot and angle was the way that the light came in from the window in the back. The window served as a natural framing element for Kylie’s face, so I framed her right in front of it. This position also gave me light on each side of Kylie’s face and balanced the frame. I also kicked a little bit of light right into her face from an off-camera flash, but it’s that central window frame that really draws us in and holds our gaze.

In the editorial doctor’s portrait above, I did something very similar. I shot this completely by myself (see my separate article on what it’s like to shoot in a post-COVID era by yourself), and I’m doing the exact same thing with this window in the background.

When you look at the three images above, you can see that I left the blinds semi-open because I loved how the light right behind the doctor held my attention right on him. We can use that same sort of framing element in many different ways. I’ve just shown you two examples of using a window to frame your subject, but you can find framing elements in every background. This is one of those instances in which I would really encourage you to take your time. When you frame your subjects, incorporate the background into that framing.
Tip 5: Take Advantage of Leading Lines

Let’s talk about the image above. The use of leading lines here is subtle. This shot comes from our Lighting 3 workshop, and I set up a backlight using two flashes, placing the flashes right behind the subjects to highlight them. I actually did a double exposure for this shot, so I first photographed the inside of a parking lot, using the lamps that go down into the frame. Next, I found a black background to use for photographing the couple and I backlit my subjects. Then, in-camera (for some cameras), you can select “double expose” and choose the two frames you want to blend. You’re looking at an in-camera double exposure, but the leading line is less obvious here than in other examples.

Above, you can see a very simple shot I capture while hanging out with David Suh. It is another shot from when we photographed strangers in Santa Monica. We came across a group of young adults and I wanted to capture a shot with a bunch of lines, sort of leading into the subject’s beautiful expression. She’s looking out and I’m using the rails to lead into her. That is one way to use leading lines, but I used them another way during this same shoot.

All we’re doing in the image above is getting down low. You can see how we have bars dropping straight across the frame while the lines are leading into them. These bars create a nice little framing element for our subject while the lines we see from bringing the camera down low and shooting on a wide-angle lens lead us directly into the person that we’re photographing.
Conclusion
We hope you enjoyed this article/video on using compositional techniques (including those found in Lighting 3 and Lighting 4) to level up your photography. Here’s a quick recap of the techniques we covered above:
- Frame Your Subject(s) over the Shadows
- Use Perspective
- Don’t Be Afraid of Negative Space
- Find and Use Natural Framing
- Take Advantage of Leading Lines
Be sure to catch our next episode of Mastering Your Craft on Adorama’s YouTube channel next week! If you want to catch up on all the episodes, make sure you check out our playlist!


Get Connected!