
Advertising is an illusion.
We see it, we know it’s out of visual (as well as an ideological) proportion, yet we still somehow believe it, or at least, we still consume it. The most intriguing part is that it still manages to slip past and no one seems to be paying that much attention or do anything in order to minimize the amount of exaggeration. There is a bit of talk in terms of glamour images where you can tell that the word ‘overdone’ seems more than applicable, but we continue to purchase the products and flip through the magazines.
On the other hand, advertising, specifically product campaigns, seem to be getting around that problem quite well. For example, let’s imagine a perfume ad. The company/ art director will provide a photographer with a brief that specifies how they want the product to be shot, even though we will never see it in the same way. It needs to be shot in a way that will make ‘you’ the consumer, want to buy it. It has to be visually appealing.
Product photography is not an easy process. In photographing products for advertisements, there is a lot of preparation, discussion, and organization that will go into making the actual image. In this article, I will try to show you the process of an advertising shoot from both points of view: photographer as well as the retoucher, since I do both. I will dive into the making of the images, break them down and show you how it is all being put together. I truly believe that all of you will find something interesting whether it is in terms of a cultural aspect or the more technical side.
Preparation
Audience. This is the main factor that you need to watch out for. So, before you even start thinking about shooting anything, you should consider: Who is your audience? Is it specifically male or female? What is the age group that you are aiming at? Where will it be displayed, in terms of countries? All countries have different cultures and it’s important that you take the right approach. It is very easy (especially nowadays) to offend someone. All these aspects should be brought up in the brief that you receive from your client.
Once you figure that out, you can start preparing your mood boards which will help you with the execution of your idea and choosing what equipment you are going to use (you may want to consider ‘renting’ if you don’t own something yourself). You may also want to consider location scouting in case you are shooting on location, otherwise you just need a big enough studio space for whatever you are shooting. If you are shooting a big campaign, it may be worth hiring a digital tech who will take care of all the digital equipment (just to take some of the pressure off of yourself).
Since I’m specifically talking about product advertising and not fashion or beauty, I will skip the makeup artists, hairdressers as well as models and wardrobe stylists, so bear in mind that there is a huge difference if you do shoot fashion. You will need totally different set of people in order to finish your job.
[REWIND: SIMPLE LIGHTING FOR BEAUTIFUL PRODUCT PHOTOGRAPHY – GETTING THE “CLINIQUE LOOK”]
Let’s move on and let me show you what happens behind the scenes of a product shoot as well as the post production!
For product photography, the studio that you will be working in will vary a lot and that goes along with the equipment that you will be using. A typical product studio should have plenty of various sizes of white and black cards. This is to reflect or subtract the light from your product. You will also need plenty of smaller random items such as blue tack, pins, nails, rubber bands…pretty much anything that you think may help you in any sort of way.
Equipment also leads to budget and that is a key factor in most cases. Budget will set limits, especially when traveling is required. Renting equipment, booking tickets, insuring your equipment and most important, paying your entire crew, all this can add up to thousands!
Shooting
The final image that gets used for an ad is not just created in Photoshop. Yes, post production does have a lot to offer and will definitely be a huge part of the process, but you need a good foundation to work on. If you don’t have a good image to work on, it will be almost impossible to do anything with it. But what does it mean to have a good image?
Do you place your lights in some sort of magical way and just take a snap? No…Maybe in a perfect world, but not in our industry. 99% of images that we see have been put together from several different images; they have been layered and merged to make this masterpiece that is actually worth showing to the public.
So what is layering? It’s simple, you fix your camera in one place so it’s stable and you are sure that it won’t move. Then, you place your product and same thing applies right here, you cannot move it. Last part is the placement of your lighting. What you want to do is shoot several different pieces in several takes (e.g. bottle, labels and the environment). Then in post production, you will select these pieces and put them together to create your final image. But let me show you what I mean:
Shooting the Bottle

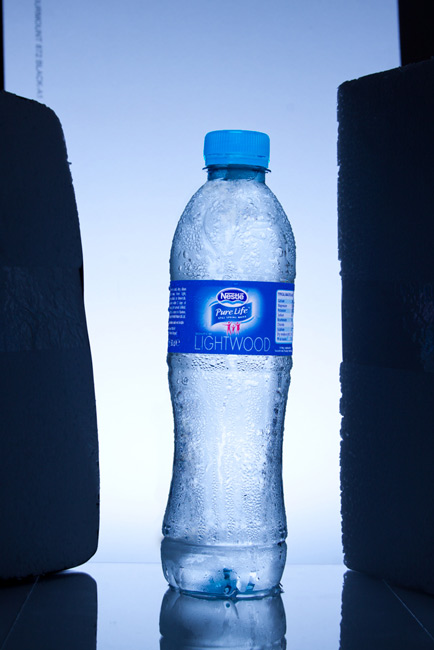
This set up was fairly easy. I placed the bottle on a glass table along with 2 polystyrene pieces on each side. The 2 polystyrene pieces takes away the light from the bottle so that we can get some shape/definition in there. In the back, there is a large white card with a single strip softbox (horizontal) illuminating it. This has pushed the light through the bottle rather than going onto it. You never want to point a direct light source at the product, as it will overpower and create an uneven highlight. It is a lot easier when you place your light away and bounce it back into it or you may want to diffuse the light with several layers.
By moving the polystyrene pieces closer or further way from the bottle, you will create deeper edges, so make sure you play around with that too. If you look at the lighting diagram, you can see what lens we used, as well as the f stop. This is also important. All this is done in a very blacked out studio. If you have any windows, cover them up, just in case. You want to have a full control over your setup. In the next part, I will be photographing the labels since they are totally black right now.

Labels

Here you can see the label has been lit. All I did here is place a beauty dish in front of the bottle. After I got the shot, I took it into Photoshop and cut out the labels, and pasted them back onto the previous (backlight) shot.
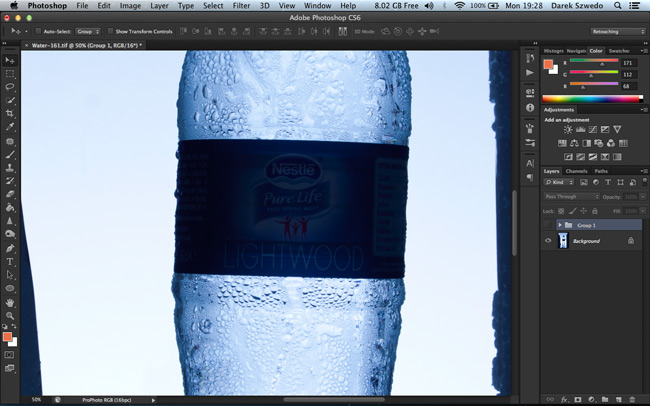
This is the original close up of the backlit photo. As you can see, there are some visible details in the labels, but nowhere near clear enough to be used in the ad. For that reason, I shoot the label separately. Now, you may wonder why not place both of the lights up (backlight and label light) at the same time and just take one photo?
Unfortunately, it doesn’t work like that…I would have had to place a softbox or a beauty dish in front of the bottle which would pick up plenty of unwanted highlights, a massive light reflection on the bottle itself and a hot spot on the label. That would simply create more problems. So it’s a lot easier and more efficient to shoot pieces separately.

Here, you can see another close-up of the label, but this time it has been put in place. I simply covered the blacked out label with a new, nicely lit label. You may think that it doesn’t look the best, but that is because I still need to go through color correction. Also, in order to go through this step, make sure that the camera is as stable as possible so that the label will fit perfectly in place. You can try using the warp tool to readjust small bits, but you really want to avoid any big corrections.
So far, I’ve shot the bottle by placing one light and bouncing it off the background. This gave me the ‘backlit’ shot. I then shot both label and a cap with a beauty dish and then finally I extracted these pieces and put them together into one file. The next set of steps will be a lot more Photoshop-orientated so it’s good to have at least the basic understanding of some post production.
Before I dive into the Photoshop, I just want to say that I usually use either Lightroom or CaptureOne and shoot tethered. This is very important. It allows me to check focus (which must be kept throughout the shoot) and see the composition on a bigger screen which is even more significant, especially when you are compositing images. As mentioned before, if any of the shots are moved, it maybe worth starting over rather than try to fix things in post.
Photoshop
Start off with a new, blank file that will serve as a new backdrop. Simply create a new document and use the gradient tool to create a background for the composite Then I just darken the corners a bit more with some dodging and burning, and that’s it.
In terms of file size, this will depend on you and you what size you want to go for. I have simply chosen the size of the camera sensor that we have used and just rotated the canvas vertically.

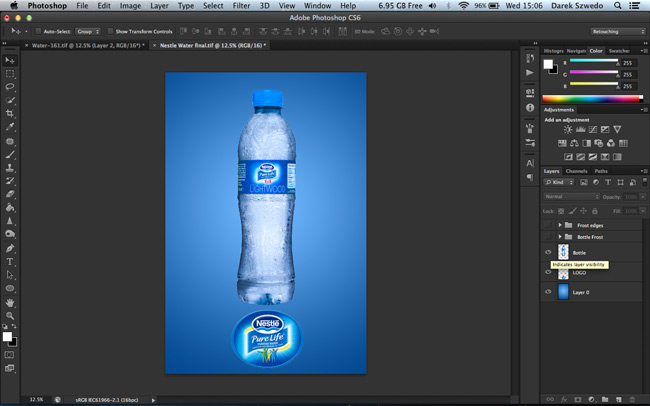
Next, I have placed the bottle cutout as well as the logo of the company onto the background. (For the sake of this tutorial, I did not retouch out the nutrition information simply because I am not allowed to repost the entire image). You may need to even out your product if it’s looking a bit wonky. You can also go through color correction at this stage. All that I did was apply some more blues in the shadows and slightly desaturate the whole bottle, so not much was done here.
The last step consists of the visual effects that will be bringing everything together. For that, I used a frosty brush preset, which brings the entire layout together:

Conclusion
That’s is it. This was a simple example of an advertising shot and how was put together. The most important part of the whole process is planning! You need to be able to envision what the final shot will look like, when and how to photograph every piece and then be able to bring them all together in post. If you are shooting in your own studio, it may be worth doing a quick composite before you start packing up, just to make sure that you have everything you need. There is nothing worse than needing an additional puzzle piece and you have already packed up and left.
In a future article, I will be showing you the process of another side of advertising, specifically food. There are plenty of behind the scenes tricks in food photography for advertising.
Let me know if you have specific questions related to this article or my future food photography article in the comment section below!


Get Connected!