
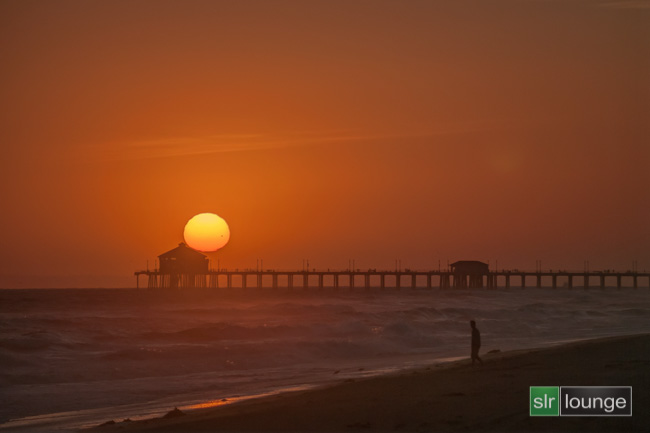
The Photo
 (Click here to view a larger version!)
The Equipment and Settings
- Nikon D300
- Sigma50-150 2.8 EX DC HSM @150mm
- Giottos Tripod & Ballhead
- Nine bracketed exposures from 1/4000 @ f/8 to 1/250 @ f/2.8
- Sigma EX Circular Polarizer
- Manual Exposure, Manual WB, RAW
How We Shot It
About a year ago, the planet Venus passed directly between the Earth and the Sun, an event which will not happen again until the year 2117. (Hopefully by then, we’ll be referring to it as “stardate 2-1-1-7” right?)
[Commonly asked question: What is HDR?]
After excitedly going out and photographing it with my astronomy friend Sean Goebel, I glanced at the images and then tucked them away in a “personal projects” folder. Well, since summer is almost here again, I thought I would dig up these images and show you how I shot and processed them, since you may find yourself wishing to capture similar sunset images, …just without the black dot of another celestial body in front of the sun. Hey, maybe people won’t all say “dude, there’s a speck of dust on your sensor in front of the sun…”
The shooting of the image was pretty tricky. Despite being a straightforward composition, getting the exposures perfectly requires quite a bit of effort. To bracket nine stops using your shutter speed alone, you would have to go from 1/8000 sec. all the way down to 1/15 sec. While this might be fine for wide angle landscapes on a still day with a sturdy tripod, I was shooting with an un-stabilized telephoto lens in very powerful winds.
So, I opted to set my camera to bracket both shutter speed and aperture, which is a very cool option on most Nikon DSLRs. This allowed my “slowest” shutter speed to be 1/250 sec.
The resulting nine frames looked like this:

The six yellow-labeled frames turned out to be the only ones that I needed for the final image; I only shot the darker frames for safety because, well, the sun is usually pretty easy to blow out. ;-)
In optimal conditions, it would have been great to take my time and re-set my exposure so that these six images started at 1/8000 sec @ f/8, so that I didn’t have to shoot as wide open as I ended up having to; or maybe it would have been nice to capture some brighter frames as well. Unfortunately, the sun sets pretty darn fast! Even working quickly and adjusting on the fly, I didn’t get my settings this good until the sun had already begun to touch the top of the pier.
Anyways, here’s what the darkest and brightest exposures looked like, of the six: (Each are processed differently, with varying amounts of boosted shadows and reduced highlights…)


You can clearly see that the dark image has absolutely horrible shadows, and the bright image has a totally blown out sun. Looks like an easy merge? Think again! If you plan on shooting telephoto sunset images this summer, pay attention to this next part…
The Post-Processing
Just for kicks, and since it seemed like a pretty simple edge, first I tried to just process each image to taste, then mask the two layers. The result wasn’t pretty:

Okay, since that failed miserably, next I tried an HDR blend in Photomatix Pro. The results looked like this:

A bit drab and the sun was still blown out, but no matter how much I tweaked the sliders I couldn’t seem to “get the sun back”. So I masked the sun back in from the darkest of the chosen six exposures, and applied a bit of faint additional blending from the brightest of the six exposures. Much better:
Normally at this point I would take the image back into Lightroom for a whole lot more finesse, but I was feeling lazy so (believe it or not) I arrived at this next image by doing one simple thing: I added the brightest exposure one last time, and set the layer mode to “Overlay”. Presto, I got all this color and tonality without any more tweaking! You may prefer to correct the vignetting a little more than I did, but that’s more of a personal preference…
The “overlay blending mode trick” won’t work for every type of HDR image, but it sure works well for summertime sunset type images!
To view a closer-up version of this scene, visit the Flickr page of my friend Sean Goebel who is an astronomer; he used a 400mm lens on a 7D.
Take care, and happy clicking,
=Matthew Saville=
Learn HDR Photography
For more HDR education, be sure to check out HDR Tutorial by SLR Lounge. This comprehensive “gold standard” guide will give you a mastery of HDR photography, from the scene considerations to the actual shooting to the post production. Click here for more info.


Get Connected!