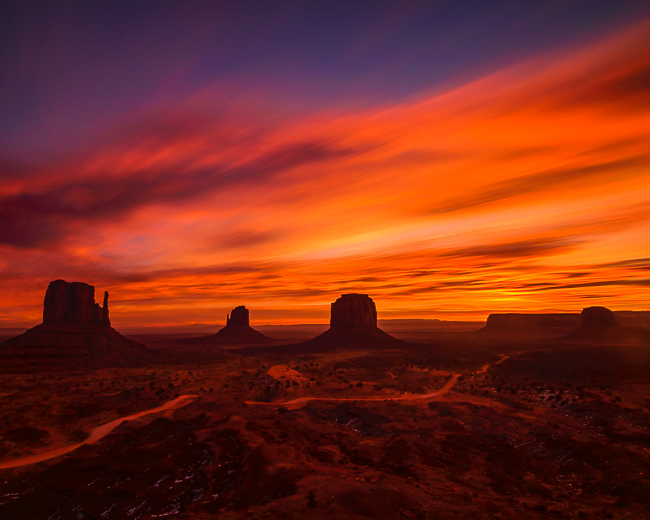
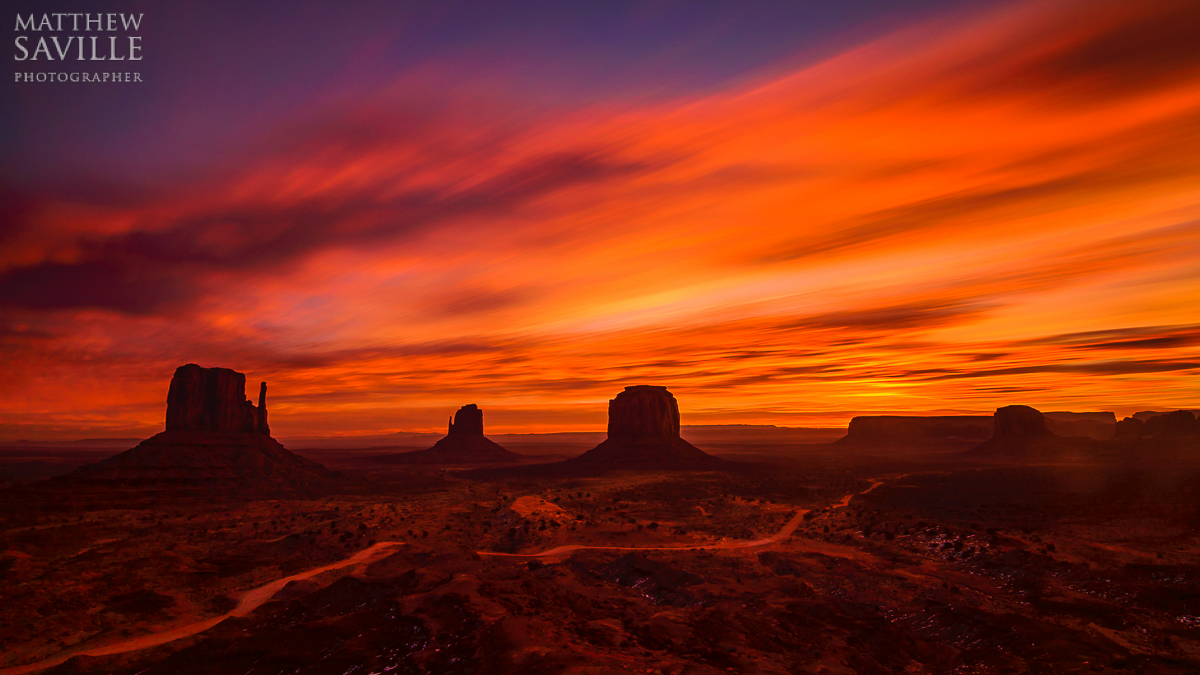
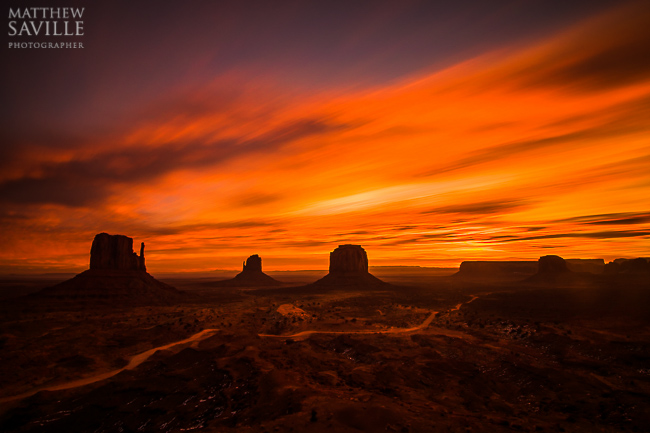
The Photo
 (Click here to view a larger version!)
The Equipment and Settings
- Nikon D5300
- Tokina 11-16mm f/2.8 @ 11mm
- FotoPro C5C Tripod
- 80 sec @ f/11 & ISO 100
- B+W 10-Stop Neutral Density Filter
- Manual Exposure, Manual WB, RAW
How We Shot It
This image builds on the techniques that we’ve talked about in previous tutorials. Recently, I shared a portrait image created using a 10-stop ND filter at sunset to create motion blur in a tidepool, and how to create long exposures without filters, on a moonless night. Last year, I created a video about how I properly gauge a very long exposure without wasting time taking lots of very, very long test exposures.
There is still plenty more that we can talk about, though! This image in particular is one that I wanted to share because it only happened after many failed attempts.
If all you had to do was take a normal test exposure and then add ten stops, that might be easy. Shooting traditional landscape images in the moments just before sunrise or just after sunset is fairly straightforward. Your shutter speed might be a few seconds long if you’re at ISO 100 and f/16, but that’s no problem since you’re certainly using a tripod and a cable release, right?
Well, once your shutter speeds reach 15-30 seconds or longer, you start to run into issues. At sunset the daylight is fading fast, and at sunrise the light is getting brighter very quickly. In the course of one minute your exposure might need to change by a whole stop or more, depending on the features and terrain.
[Recommended: 10 Common Long Exposure Photography Mistakes To Avoid]
Add to this the fact that “peak color” is rather fleeting. Certain colors in the sky are only present for a minute or two. Faint clouds may only catch a ray of sunlight perfectly for a few seconds, even. Thus, at very long shutter speeds you find yourself “putting your eggs in a basket” as they say. If you decide to make a 1-2 minute long exposure and fail to properly gauge the exposure, you’ll be kicking yourself for sure.
The day before this sunrise image was made, I attempted to create a few other long exposures at sunset in the same location. Each time, the light was fading fast and I didn’t compensate for this well enough. Even though my light meter said I was over-exposing by 1-2 stops when I began each exposure, by the time they finished they were both totally under-exposed.


FAIL. The above images were made about 10-20 minutes after sunset. My back-of-camera histogram showed them as 2-4 stops under-exposed. I wasn’t too bummed out, because the sunset itself was rather overcast and kind of a dud to begin with. I was certainly determined to do better next time, though.
[Rewind: Create your own 10-stop Neutral Density Filter!]
In the morning, I started testing long exposures and tried to shoot quickly. This image was created about 10 minutes before the actual sunrise, and I estimated that over the course of 1-2 minutes the ambient light would get about one stop brighter. Maybe if I under-exposed by just one stop, I’d be okay. So I picked my camera settings, slapped on the 10-stop ND filter, and did some mental math to raise my exposure by about nine stops. As luck would have it, the image came out!
Oh, and in case you’re wondering, here is what the sunrise looked like at a more normal shutter speed before and after the 80 sec. exposure was made. You can see just how critical a few seconds can be when attempting to capture peak color!


The Post-Processing
Obviously this particular image never stood a chance at looking “correct”. Rightly so, because it was one of the most fiery sunrises I’ve ever witnessed! Therefore I decided to just let it go, and embrace the intense warm feeling. Here is the original un-edited image:

My main priority was to preserve the highlights and bring out the vibrant colors. Of course I would have loved to bracket a brighter exposure for the foreground, and create a true HDR image, but as you could imagine time was of the essence and I knew that my camera would have a decent amount of shadow detail to recover.
In Lightroom / Camera Raw, I hit my SLR Lounge Preset for Base Vivid – HDR Medium. The results looked like this:
From here I did a few more things. My in-camera white balance was way up at 6850 Kelvin, so I brought it down to exactly 5000 which is normal daylight. This cooled down the image, but not much. From there I made a few minor tweaks to the basic settings, and then to top it off I used another one of my favorite tricks for my Nikon cameras and warm sunset / sunrise images: I changed the Camera Calibration Profile (The very lowest panel in the Develop Module) to “Camera Vivid”. I gave it a 16:9 crop to add emphasis to the monuments and the colorful sky, and thus the final image was achieved. What do you think?
Take care, and happy clicking,
=Matthew Saville=
The SLR Lounge Preset System
The SLR Lounge Preset System is designed to enable Lightroom users to achieve virtually any look and effect within 3-5 simple clicks. From basic color correction, vintage fades, black & white effects, tilt-shift effects, faux HDR, retouching, detail enhancing, and so much more. The sky is the limit with what has been dubbed the most powerful and intuitive preset system available. Click the link above to learn more/purchase! The SLR Lounge Preset System is now available for both Lightroom 5 and Adobe Camera Raw. (Bridge CS6 and CC only, click for more info.)
You can also purchase the SLR Lounge Preset System as part of the Lightroom 5 Workshop Collection.
Learn HDR Photography
For more HDR education, be sure to check out HDR Tutorial by SLR Lounge. This comprehensive “gold standard” guide will give you a mastery of HDR photography, from the scene considerations to the actual shooting to the post production. Click here for more info.


Get Connected!