
Ever had a night out where the whole purpose of the evening’s debauchery was to get hopped up enough make some bad decisions? Of course you have, you saucy thing. That bad decision may have been the company you kept, a late night burrito, or as it often is, a tattoo. Or maybe you have a tattoo reflecting an old flame you’re looking to put out, or realized having just tired of one you’ve got. For whatever reason, you have a tattoo and you want it removed and Photoshop can help. Well, it can help temporarily.
Actually, removing a tattoo in post has a lot of practical applications which can be presented in many scenarios. You may have a bride that has one she prefers to not be visible in some of her photos, or a model you’re shooting may be tatted in such a way or in such a place that you need it removed by request of a brand or agency.
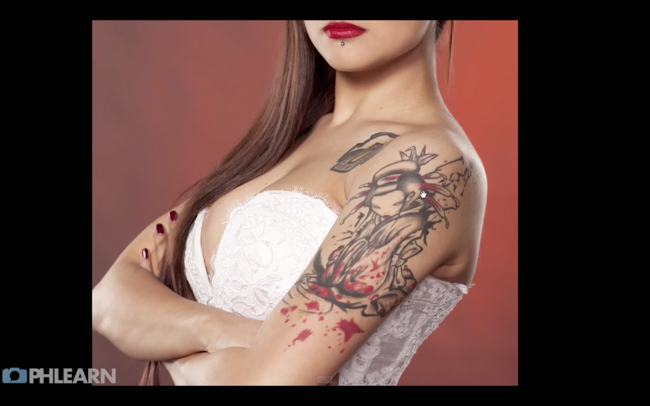
In the video herein, Aaron Nace and the Phlearn team have broken down how you can remove a tattoo from someone using Photoshop and make it look as if, maybe, they’d never had one to begin with. The process, is actually quite deceptive in simplicity, especially since you may be tempted to use basic clone or patch tools to achieve your look, but really this is more effective a solution.
[REWIND: How To Add A Realistic Tattoo To a Person With Photoshop]
The Three Steps Are Broken Down
Basic Removal: This is where you’ll use the Spot Healing Brush set to Normal and Type to content aware. This is the most basic step that involves just painting over a certain layer, working best doing smaller sections at once, and you can expect blotchy look, but the whole point of this part is to rid the skin of the tattoo – perfecting it comes next.

Painting the Skin: It’s in this step you’ll begin to paint over the blotchy skin created in the first steps. You’ll be sampling some natural skin and aiming to paint by paying attention to highlights and shadows so you don’t just end up with a flat looking section of the body. The devil here is certainly in the details and you can expect to sample often. Aaron suggests keeping a very low flow to your brush, around 5 to 20, though honestly I typically keep my flow around 2 to keep things as gradual as possible. Lower, even, if need be.

Adding Skin Texture: By this point, you should have good color grading, but it WILL look painted and unreal. This is clearly not what you’ll want so you’ll aim next to go in and add texture back into the skin. In this example, it’s done by adding layers of noise and blur set to overlay, and you can end up with something very, very good. I often use the patch tool whilst working within the Texture layer during frequency separation to take skin texture from one area to another. It can work wonders and do so quickly.

Additional details can be seen in the video itself, and if it wasn’t apparent from the video, I highly recommend you use a Wacom pen tablet to do this sort of work, or indeed any Photoshop or Lightroom work. Aaron uses the Intuos Pro Small, and this is a great tablet. If you’re looking for something less intense and less expensive, I highly recommend the Intuos Pen & Touch Small, as it’s most of what most everyone will need for their processing work. You can see our review of it here, and a review of the Pro series here and make your choice.
For more Photoshop tutorials by Phlearn, check out PHOTOSHOP 101 AND PHOTOSHOP 201 BY PHLEARN in the SLR Lounge store!
Happy editing.
Source: Phlearn


Get Connected!