
Why is blogging so important for a photography business?
A blog is a powerful tool that allows for personal connections with clients, and in turn, increases your chances of being found through organic search. Don’t get lost amongst all the blogs out there. Why not stand out? Capturing your audience with a stunning collection of your best images has never been easier – just download one of our many free photo layout templates to create a professional collection of images to showcase to prospective clients, or use for your blog on your own personal photography website.
Our Free Photoshop Collage Templates
Sure, there is software out there that assist in the creation and design of your very own blog. However, many are expensive, complicated and end up looking messy in the end. That’s why we created our very own pack of 13 photo layout templates to make creating blogs simple & efficient! If you are someone who is looking to create or redesign your current blog, download our free templates to keep your blog clean, professional and your audience coming back for more!
Sign up for our newsletter below to download these for FREE!
To see & download all of our free resources click here.
How to use our photoshop collage templates
Our free photo layout templates are deliberately simple, allowing for your pictures to really capture the viewer and tell a clear & powerful story. Designing it this way makes it very easy and quick to use, so you don’t waste any time getting images onto your blog page. All 13 our templates are precisely measured so your pictures can fit perfectly.
Step 1 | Open the File – To begin simply open the .psd file of the template you want to use and you should see something like this pop up:

Step 2 | Insert Images – It’s time to insert your awesome images! To replace the images inside the template open the Layers window (usually located on the bottom right side of the screen).
If you look there are checkered boxes which accompany each part of the template. To change the picture in the specific region, double-click on the Smart Object Icon in the bottom right-hand corner of the checkered box to open up smart object file. Your image will pop up.

Next, drag & drop your image into the template. Choose the image from your computer that you want to place in this section of the template and drag it over and onto the blank space. Resize and recompose (shortcut: Cmnd/Ctrl + T) your photograph inside the template and press enter.

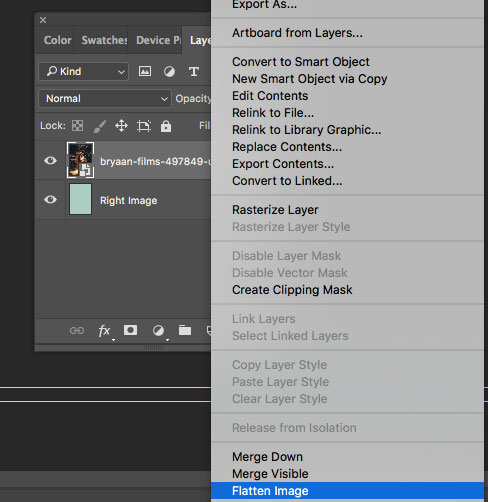
Step 3 | Flatten the Image & Save – Finally, right-click on the Image Layer to pull up the Menu, and select ‘Flatten Image’. Save the new Image Layer and close out that tab and you will see that your template has been modified to showcase your image.
Step 4 | Repeat – All you have to do is repeat this process for each section of the template. In our example, we would need to select one more image to fill in the rest of the remaining slots. Remember that when you click the Smart Object Icon it opens that layer into a new tab in Photoshop. After adding an image, you must save that layer for it to show up in the original template.
example blog spreads from the templates
Below you can see examples of some of the Photoshop collage templates included in our pack of 13. Each spread is designed to help tell a story by taking the viewer through a series of images.
Asymmetrical Photoshop Collage Template

2 Verticals Side By Side Photoshop Collage Template

3 Verticals Side By Side Photoshop Collage Template

Right Horizontal, 2 Left Horizontal Photoshop Collage Template

To see & download all of our free resources click here.


Get Connected!