

We’ve covered somewhat extensively, and will continue, to cover photo retouching of people. Aside from the fact that technologies are continually changing and presenting new solutions to old problems, and frankly, new problems, there are just so many ways to achieve a particular result. This is a good thing because as with learning anything, much of the difficulty and resulting absorption of material is in how the information is brought across, and different methods suit different people.
[REWIND: How to Effectively Recover Skin Texture from Over-Exposed Areas]

Just two days ago , I wrote about a method that’s used to adjust skin tone via sliders in Camera Raw, and it is very much an artistic, intuitive process, which I love, and the ease and speed at which it can be done is part of the reason why.
However, just getting the skin tones on one part of the body is one thing, but then different parts of the body often have different tones, and much exacerbated due to how light falls on it, clothing, make-up etc, and evening out that difference presents a challenge most will face. Here’s a method to help with that. If you’re of a more technical persuasion, the type whose cheque books are always balanced, and see in matrices of zeroes and ones, this next approach may suit your precise nature. You can thank Michael Woloszynowicz of Vibrant Shot.
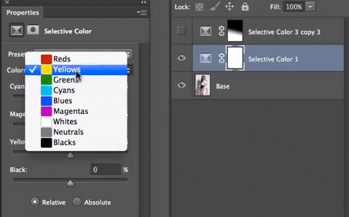
Using sampling of colors from the forehead and taking note of the values presented in the CMYK section on the Info panel, it’s quickly clear that the ratios between those colors is what your aim is to balance on all areas of skin – in this case it’s about matching the lower half of the body to the upper. Bringing up the selective color adjustment and choosing between Yellow and Red, then manipulating the CMYK options in either should give you enough control to bring the area you want to match the numbers with (Legs), to the area you’re basing off of (face).

Michael puts out some of the best retouching material out there, and much of it for free. His meticulous eyes and methods pair well with his calm way of speaking, that’s great to follow along and learn from.
This is just one of Michael’s brilliant free tutorials, and if you weren’t yet aware, there are many more where that came from. Check out his YouTube Channel, and his Facebook, and anything to do with VibrantShot. His paid products have met with real critical acclaim too, seem to be very comprehensive, and he has a new comprehensive course on fashion and beautfy photography to take you through all stages from the ground up.
Source: Michael Woloszynowicz YouTube


Get Connected!