
There is a funny issue that is cause for debate between photographers, and those who simply think they know what a good photograph should look like. It often has to do with how a particular person feels exposure should be rendered. To some, a picture wasn’t made correctly if there are blown out highlights, or parts of the scene, such as the sky, are under or overexposed compared to the rest of the image.
Taking overall exposure and highlights into account is certainly one of the things that separates complete novice photographers from those who, at least, put a little more thought into it. I’m not taking a stance here saying that an image with parts a bit blown out aren’t good, in fact I am a fan when it’s done correctly, but as I always like to say, it’s important to know the rules before you set out to break them. Try to understand how to balance exposure, and then decide how you artistically want to play with it.

Nonetheless, there are countless times when we have an image and want to lighten or darken some part of it, and typically, it’s the sky. Whether it’s a landscape shot, or something to do with aviation, or even a portrait. Largely, graduated filters would be the best option to take care of this at the time of the shoot. They will give the most natural look, but are not without their drawbacks. Namely, you don’t always have your filters on hand, or perhaps you have a new camera system and have yet to acquire the requisite set of filters for it. Luckily, there are ways to add gradient filters in post.
Also, when using a graduated filter, ND or not, while it may give a natural look to the sky, if there are any subjects in the foreground that protrude into the sky, they will also take the effect of the filter, and you may not want that. It could be some structure, a person, a mountain, or anything, and correcting that in post isn’t always pleasant. The same sort of problem would arise when using graduated/gradient filters in Photoshop or Lightroom, where you would drag the gradient filter into place and achieve a wondrous sky, but then the person or building in the image would be half dark. Then you’d have to painstakingly go into other tools and try to bring back those parts of the image to their original nature. Well, it needn’t be that difficult, and an update to Camera RAW is why.
[REWIND: F-Stops & T-Stops? Which One Matters To You & Why]
In a somewhat recent update from Adobe, Camera RAW now gives you the ability to take a special adjustment brush right out of the graduated filter panel and simply erase the graduated filter effect from the parts of the image it does not belong. So no more fumbling with saturation and brightness and density etcetera to bring back those parts. It’s simple, and the masking features make it even more painless by eliminating the need to be as precise as a neurosurgeon with brush strokes. I don’t do a whole lot of landscape photography, but I do quite a bit of aviation, beauty/swim stuff that benefit from this too.
Here’s how:
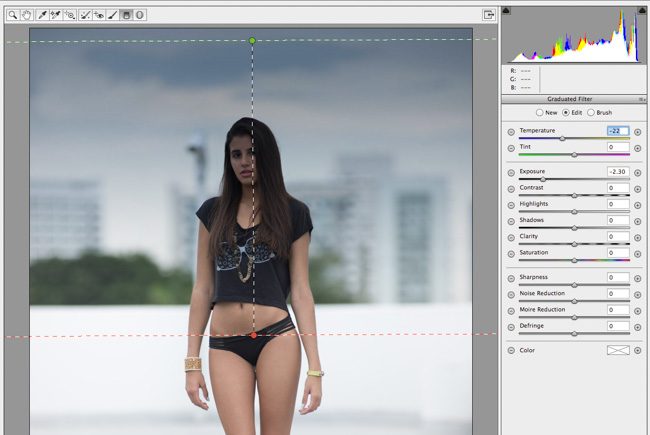
Open an image in Adobe Photoshop CC. If you’re opening a RAW file, it’ll likely open in Camera RAW to begin with, or you may have your system set up to open JPEGs there also. If opening a JPEG without this set up, simply go to Filter>Camera RAW Filter. Select the Graduated Filter and drag it into place, making the adjustments just as you’d want, i.e. exposure, highlights, etc.
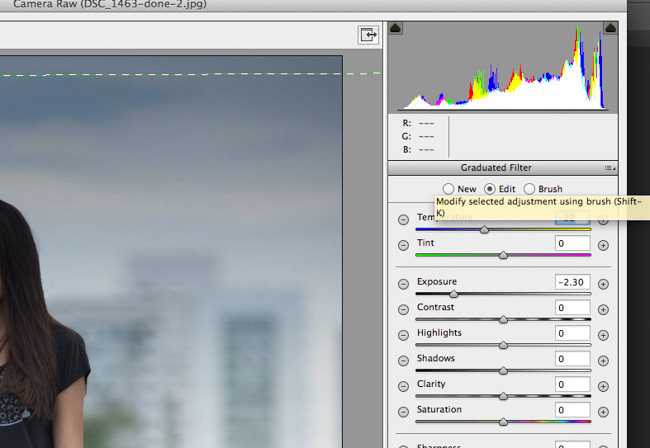
Once you’ve done that, select BRUSH under the Graduated Filter menu under the Histogram and you’ll be presented with a new menu that looks like the one below:
Select the Brush Icon with the Minus sign, and adjust your brush options as desired. At this point, all you’ll need to do is brush over the areas you want the filter effect removed from.
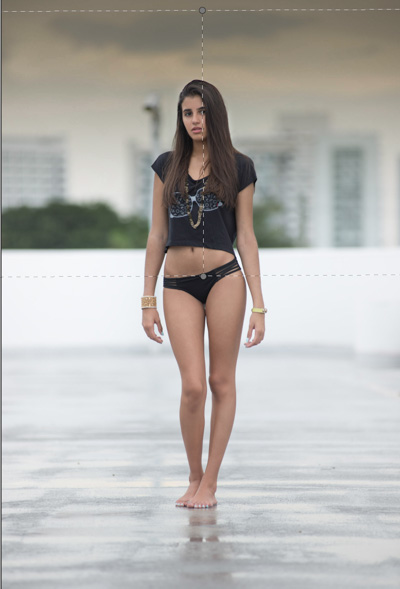
Under the Brush panel, you’ll see an option for Automask, and this is a saving grace for detailed spots. It seems to detect edges and gives you much more room for going over your boundaries when removing the filter effect. The caveat is that it works well for the detailed edge areas, but for larger open areas, (like her face and chest) it’s better to have it off – so toggle as needed.

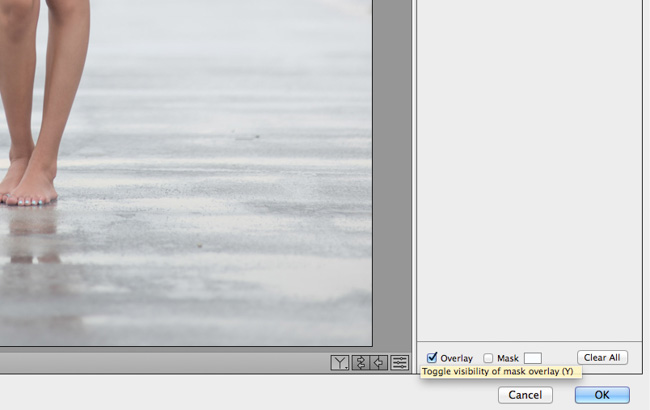
Once you’ve completed erasing the effect, you can click MASK at the bottom right of your Camera RAW screen to see if you’ve left any remnants on the subject you should remove. The default color is white, which I prefer, but you can change it to any color you desire.

Don’t forget too, that this filter option lets you change color so you can play around to get all sorts of interesting effects. Here are a few.


Thoughts
It’s such a brilliantly simple thing to use, and will make your life so much easier in regards to making the most out of skies and filters. I would say, as always when it comes to Photoshop or Lightroom, that having an Intuos Tablet will make your life exponentially easier, and make your workflow that much faster as well, and that much more accurate. I have reviewed the types I use which you can find here for the least expensive and perhaps the only one you’ll ever need, and for its much bigger brother here. Do you need it for this type of effect? No, but it makes it a lot faster. Happy editing.


Get Connected!