
Welcome to Time Out with Tanya, where I’ve put my fast paced graphic design career on hold in favor of adventures in motherhood. I’m capturing every moment on camera, and you can come along if you’d like. Sign up for my weekly email here, so you’ll never miss a Time Out.
When it comes to gift giving for my husband, I’m always a little stumped. As if birthdays and Christmas weren’t hard enough, now I have to come up with gifts from all the kids for Father’s Day. A few years ago I came up with the idea of interviewing the kids for a little Father’s Day tribute video, and it was a big hit. He loved it! Plus, it’s a great way to get a video documentary of the kids each year.
[Rewind: Click here for Animoto Discounts]
Previously I just turned on the camera and let it roll the whole time I interviewed the kids. While that worked ok, it wasn’t ideal. I wanted to be able to easily and quickly piece together video clips and add music. Animoto has been around for awhile as a way to make slideshow videos, but it wasn’t until recently I realized you could use it to edit video clips, too. Awesome!
[RELATED: FATHER’S DAY SALE! SAVE 25% OFF LIGHTING 101]
Here’s my step-by-step guide for how to make an easy Father’s Day video with Animoto.
Step #1: Prepare a Plan
What message do you want to convey in your video? Come up with a plan in advance. For my video, I simply wanted to show a little glimpse of each of our children at their current ages. I wanted to record their voices and hear some of their honest answers about their daddy. I actually googled “Father’s Day interview questions” and borrowed some from Pinterest. If you’re a little less sleep deprived than me, you can probably come up with your own unique concept.
Think about what you want the kids to wear, where will you film it, do you need any special props or costumes? Plan it all out in advance, even if it’s just in your head.
Step #2: Set the Stage
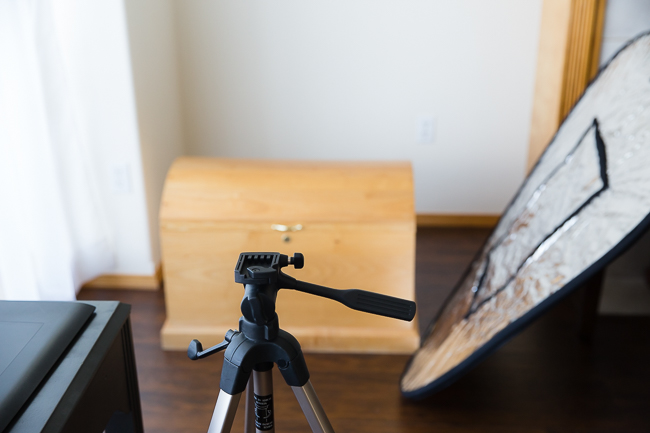
For my video, I had a simple set up. There’s an ideal corner in my living room next to a huge window. I hang white sheer curtains in the window, and lovely diffused light comes through all day. For some fill light, I simply prop a reflector up opposite the window. If you don’t have a 5-in-one reflector, you can use a piece of white foam core board or a large sheet of styrofoam insulation board from the hardware store.
If you don’t have an ideal window in your space, you could always film outside at a favorite park, your yard or any openly shaded area.
Pay attention to the background in your video. If you’re not using a specific backdrop, make sure you’ve cleared the clutter, so there aren’t any distracting elements in your frame.
I provide a hard chair or bench (in this case a cedar chest) for the kids to sit on. I discovered long ago that if you put a kid on a squishy, bouncy ottoman or chair, they have a harder time sitting still.
Step #3: Gather Your Gear
My gear list was short and sweet for this project. I just used my Canon 5D Mark III DSLR and Canon 24-70mm f/2.8 lens at 70mm, plus a tripod. You could technically use any video camera, even your phone. Just make sure you have a way to stabilize it unless you’re going for a Blair Witch Project vibe. This is especially important for the interview portion. As previously mentioned, I also used a reflector to bounce some light onto the shadowed side of the kids’ faces. If you want to get super fancy or are filming at night, you could use a video light.
Step #4: Record Your Video Clips
To keep the kids focused on the camera and as free from distraction as possible, I interviewed them separately and sent the others down to the toy room to watch a movie. Yes, I admit I use the TV as a babysitter on occasion. Who doesn’t? The kids loved the individual attention they were getting during their interview. I think I should do this more often!
Since I knew I would be using Animoto to edit my video, and most of their pre-designed templates allow a maximum 10-second video clip, I recorded my video in short little blurbs. This made it very easy to just piece them all together later, without having to do any cutting of a long reel of footage.
Step #5: Upload & Edit Your Video Clips
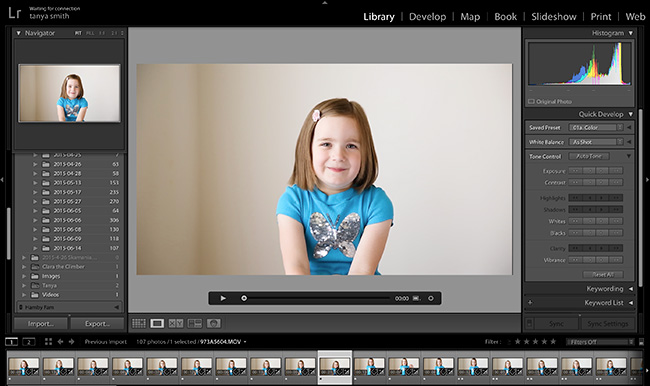
I imported my video clips into Adobe Lightroom and applied the basic soft color import setting from the SLR Lounge Lightroom Preset System. Presets are a quick and easy way to adjust your video clips in Lightroom. Just keep in mind, only certain basic editing can be done to video in Lightroom (like exposure, contrast, color toning, white balance, etc.). I had to bump up the exposure on a couple of the candid clips, but other than that, I didn’t make any changes.
Step #6: Export & Import Your Video Clips

As I was going through my video clips in Lightroom, I rated those I wanted to use in my Animoto video. Then it was super easy to just select those with the star rating I wanted for this video and export them to the size I needed. I exported them at a medium quality (1280 x 720). Then I went to the Animoto website, set up my account (you can try it for free!) and clicked the “Create” button.

Simply click “upload pics and vids” to upload your video clips. You could also include still images. All your clips will show up on the screen with little thumbnails. Voila! Now you’re ready to really make the magic happen.
Step #7: Fine Tune

Now that all your clips are imported into Animoto, it’s time to fine tune everything by trimming your clips and placing them in an order that tells your story in the most impactful way. I tied all my clips together by adding slides showing the questions I asked the kids.

Adding a title card in Animoto is easy and quick but if you wanted to create custom designed slides you could make them with graphics software and import them as images.

To trim your clips, you simply double click on a thumbnail and use the sliders to trim the beginning and/or end of your clips. Easy-peasy.
Step #8: Choose a Song

This may be the most time-consuming part of the whole process. The pro account at Animoto includes thousands of licensed songs in various genres. Finding the right song can add a lot of emotion to your video so make sure you take the time to explore your options.
Step #9: Preview Your Video
Click the preview button to see a low-resolution rendering of your video. Then you can make adjustments as needed to the flow and feel of your video. When it finally looks good, you’re ready to produce it.
Step #10: Produce and Share

Now you’re ready to finalize your video and share it with the world (or the special dad in your life anyway). After previewing your video, simply click on the “produce” button and your video will be ready in seconds. There are easy sharing options right on that page. Share to social media, download to your computer and burn to a DVD or embed it on a website or blog. So many options!
My video isn’t perfect, but it’s incredibly charming and my husband will love it. I created this video in one afternoon. You still have plenty of time to create one yourself. Give it a try at animoto.com.
Other articles you might like:
TANYA’S TOP 10 WAYS TO IMPROVE YOUR PHOTOGRAPHY WEBSITE
HOW TO ACHIEVE A JIB SHOT WITH A SLIDER | CINEMATOGRAPHY
THE SECRET TO MAKING IMAGES MORE CINEMATIC: THE 28MM LENS


Get Connected!