![Electric Universe – a Film Photograph Four Years in the Making [How You Shot It]](https://cloudfront.slrlounge.com/wp-content/uploads/2015/07/Light-Painting-Jason-D.-Page-Electric-Universe1.jpg)
How You Shot It is a series where you show us how you shot an image. Many who use our presets love to share their special processing recipes. You can join the SLR Lounge Community group on Facebook and share your favorite images and recipes as well! Or for a chance to have your shoot featured, click here.
Today’s post is from Jason D. Page.
My name is Jason I have been creating my light painting work since 2004. I
am the founder of LightPaintingPhotography.com and I also created the Light Painting Brushes, a simple system of tools for light painting. My personal website is Jasondpage.com. Here is how I shot the image, “Electric Universe.”

Inspiration
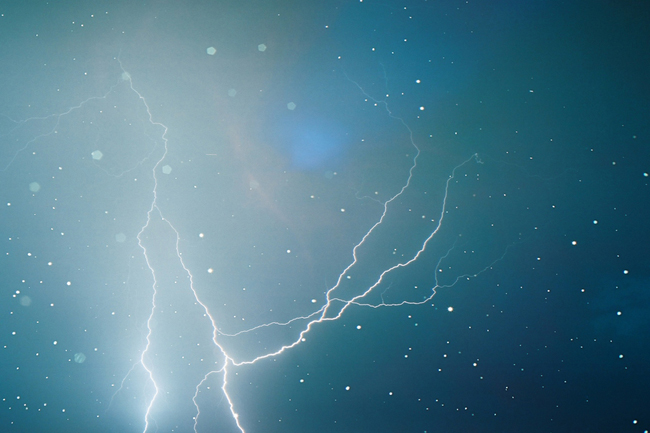
My attempts to create this image started about four years ago. I have always been fascinated by storms and lightning, in particular. My favorite time to shoot is at night just as a storm is rolling in, and the wind is picking up with the smell of rain in the air. I have been making deep space light paintings for a while.

I wanted to combine this style of my light painting work with my favorite time to shoot and capture a lightning storm to create an “Electric Universe” all on one frame of film. I honestly thought it would be much easier than it was. I planned to shoot a whole series of these, but that series idea slowly became a quest to try and just get one image that I felt was right.
How I Shot It
I shot this image on a Canon AE1 using Ektar 100 35MM film. I created the space parts of the image by Light Painting. I locked the shutter of the camera open in a dark environment and then used different lights to create the space look. For the “Space,” I used El Wire and a handheld blacklight.
To make the planets, I used some early versions of the Light Painting Brushes (basically empty water bottles attached to flashlights with various paints and colored gels on them) to create the different light textures. For the stars, I used small LED lights and a custom made “Starlight” box that was made out of an old shoebox with pinholes in it.

Once I had the space image onto the film, I would then wait to shoot the lightning. This proved to be the most difficult part because I needed very specific conditions that are much rarer than I thought. For the conditions to be right, I had to shoot the storm at night. I needed to either be on the leading edge of the storm or just behind it out of the rain. I also had to capture the lightning in a location with low light pollution – most of the time I went to the beach. This is the part that got really tricky, for the idea I had in my head I also had to capture cloud to cloud lightning and it couldn’t be too bright or too frequent because when it’s too bright or too frequent, the lightning erases the space portion of the image.
When you are Light Painting, the light erases dark meaning that a brighter image will erase something not as bright from the film.
Contrary if the lightning was too dim or infrequent, then it wouldn’t show on the film.


Getting all these condition to line up is why it took four years to make this image. I shot about 15 rolls of film over that time, many times getting up out of bed to chase a storm in the middle of the night. I had a few that night that were close to what I wanted but just not right.

Finally one that came out just how I envisioned, I definitely made a lot of mistakes and had many disappointments making this image, but I also learned a lot.
I didn’t do any post production. All of the images are 35MM film straight out of the camera.
Gear List
- Canon AE1
- Vivitar 28mm F2.5 for the Space Portion
- Canon 50mm F1.8 for the Lightning
Light Painting Equipment:
- Coast G26 Flashlights
- Light Painting Brushes
- El Wire
- Small LED Keychain Light
Other Equipment Used:
- Water Bottles
- Cinefoil
- Gaffer Tape
- Rosco Gels
- SLIK Tripod
- Kodak Ektar 100 35MM Film
Conclusion
I know it’s pretty silly that it took 4 years to get a single image and, of course, people are going to say you could have done that in Photoshop or whatever, but if I would have done it the “easy” way, I would never have learned from all my mistakes. I think it’s the mistakes that help people become better artists and/or photographers as long as we learn from them.
Sometimes my mistakes take me an incredible direction leading me to discover something I would never have thought of otherwise, without going through the process I would not know what I do now. I enjoy the challenge of creating an image in the camera even when it takes ways too long. I plan to continue to shoot this “series” as time goes on hopefully it won’t take 4 years to get another one. :)
About the “How to Shoot It” Series
This educational series highlights amazing images from our writers as well as our community. The goal is to not only feature inspirational work but to provide valuable education for our photography community. If you would like to submit your work or shoot to be considered, please click here.


Get Connected!