
I have seen several posts recently around the web talking about how people use third party apps like Blog Stomp to create the images that they feature on their blogs and social media networks. To me this seems like an extra step that I don’t want to deal with and so I just do it from Lightroom (something that apparently not a lot of you knew that you could do).
I think that the reason many of you do not know about the ability to do this from Lightroom is because it is not built into the standard export feature that you normally use to export your images. In order to export these blog ready duos and collages you need to click on the Print module, a place I am sure many of you hardly – if ever- open.
If you would like to learn how to set up these layouts yourself keep on reading. If you would like to just short cut it I have put together a template which you can download here and use yourself.
(To Install it simply right click in the Print module where the other templates are listed and select the import option.)
Create a Simple Blog “Duo” Layout in Lightroom
Creating a simple “Duo” layout is really quite easy and you can take what you learn here to create your own templates for different layouts. Basically how you get this all to work is by tricking Lightroom into thinking that you are setting up a layout to be printed, but instead of printing you export to jpg which you can then upload to the web.
Step 1: Open Lightroom and navigate to the “Print” module

Step 2: If it is not activated by Default Select “Custom Package” as the Layout Style

Step 3: If checked, un-check the Rotate to Fit, Photo Border and Inner Stroke Options

Step 4: Set the Ruler units to “Inches” and the Grid Snap to “Off”

Step 5: Select Print to “JPEG File” and enter a resolution of “100 ppi”
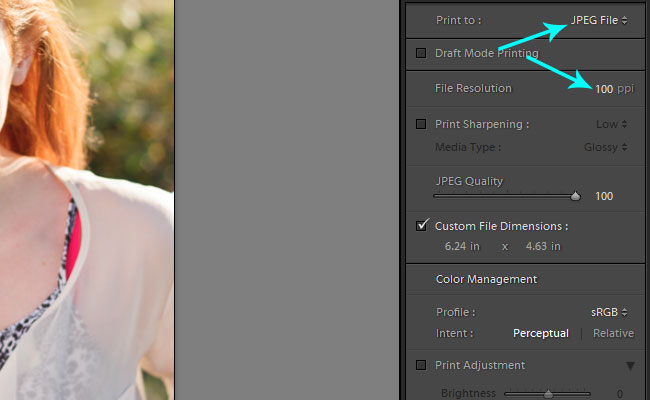
Step 6: Enter the size you want your template to be, in my case I wanted the final image to be 624px by 463px, so I entered 6.24 x 4.63. Basically mentally remove the period between the numbers and you have your px size. So for example if I wanted something sized for Facebook I would create it at 9.20in wide (or 920px).

Step 7: Add your Image Sections to the Template. In this case since we are creating a Duo we need two portrait sized slots.

Step 8: Adjust the Cell size to 4.63 x 3.09 (if you are wanting to go with the 624px wide design that I am talking about).

Step 9: Move the new Cell to the left half of your layout.

Step 10: Repeat Steps 7, 8 and 9 (except with 9 move the cell to the right half of your layout)

Step 11: (Optional) I like to stick my logo in the bottom right side of the images I upload online. To do this Check the “Identity Plate” option and then place the logo on the images wherever you prefer it to be located.

Step 12: Save your Template

Using Your New Template
Using your new template is as simple as can be, all you need to do is select the images that you want to be used in the duo and drag them into the cell you wish for them to occupy.

Once you have the images placed as you would like them to be placed then all you need to do is export the image. To do this simple click on the “Print To File” button in the bottom right.

It is as simple as that. The image will be exported to whatever location that you select after clicking “Print to File”. Once you are done with the blog images you want to post simply navigate to that location and upload them to your blog or social media.
It takes a little time, not much really, to set up these templates however you want them but once you save your templates you never have to make them again. The process is so much faster than exporting the images and then importing them into some third party application. Save your time and do it in lightroom.
[Use the SLR Lounge Lightroom Presets to Quickly Edit Your Images]
An added benefit is that since you are exporting these layouts directly from lightroom they will be higher quality than the ones from a third party app which has to re-compress your already exported Jpgs. The images from lightroom are only being compressed the once and so they will likely look better once they have been uploaded online.
I hope that this helps you save a little time when doing your blogging and social marketing. If you have any questions please feel free to email me or leave a comment below and I will try and help you out. Have a great weekend!


Get Connected!