
Last week, I wrote an article all about clamshell lighting. For those that missed it, click here. That article explained what clamshell lighting is, why it’s so good, and how to accomplish it. With this article, I’m going to tell you about how I built a portable lighting rig to easily take clamshell on the road.
A Word Of Warning
As professional photographers, we usually have our specialties. We buy all the necessary equipment and design our websites and marketing materials with the intention of attracting those specific niche clients. Despite this, you will still get phone calls from people who have seen your very specialized website, and still decide you would be suitable for their project. It may not be your usual job but it pays the bills, so why not?
Before I get into the specifics of the rig I put together, I’d like to stop and highlight a trap which I (and I assume others) fall into. The new job gear trap. If you’re starting a business, then every penny must be accounted for. While we are easily able to justify the purchase of new equipment for a job, I’d advise you to try and accomplish it with as little added investment as possible. I think we all know that’s the sensible thing to do.
[REWIND: THE CURE FOR GEAR ACQUISTION SYNDROME – G.A.S.)
Clamshell Lighting | Building A Portable Rig On A Budget
I primarily shoot family portraits. Hence, given what I have just said, when this job came in, I immediately started looking online at all the pieces of kit I could buy. I’m the type that finds buying things like a new peli case extremely exciting!
But wait, that’s exactly what I’m not supposed to be doing. Damn! So, then I start to look at how I can do it on the cheap.

That was as close to a snapshot of my thought process as I can give. I’d love to have bought a ton of stuff that would have been the “ideal” kit for the job, but when running a business, sometimes you need to do what’s cost effective, especially if the same look can be achieved without additional expenditure. Here’s a list of what I ended up using for my clamshell lighting rig:
Lights:
2 x Yongnuo YN600EX-RT
1 x 300WS Lencarta SuperFast Strobe (my least powerful strobe)
Modifiers:
Godox 32” Umbrella Octabox (have been very surprised by the quality of this)
Westcott Recessed Mega JS Apollo (used as background)
Cheap 5-in-1 reflector (similar in size to the softbox, any will do)
Grip:
1 x Bowens portable light stand
1 x Bowens heavy duty light stand
1 x Phottix Multi Boom
1 x Avenger Extension Arm
1 X Avenger Grip head (plus a spigot to go inside it)
1 x Manfrotto super clamp with stud
1 x Interfit reflector holder
1 x Camera bag used as sandbag
Misc:
Lighting bag on wheels (similar to this, I got mine used and can’t find it now)
Long light stand bag for stands and Westcott Apollo JS
Any necessary triggers, cables and batteries.

The photo above gives you an idea of what the rig looked like. The only difference between that and what I used in the end, is the light stand. The stand in that photo is a regular one and was bowing under the weight. It was replaced with the heavy duty stand listed above. If you read the first article, you’ll note that the Westcott Recessed Mega JS Apollo (catchy name) is positioned behind me and being used as a background.
The above photo is uploaded in hi-resolution so you can zoom in and look at how all the bits go together (and my messy kitchen). The only things you cannot see are:
- The strobe is inside the octabox mounted on top of the Avenger grip head
- The background is made up of: the Bowens light stand, Westcott Apollo, Phottix Multi Boom and the two speed lights.
Despite all the kit that was needed, I only had to purchase one or two extra items. Did that mean that the whole set up was a little more on the heavy side? Yes. However, I made more from the job and will be able to add to my “ideal kit” as other similar jobs come by (a far more sensible, albeit less interesting, way to run your business).

Clamshell Lighting | Subject Positioning And Settings
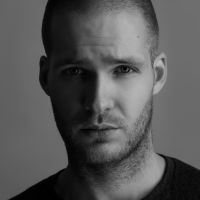
For the shots in this article, I used the following settings: 1/160th (sync speed), f4 and ISO 200. I chose ISO 200 so that the Speed Lights could be on a lower power setting, increasing recycle time.
**Important** I like to do these kinds of images at a relatively wide aperture. When doing that, you have to remember that the natural light present in your location may have an impact. Make sure you close the curtains and turn off the lights. By using the modeling light on the strobe, you can avoid the unflattering wide pupil look.

As we’re using a reflector as the fill light, all you need to worry about is the power of that key light. Dial that in and then work on your background. The further your subject is from the background, the less of an impact it will have on them. Remember, it’s another light source. At the ideal distance, the background will give us a nice little rim light on our subject. This is something I advise you test yourself but I found roughly 3-4 feet worked well.
[REWIND: BREED MASTER CLASS: ADVANCED FASHION PHOTOGRAPHY LIGHTING | REVIEW]
You will also need to use a lens at least 85mm in length. This is not only desirable to flatter your subject’s facial features, but necessary for the background to fill the frame. Depending on what softbox you use, you will most likely need to extend the background in post. Just make sure your subject is contained within the white softbox and this will be a very easy job.

Clamshell Lighting | The Ideal Portable Headshot Rig
I needed this rig to be: quick to assemble, unobtrusive, easy to manage for one person, have a relatively small footprint, and able to take it on the tube. That last one was pushing it slightly with what I ended up using, but if I got by with my bad back, then anyone can do this.
However, the items I listed above are by no means the best things to use. If I were solely doing this type of work, did it more often, or just had a ton of cash to spend, I’d substitute the following:
Lights:
Lose the strobe and cheap Yongnuo speed lights. Instead, get four Phottix Mitros +. That alone would save a huge amount of weight and space.
Grip:
Change the heavy duty light stand for a normal one. There’s no need to go heavy duty now that we’re using speed lights. We can also use something like a Manfrotto 5001B for the background stand – I’d test this with the Apollo, due to its size, but I think it would be ok.
Misc:
As we no longer need the strobe and have taken smaller stands, we could use a much smaller rolling bag to transport all the other gear. Something like a Pelican 1510 for example.
As you can see, the substitutions are all made to reduce weight and overall size for transportation. I’m sure there are lots of ways to refine this kit even further and I’d love to hear what you all suggest in the comments below.

Clamshell Lighting | Summary
Due to the nature of this article, it became a long list of different pieces of kit you can buy. Before you rush off to do just that, let’s pause and come back full circle. Before you decide to get anything, look at the gear you already have and see if you can accomplish the same look. If you can, save the money. Your business will thank you in the long run.
I hope both these articles have given you the clamshell lighting bug. It is a fantastic set up which you must try. Seriously, you must. Go. Do it now. When you’ve given it a shot, post your photos to the SLR Lounge Facebook group. I’d love to see your work.
If all this talk of flattering, easy to accomplish light setup has wet your appetite, then make sure you check out some of the amazing lighting tutorials Pye and the SLR Lounge team have put together. You can find them in the SLR Lounge Store by clicking here.


Get Connected!