
Infrared photography is an area unexplored by most photographers because the barrier to entry is so steep, and getting special camera modifications requires risking your own equipment, or paying through the nose for a conversion. Though infrared images tend to look nice from the beginning, the ability to make them great must still be developed like any other. Today I found someone who has overcome these challenges quite brilliantly and created a body of work that brings you to extremely beautiful worlds you’ve yet to see. In this article, we’ll show you examples and give you tips on creating beautiful infrared photography.
This article was originally written in 2014 and updated in 2022.
Who is David Keochkerian? About the Photographer
David Keochkerian is a photographer based in Amiens, France, who started shooting infrared back in 2010 after seeing some examples on Flickr, the popular photo sharing network. He initially started off using a Nikon D70 with an external IR filter, but has only been seriously active for the last two years when he switched over to a modified version specialized for infrared photography. One of the advantages of which is the ability to use normal shutter speeds he says.


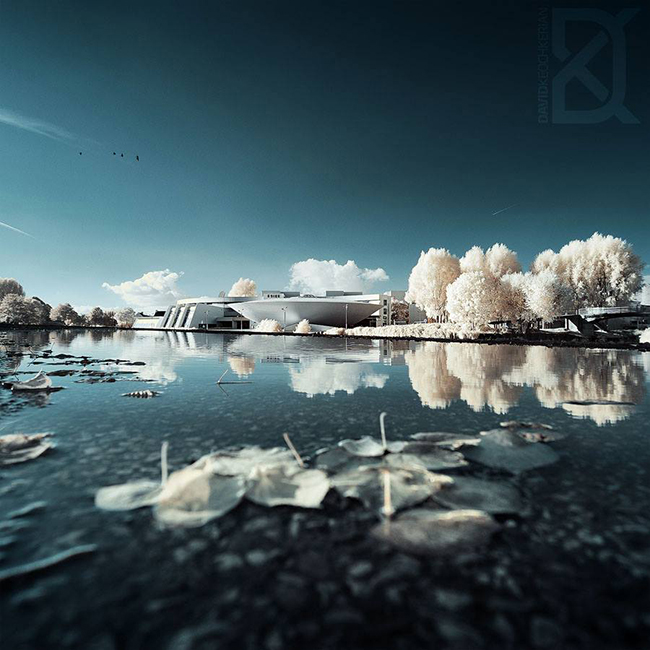
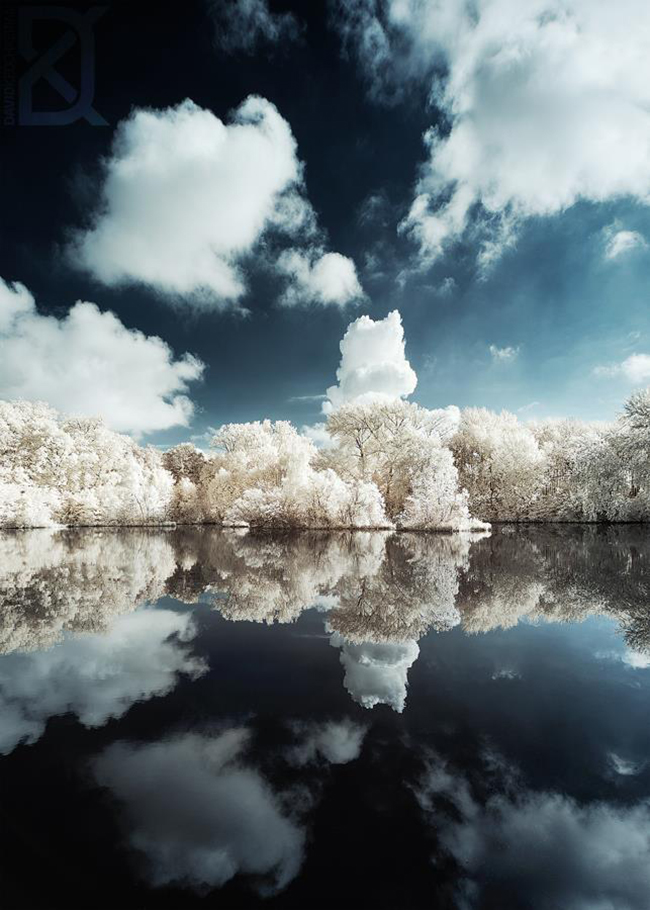
According to the photographer, the best time to shoot infrared is during the spring and summer when the foliage is green and the sun is out. His favorite pieces to shoot are those which allow reflections in the water, but most importantly places where the landscape is predominantly green.

This an oversimplification of his editing process, but it will give you an idea of what he gets in camera and how he achieves his results:

About The Infrared Photography Process
The text here is in French, so I’ll explain the post processing method he uses. How he starts is a process called HDR, or high dynamic range. If you’ve heard the term before, you know it’s a controversial editing method that’s easy to abuse, but in this situation, is used to great effect. These images can be a compilation of four or more shots blended in Photoshop using layer masks. After the initial blending and white balance adjustment, the real magic begins and things get technical.
At this point the photographer swaps his color channels; here’s the train of steps you’d need to take in Photoshop to get to the bottom left image: Adjustments –> Channel Mixer –> Output Channel –> Choose the Red Channel (set red/green to 0% and blue to 100%) –> switch over to The Blue Channel (set red to 100% and green/blue to 0%). From there the post processing is straight forward and to the artist’s taste.
More Examples of Infrared Photography


In order to take the infrared images, David Keochkerian had his conversion done at lifepixel.com where you can get infrared conversions starting at $325, though I was surprised to find they also do full spectrum conversions, ultraviolet conversions, anti-aliasing filter removal, scratched sensor repair, and special focus calibration for infrared light.
Here’s the gear David uses for his Infrared Photography while out and about:
- Nikon D700
- Nikon 16-35mm f/4
- Nikon 105mm macro f/2.8
- Nikon 50mm f/1.4
- Nikon 16mm fisheye f/2.8
- Nikon 70-300mm f/4.5-5.6
- Nikon 24mm f/2.8
To find more of David Keochkerian’s work you can go to his website, facebook page, or 500px.
I hope you enjoyed the images, keep shooting!
CREDITS: All photographs by David Keochkerian are copyrighted and have been used with permission for SLR Lounge. Do not copy, modify or re-post this article or images without express permission from SLR Lounge and the artist.


Get Connected!